
Published 2007
Installing an O2 sensor in your Roadster for tuning
Keith Williams (keith0alan@aol.com)
What is an Oxygen sensor and what can it do for me?
The oxygen sensor is how the modern closed loop fuel injection system detects if the air to fuel mixture is rich or lean. If the mixture is too lean the NOx content of the exhaust rises because the combustion temperature gets too hot. If the mixture gets too rich, this causes the unburned hydrocarbon and carbon monoxide contents go up because there is not enough air for complete combustion. Fortunately if you overlay the NOx and CO curves you find that there is a notch where both are at a low level. That air to fuel ratio is about 14.72 to 1. The Oxygen sensor is designed to go from producing no voltage when lean to producing a voltage of about nine tenths of a volt when richer than the “ideal” air to fuel ratio. The fuel injection system constantly adjusts the mixture back and forth based on the output of the oxygen sensor. The crossover region goes from an air fuel ratio of about 14.5 to 1 to about 14.8 to 1. Having access to this kind of information can be very useful in the process of tuning and troubleshooting carburetors. Your engine will run over a wider range of air to fuel ratio than the oxygen sensor will measure. The sensor cannot be used to directly measure the air to fuel ratio under all operating conditions. The crossover region where the sensor goes between lean and rich can however be used as a reference point. In spite of its limitations the output of the sensor can help in synchronization of multiple carburetors and in the selection of jets and needles used to control mixture.
How do I build one?
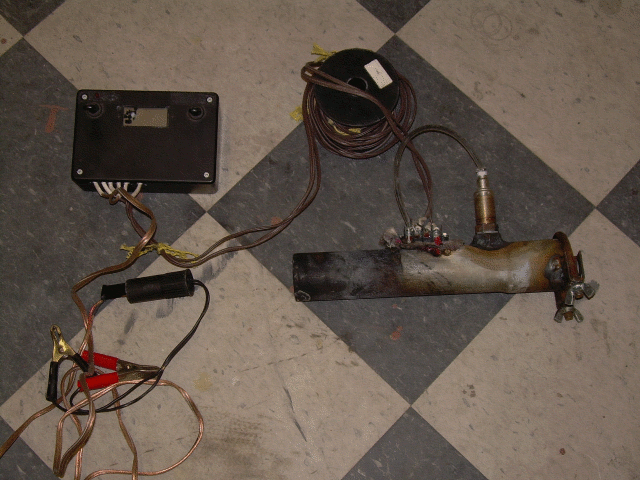
The construction consists of two basic parts. The first is the Oxygen sensor holder that mounts the sensor to the end of the exhaust pipe. This part consists primarily of cutting and welding a section of exhaust tubing to hold the sensor and mount it to the tailpipe. It is important to remember that when welding coated steel, that adequate precautions are taken to avoid inhaling fumes from Zinc, Cadmium and the other metals. The second part is the control and display box that feeds power to the Oxygen sensor’s heater and displays the signal voltage coming from the sensor. The control and display box uses basic electronic construction. These two parts are connected with a set of wires that allow you to drive the car or adjust the carburetors while reading the display.
The basis for the sensor holder is a 12” long section of exhaust tubing. Make sure that one end is large enough to fit snugly over the end of your exhaust pipe. The piece I used is 2” inside diameter at one end and 2” outside diameter at the other end.
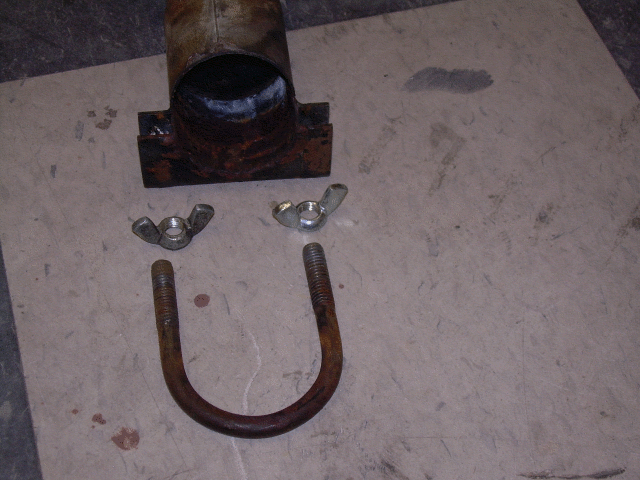
A muffler clamp is used to secure the tube to the end of your exhaust pipe. In order to make attachment and removal easier, I cut a notch at the end of the pipe and welded the base of the muffler clamp to the tube. The stock hex nuts were replaced with wing nuts for added convenience.
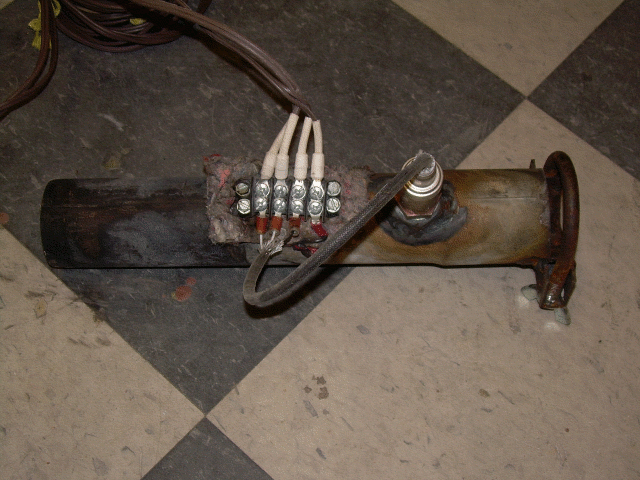
The sensor is threaded like a spark plug. As I could not find the exact size nut to fit the threads (11/16 x 16 tpi) I took a ľ x 16 tpi and reduced it’s diameter by cutting and welding. The correct fitting are available from performance automotive suppliers such as Summit Racing. A ľ” hole was drilled about 3” from the end if the pipe that attaches to the exhaust pipe and the nut was welded over this hole. When the sensor is screwed into this hole the sensing element extends into the exhaust gas flow. Anti-seize was used on the sensor’s threads to allow for easier removal.
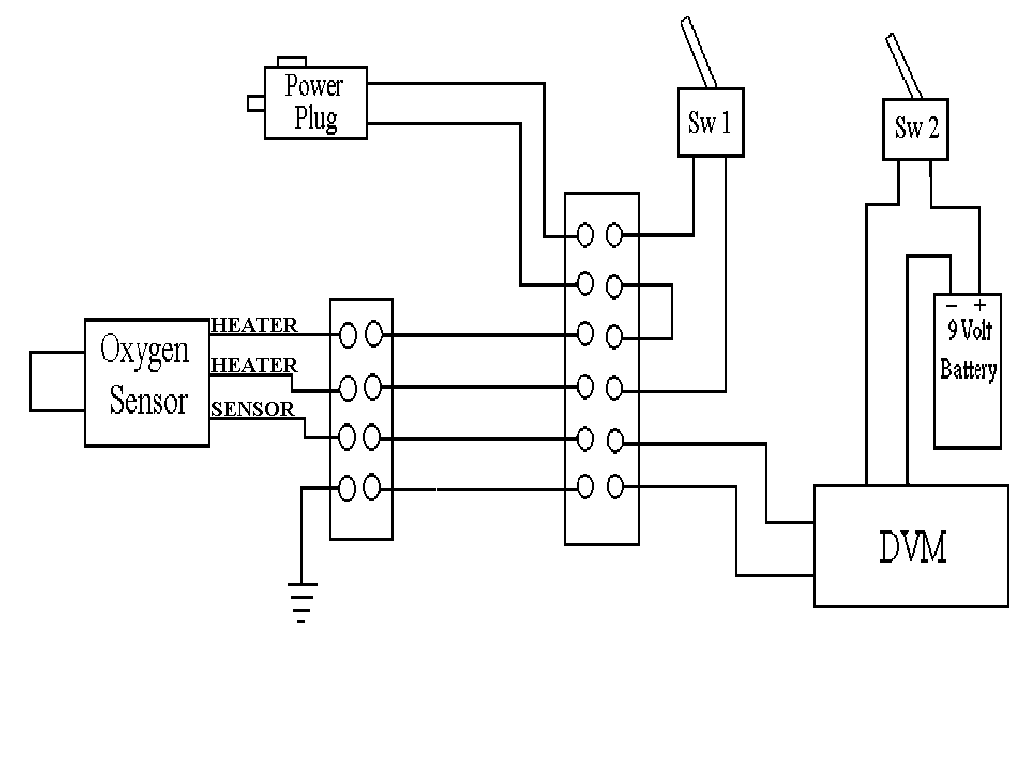
Pilot holes are then drilled to mount the terminal strip and the ground wire. The terminal strip is attached using #6 sheet metal screws. This terminal strip provides the connection between the sensor and the control box. A short piece of wire is attached between the terminal strip and the exhaust tubing to provide a ground between the sensor and the meter. The three wires from the oxygen sensor are then attached to the terminal strip. The signal wire (black) next to the ground wire and the two heater wires (white) to the remaining two terminals.
The second part is the control and display box. There are actually two circuits involved here. One is the power for the sensor’s heater and the other is the meter to measure the output from the sensor.
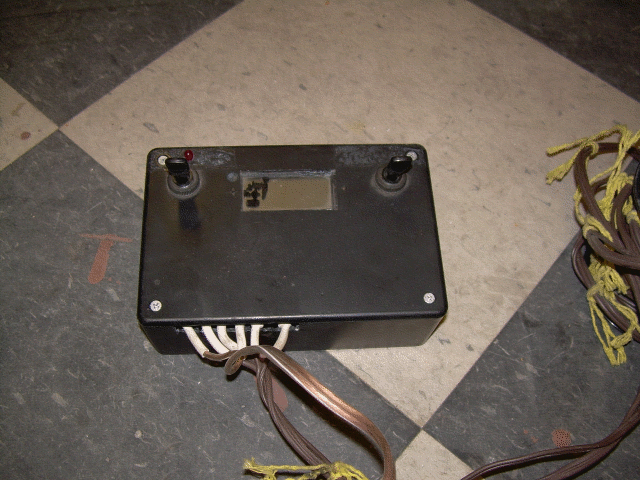
Power for the sensor is provided by a fused cigarette lighter plug and is controlled by switch number one. The wires from the cigarette lighter are attached to the terminal strip in the control box. A second set of wires are then connected from the terminal strip to the switch.
The sensor signal and ground wires are taken from the terminal strip to the input of the digital panel meter. It is important to remember that the internal resistance (impedance) of the sensor is very high. The meter used to measure its output must have a high input impedance (10 megaOhm or higher). These panel meters are powered by a 9 volt battery. The meter power supply must be isolated from what you are measuring. For that reason the meter power does not use a ground common with the heater power or the sensor voltage. Switch two is used to turn the meter on and off. An alternative to using a panel meter would be to jumper the sensor signal and ground to a pair of pin jacks or terminals on the front panel of the box. The sensor voltage can then be measured with a Digital Volt Meter.
All of the components for the control box were attached to the lid of the box so that there are no wires running between the box and the cover. The terminal strip and the panel meter were attached to the front panel with Silicon Seal, also known as RTV. A notch was cut in one side of the box for the wires to exit.
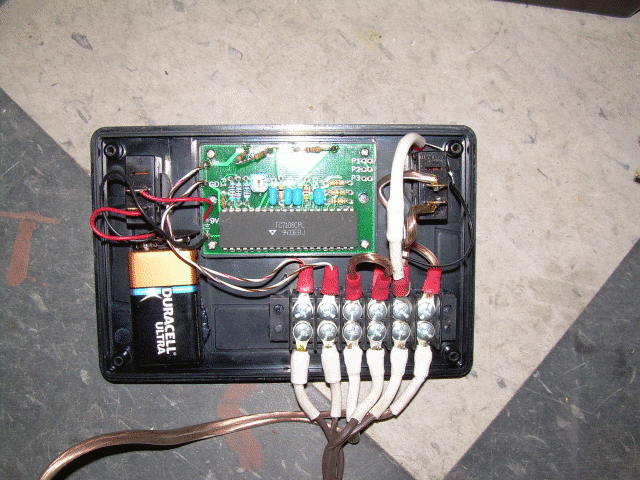
The sensor mount and the control box are connected by four wires. I used 25 foot wires so that they would be long enough to bring the box to the front of the car while the sensor is attached to the tail pipe. For the heater use a pair of 16 Ga. speaker wires and for the sensor output and ground use a pair of 22 Ga. speaker wires.
How do I use it to adjust and diagnose my carburetor?
Adjusting the carburetors should always be the last step of tuning the car. Insure that the valve clearances, ignition timing and carburetor air flow synchronization are set first. Having the valves set and the air flow balanced are particularly important to achieving a smooth idle. Valve adjustment is also a big factor in determining the results of your smog test.
The sensor responds to excess fuel in the exhaust. If one carburetor is too rich then it will mask the other being too lean. To set the idle mixture, adjust both carburetors lean until the output voltage drops to less than one tenth volt. Increase the richness on the first carburetor until the voltage starts to rise. Then lean the carb out until the mixture is just leaner than the sensor can detect. Repeat this process on the other carburetor. At this point, the mixtures are balanced at a known point. Using this as your reference point, you can now adjust the carburetors to run richer or leaner based on your preference. An example would be to balance the mixtures, then richen the idle screws by ˝ turn. This same method can be used to balance the mid range and high speed adjustments to a known value then adjust from there.
Limitations that will cause erroneous readings.
The sensor is measuring the gas mixture coming out of the end of the tail pipe. Smog equipment that modifies the exhaust gases will cause erroneous readings. On Roadsters the air pump will be the major problem. On later model cars the catalytic converter will change the readings. On a catalyst equipped car with no air pump the sensor can be inserted in the exhaust system before the converter by drilling into the header pipe and welding the mounting nut to it. This worked well on my Z-car and allowed me to use the less expensive one wire sensor. In racing applications the air pump and catalytic converter will most likely have been removed. On a street car they can be temporarily bypassed for the purpose of tuning. Another limitation is that the sensor may be contaminated by leaded fuel. This will be a problem if you are running leaded racing fuel. Remember to observe local and federal laws concerning smog equipment on street cars.
Conclusion.
The limitations of the sensor prevent it from being as convenient as we might like. In spite of that, this is a valuable tool in adjusting and troubleshooting carburetors. Determining initial setup and changes needed for various racing conditions will become more of a science than the black art that it is for most of us. One of my ongoing projects will be studying the various metering needles available for the SU/Hitachi carburetors. I hope to determine the strengths and weaknesses of the different needles and develop modifications to improve them.
Parts list for Sensor box:
- 1 ea. 6 position dual barrier strip(Radio Shack-Model: 274-659- Catalog: 274-659-$2.39)
- 2 ea. SPST toggle switch(Radio Shack-Model: 275-602-Catalog #: 275-602- $2.69)
- 1 ea. 25 foot roll 16 Ga. Speaker wire
- 1 ea. 25 foot roll 22 Ga. Speaker wire
- 1 ea. High impedance DC panel meter(http://www.jameco.com(approve sites) Part number 175951 for $12.95)
- 1 ea. 9 volt battery
- 1 ea. 9 volt battery mounting clip(Radio Shack-Model: 270-326-Catalog: 270-326-$.99)
- 1 ea. 9 volt battery snap connectoy(radio Shack-Model: 270-324-Catalog: 270-324-$2.99)
- 1 ea project box 2” 4” 6”(Radio Shack-Model: 270-1806-Catalog #: 270-1806-$4.99)
- Misc. hookup wire and wire terminal lugs
- 1 ea. Vehicle Power Adapter Plug with Banana Jack(Radio Shack-Model: 270-1521-Catalog #: 270-1521-$8.49)
Sensor holder:
- 1 ea. 12” long exhaust tubing
- 1 ea. Exhaust clamp
- 1 ea. Oxygen sensor Bosh part number 13248
- 1 ea. Nut 11/16 x 16 tpi or sensor port
- 2 ea. Wing nuts to fit Exhaust clamp.
- 6 ea. Number 6 x 5/8 sheet metal screws
- 1 ea. 4 position dual barrier strip