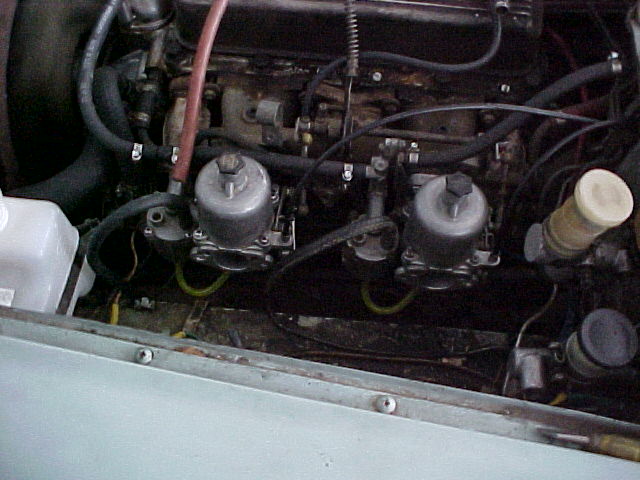
Setting up
and adjusting SU/Hitachi carbs on the Datsun Roadster
by Keith Williams
First things first.
In order for the carbs to work properly the ignition timing and valve
clearance must be correct.
On the 1600 (R16) engine two
different distributors were used. The point gap for both is .018" to
.022" or .45mm to .55mm. The dwell angle for the
The 1600 (R16) was fitted with
the early mechanical advance curve of 15 crank degrees and a late (smog) 30
degree curve. The early distributor requires an initial timing setting of 16
degrees before top dead center. The late distributor is set to zero degrees
before top dead center. Distributors were often swapped so it is best to check
to see which on is in your car. A way to do that is, after disconnecting the
vacuum advance, set the timing to TDC. Rev up the engine watching the timing
mark. The early distributor will only advance 15 degrees. The later will
advance 30 degrees. For a final check after setting the timing hook up the
vacuum advance, rev up the engine and check the total advance. It should be
about 36 degrees maximum. On the SU equipped 2000(U20) the timing should be set
to 16 degrees BTDC.
Valve adjustment is very
important. The amount of fuel/air mixture each cylinder draws is affected by
when the valves open and close and that is affected by the clearance setting.
For the 1600(R16) all valves ate set to .017" or .43mm with the engine
warmed up. The 2000(U20) intake valves are set to .008" or .2mm and the
exhaust to .012" or .3mm. Again with the engine warmed up.
Insure that there is some
slack in the throttle cable. The cable housing grows longer as it heats up. If
there is not enough slack the idle speed will get higher as the engine warms
up.
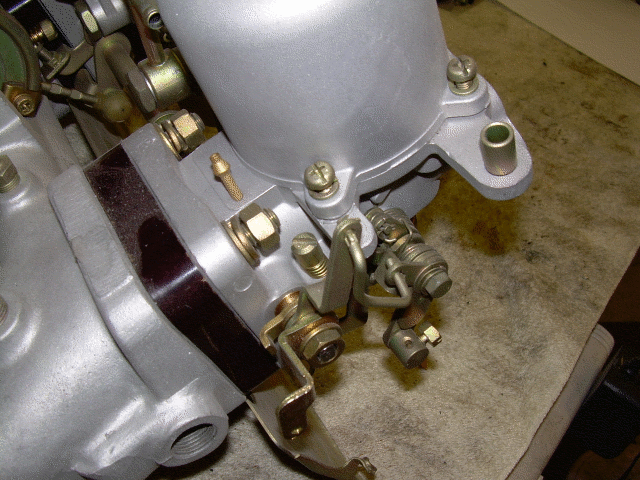
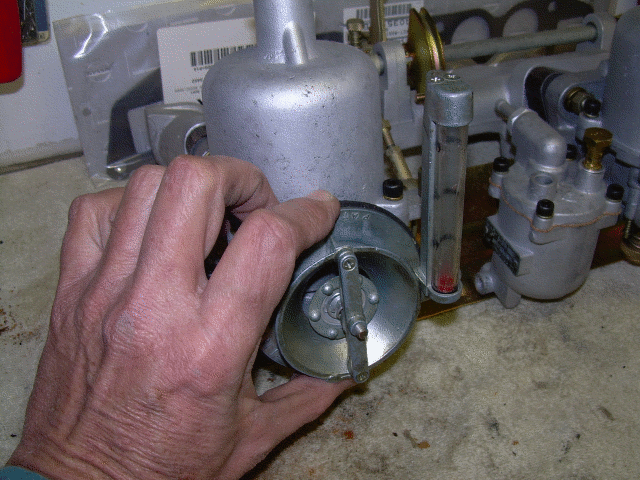
Service screw?
This is the “service screw”
it’s only use it to raise the engine speed while adjusting the carbs. In normal operation it is backed off till it does
not touch.
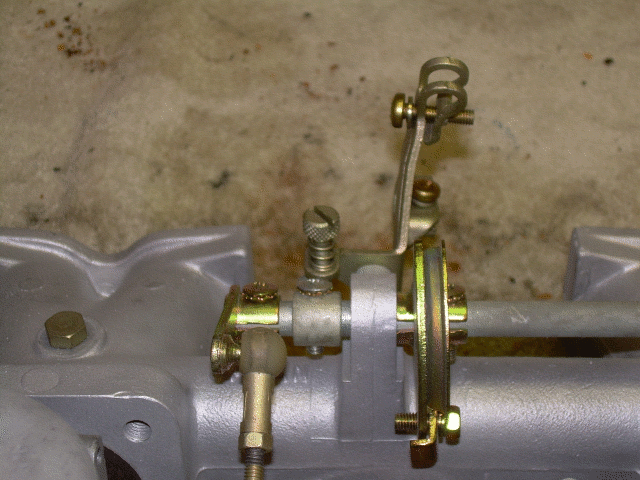
The service screw found on the 1600
(R16).
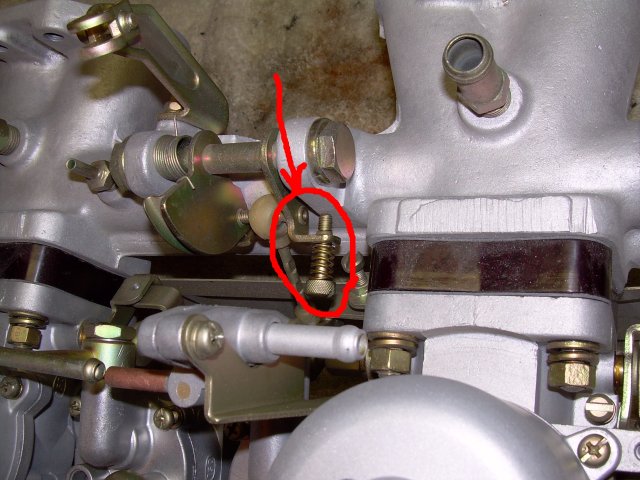
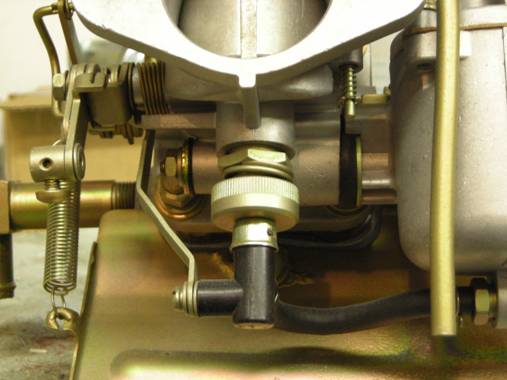
This service screw design was
introduced with the 67.5 2000. This engine did not have the thermo fuel valve
and the design worked well. In 1968 the thermo fuel valve was introduced and
there is an interference problem between the screw and the valve. Some of the
screws were made shorter to address this problem. The shorter screws are too
short to work properly. A small folded up piece of paper between the screw and
the manifold will allow it to work. When you are done using the screw it needs
to be screwed in as far as it will go without touching the manifold and the
screw head to thermo valve clearance checked. If they hit it can cause the
throttle to stick open.
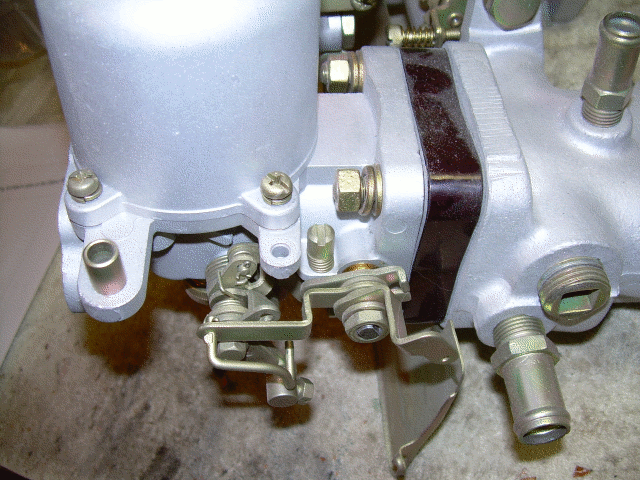
Idle air flow synchronization
With the service screw backed
off and some slack in the throttle cable the dog bones should have some play.
This looseness allows the idle adjustment screws to control the throttle
butterfly valves. If either throttle is being pushed closed or pulled open by
the dog bone at idle, adjust the length of the dog bone.
Here is the front carb idle air flow
adjustment screw for the 1600. This screw opens the butterfly valve a small
amount.
The 1600 rear carb idle air flow adjustment screw is the same as the
front. If the dog bones are set up properly and the service screw is backed off
the two idle adjustments should act independently.
The 2000 idle adjust screws. The 2000 carbs are
mirror image of each other so the screws are on the opposite side.
Front 2000 carb
idle adjustment
Rear 2000 carb
idle adjustment
High speed air flow
synchronization
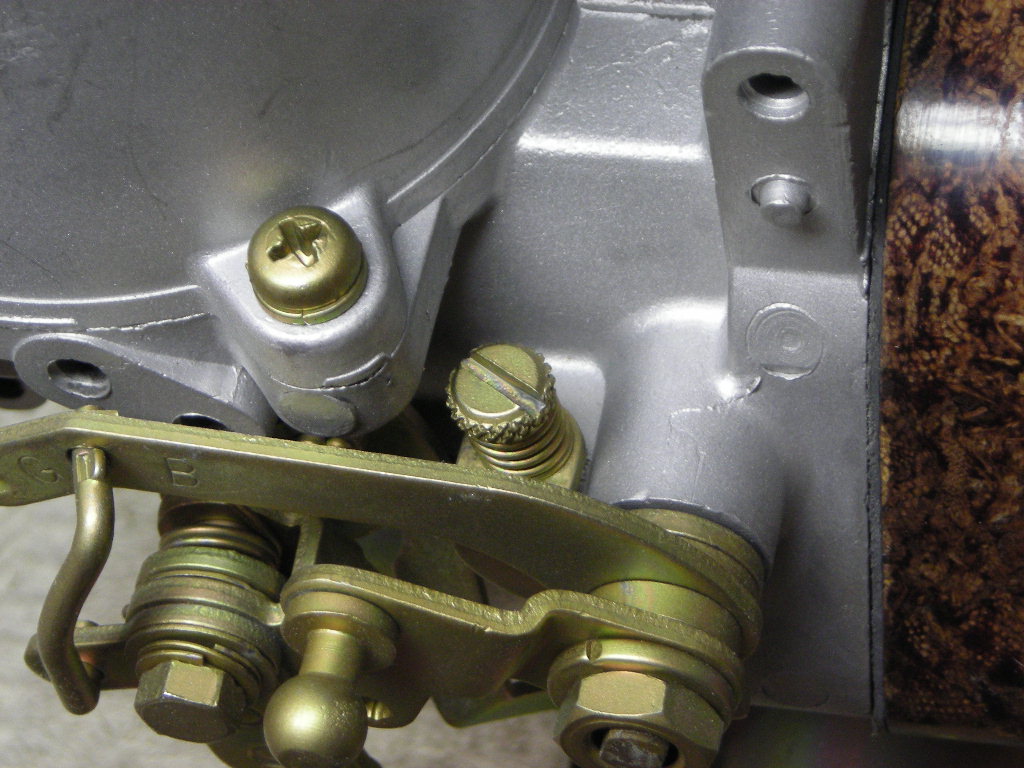
Here is the "dog bone",
the 1600 has two of these turnbuckles to adjust the high speed synchronization
of the carbs.
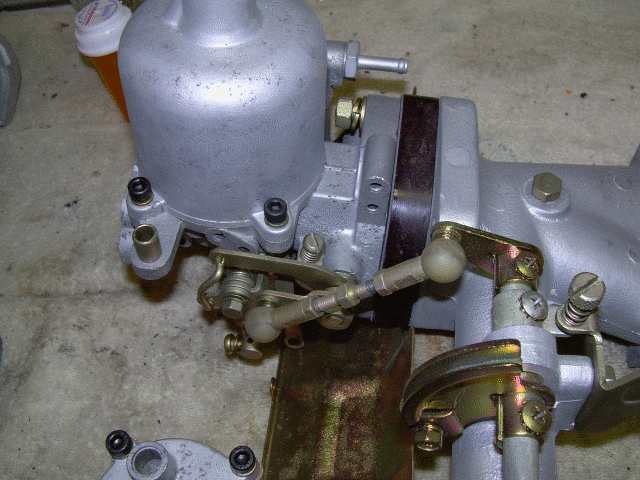
The "dog bones" are
turnbuckles. It is not necessary to remove them to change the length. Loosen
both lock nuts and turn the center section to vary the length. After the
initial setup is done pick one dogbone to make future
adjustments. This prevents them from getting progressively longer or shorter as
you switch back and forth. I normally adjust the one closest to the firewall.

The high speed
synchronization screw on the 2000 carbs. This screw
should be a very snug fit to prevent it from moving from vibration. A properly
fitting screw driver is essential.
Air flow balancing.
By measuring the air flow through each carb with a UNI-SYN or similar tool the front and rear air
flows are set to be the same.
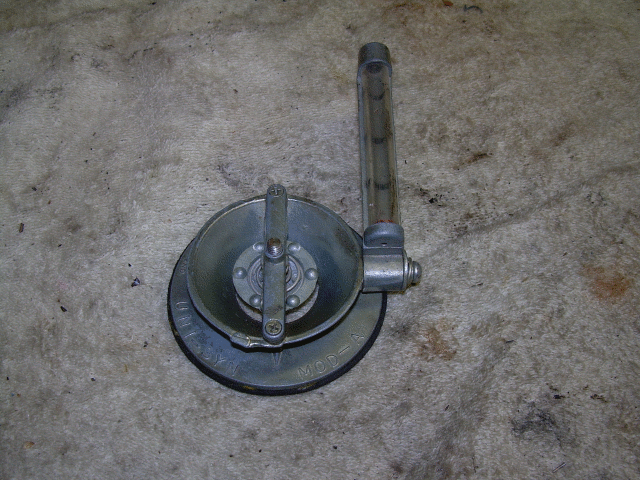
This is the UNI-SYN. A good basic tool
that gets the job done.
The idle air flow is balanced
first. The Uni-Syn is adjusted so that the ball rises
about half way up the tube. By adjusting
the idle speed screws the idle speed is maintained about 600-700 RPM and the
flow is adjusted so that the ball raises the same on both carbs.
Once the idle air flow is
balanced the service screw is used to raise the engine speed to 2000 RPM. The Uni-Syn is adjusted so that the ball rises about half way
up the tube at this higher speed. Using the dogbone
on the 1600 or the balance screw on the 2000 the flow is balanced so that the
ball raises the same amount on both carbs.
When the high speed is
balanced, back off the service screw and recheck the idle air balance. The two
adjustments should be independent but sometimes it takes a little fiddling to
get all the linkages set up properly.
Mixture adjustment
Once everything else is done it is time to adjust the fuel/air mixture. The
mixture adjustment is done with the large knobs on the bottom of the carbs.
This knob raises and lowers the metering
nozzle. Screwing the knob down (clockwise from the top of the carb) lowers the nozzle and richens the mixture. Turning
the knob up (anticlockwise from the top of the carb)
raises the nozzle and leans the mixture.
To set the carb mixtures first raise the engine speed
to 2000 RPM with the service screw. The idle and high speed mixture both are
set with the same knob. As the car is usually driven with the engine at speed
and spends little time at idle I prefer to set the mixture at the higher speed.
There are two methods to set the mixture knobs. The first is to use a service tach to monitor the engine speed. Adjust each carbs mixture knob to maximize the engine RPM. If the
engine speeds up too much lower the speed with the service screw. The other is
to raise and lower the slides to test the mixture. Reach down the carb mouth and lift the slide a little with your
fingernail. Try to stay out of the air flow going under the piston. Raising the
piston allows more air in and reduces the vacuum at the nozzle. This leans this
carb. If the engine speed rises as the slide is
raised a little that carb is rich. The adjustment
knob for that carb needs to be turned up
(anticlockwise). With a little practice you can push down on the face of the
slide and lower it a little. This reduces the air and increases the vacuum at
the nozzle. This richens the carb. If the engine
speeds up that carb is lean. The adjustment knob
needs to be turned down (clockwise). Once the mixture is correct either raising
or lowering the slide will slow the engine speed. With either method this will
get you very close to the ideal mixture. This is where the idle speed is
adjusted to be between 600 and 700 RPM. Remember, to raise or lower the idle
speed both adjustment screws need to be changed and the air flow rebalanced.
Once this is done recheck the high and low speed air flow balance. For the
final adjustment the car needs to be driven and the spark plugs checked.
Starting with fresh plugs. If the plugs are getting black from carbon that carb is a little rich. Lean it about 1/4 turn. If at a
constant throttle cruise you notice stumbling the carbs
are too lean. Richen both about 1/4 turn. A couple of rounds of this and you
should get rid of stumbling and not carbon the plugs.
Dashpot
Oil
On
acceleration the mixture needs to be richer or you will get stumbling. The oil
in the dash pot slows the rise of the piston. The piston being lower than it
wants to be causes the mixture to be rich. Generally speaking you want to use
the thinnest oil that stops stumbling on acceleration. Roadsters tend to be
quite tolerant of running rich so thicker is better than thinner. However, too
thick will over richen and cause the acceleration to feel flat. The correct
thickness will have a crisp acceleration. The factory spec is 10w. That is in
the range of ATF and MMO. 3 in 1 is thinner. In one Z I did I ended up with 50w
before it would accelerate cleanly. The synthetic oils do tend to be thinner
than regular oils so I'm not sure what the "real" viscosity of the
synthetic is. Motorcycle fork oil works well, comes in convenient bottles, and
in lots of weights. Single weight engine oil comes in 20, 30, 40, and 50 weight
but I haven't seen 10w. If you're being fiddly you can mix weights to come up
with in between weights. I use fork oil for the thinner weights and single
weight engine for the thicker.
Common problems
Mixture knob all the way lean and the carb still too rich:
The most common cause is worn metering needle or nozzle. The metering needle
should have a satin finish. Shiny spots indicate wear and the needle should be
replaced. The hole in the end of the nozzle should be round. It is .092"
for the 1600 and .100" for the 2000. They can be checked with a pin gauge.
If visibly pear shaped or worn oversize it must be replaced.
Another possibility is the float level being too high. If you remove the dome
and piston immediately after the engine is shut down the fuel level should be
down the nozzle a little bit. When the choke is pulled full on the end of the
nozzle should be lowered just below the fuel level. This will cause a small
puddle of gas on top of the nozzle. If the fuel level is higher than the top of
the nozzle with the choke off that carb will always
run very rich.
Choke sticking:
If the choke linkage is sticking the nozzle can stay down when the choke is
off. The best way to clean the linkage is with a good quality spray carb cleaner. Lubrication of the carb
linkage should only be done with silicone spray. WD-40 and similar products
leave a sticky residue that collect dirt and make things worse. The float bowl
to nozzle hose must be flexible. If it is hard and stiff it needs to be
replaced.
High speed mixture good but idle way too rich:
This is an indication of worn metering needles and nozzles. Check the needles
and nozzles for wear. The Nissan metering needles for the 1600 tend to be rich at
idle and lean through the mid range. As they wear this only gets worse. My prefered needle for the 1600 is the British ADQ needle.
They were not fit to cars that came to the
Where does the vacuum advance from the
distributor go?
The roadster uses ported
vacuum from the carbs to operate the vacuum advance.
This provides no advance at idle, maximum advance off idle and at cruise, and
little of no advance at wide open throttle. The 1600 vacuum port is on the
bottom of the rear carb. The 2000 vacuum port is
usually on the top of the front carb but can
sometimes be found on the top of the back carb. The
hose barb on the manifold is for emission controls. If this port is used for
the distributor vacuum advance the advance will be maximum at idle. This
increases the idle speed making setting the carbs
difficult.
A
method to fine tune the idle mixture
The metering needle can be set out from the piston a few thousanths
of an inch to lean the idle mixture. This effects the high speed mixture some
but the major effect is on the idle mixture. By setting the needle out a little
at a time and checking the idle and high speed mixture both can be dialed in.
This is not a fix for worn needles and nozzles as it will only move the too
rich condition to just off idle.
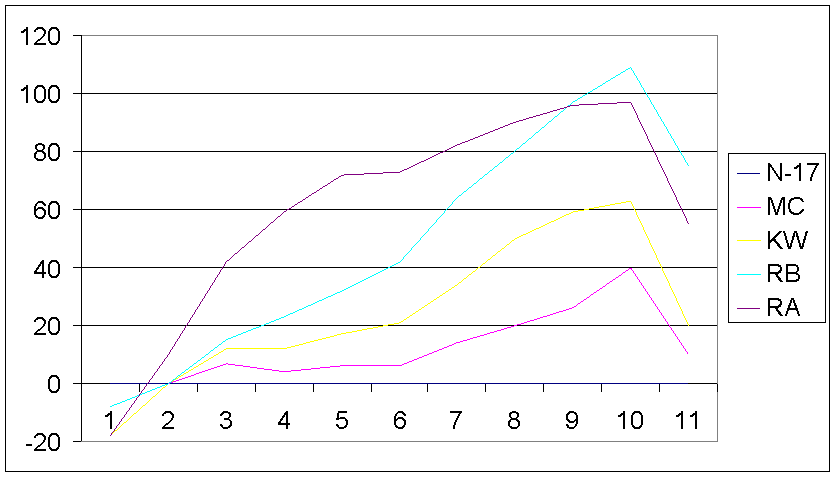
Metering needles for the 2000 SU carbs
I have found a selection of
metering needles that provide a good range of options for the 2L engine. The
baseline on this graph is the stock Nissan N-17 needle. Up is richer and down
is leaner. All the needles start out
about the same place at idle but are progressively richer as the engine load
goes up. The N-17 will sometimes be too lean at the top end if modifications
have been made to the engine. The normal approach is to step through the
selection in lean to rich order (MC, KW, RB, RA) until you find what your
engine likes. These are British SU
needles and are available through Burlen Fuel Systems in
Nissan part numbers for
some carb items
These parts are available
through Nissan as of the last time I checked. They often are not happy about
looking them up. But, if you bring the numbers they will usually order them for
you.
Loose floats for 1600s and
some 2000s 16061-K1407
1600 manifold gasket 14035-14611
Carb Gasket kit, includes float bowl gasket 16455-H2310
Hinged floats for most 2000s
and some 1600s 16061-E4310
N-17 metering needles, stock
for 2000s 16354-25611
2000 manifold gasket 14035-25501
Float bowl gasket only 16064-22010
And that pretty much covers
adjusting the SU carbs on a Datsun
Roadster. They are a fairly simple design and pretty rock solid once dialed in.
Thanks to Keith for sharing his expertise.

Copyright
(c) 2001-2014 www.311s.org
All Rights Reserved.
Reproduction of material presented here is strictly prohibited without
written permission from the Author.