Need help with my E/I Distributor installation [With Pics!]

Tech tips and how to's

Moderators: notoptoy, S Allen, Solex68

Post Reply
User avatar
GeoffM
Roadster Fanatic-Site Supporter
Posts: 1596
Joined: Thu May 22, 2008 2:28 pm
Location: Vancouver BC

Need help with my E/I Distributor installation [With Pics!]

Post by GeoffM »

Hi People,
I'm installing an E/I distributor but I'm running into a curious problem:

I have the engine set up at #1 TDC (did that before I removed old dizzy). I've installed the new distributor, then I've moved the crank to 16 degrees based on the timing marks. Now, I moved the distributor body to line up the reluctor with the stator, but as you can see from the pics, I've lost my timing travel. It's like I'm way too retarded (yeah yeah).

I have confirmed visually, by removing #1 spark plug and looking at the piston movement, that #1TDC kinda conforms to 0 degrees in the timing mark.
What am I missing??
Image

Image
Geoff
1969 SPL-311
User avatar
spyder
Roadster Fanatic-Site Supporter
Posts: 2207
Joined: Tue Apr 12, 2005 1:43 am
Location: Live Oak, TX.
Model: 2000
Year: High Windshield-68-70

Re: Need help with my E/I Distributor installation [With Pics!]

Post by spyder »

It looks like you have the dist. fully advanced. I had a similar problem when I installed a Pertronix on my 520. It was way retarded and I had to modify the plate with the screw into the bottom of the distro. order to get the timing to where it was adjustable. The distro. turns at 1/2 speed of the crank so I tried to jump the drive gear in the oil pump ahead one tooth. There are 14 teeth on the gear and 720 degrees divided by 14 is around 52 degrees. That was too much advance to retard back by adjusting the two screw slots. Where does the thing fire the coil? When the points come together or move apart? I don't know. Put it together and see how it acts than adjust / modify from there, that is what I would do. One of two things will happen, it will work ................................or not!
User avatar
GeoffM
Roadster Fanatic-Site Supporter
Posts: 1596
Joined: Thu May 22, 2008 2:28 pm
Location: Vancouver BC

Re: Need help with my E/I Distributor installation [With Pics!]

Post by GeoffM »

I guess I could slap it together and try it but something doesn't seem right. I should say that the pictures were taken with the timing mark at TDC so my problem only gets worse when trying to retard it to 16.

Anyone else run into this other than Spyder?
Geoff
1969 SPL-311
User avatar
Linda
Fraternal Den Mother-RIP
Posts: 7807
Joined: Sat Nov 05, 2005 11:37 pm
Location: Los Angeles
Model: 1500/1600
Year: High Windshield-68-70

Re: Need help with my E/I Distributor installation [With Pics!]

Post by Linda »

I'm going to take a guess here since no one else is answering and say that the distributor is 180 deg out, perhaps? The rotor usually points to 4PM for #1 not 10AM unless you have it set up that way. So try moving the cap wires to correspond to what you have now and see if it runs.
I have my car with an EI set up like this. To change to the more conventional placement means taking the distributor out and paying attention to the offset tang on the bottom and facing it correctly into the slot. It's a hassle anyway so it has been left like this.
Don't do anything until someone who really knows alot checks this out though LOL

Linda
Sadly-Linda has passed away 2022. She was the 311's den mother and drove the first Rare-Parts ball joint project. RIP.
User avatar
GeoffM
Roadster Fanatic-Site Supporter
Posts: 1596
Joined: Thu May 22, 2008 2:28 pm
Location: Vancouver BC

Re: Need help with my E/I Distributor installation [With Pics!]

Post by GeoffM »

Thanks Linda....very interesting. I had to remove the offset coupling 180 degrees to correspond to my old dist.

I spoke to Stan on the phone and he suggested repositioning the oil pump drive shaft a tooth. I'm guessing this will fix the problem and is probably the source of my timing/overheating issue since day 1.

Also confirmed with the following picture that #1 was at the 10oc position on the old distributor.
Image
Geoff
1969 SPL-311
User avatar
datsun1500
Roadsteraholic
Posts: 1335
Joined: Wed Sep 19, 2007 8:24 pm

Re: Need help with my E/I Distributor installation [With Pics!]

Post by datsun1500 »

I also think you are off a tooth. Both of my cars point to 10, not 4
I remember when no one wanted the 1500s......
User avatar
shifty
Roadster Enthusiast
Posts: 1166
Joined: Mon Dec 20, 2004 10:56 am
Location: Portland, OR
Contact:

Re: Need help with my E/I Distributor installation [With Pics!]

Post by shifty »

Mine points to 10 as well - doesn't really matter. I had similar trouble and found that it was one tooth off. The usual set up is for the gear slot to be at 11:25 - I found that setting it to 12:00 (or 12:30) worked for me.

Good luck! It took quite a few tries for me to get it in the right position! The EI dizzy is probably the best upgrade you can do for these cars.

Here's a write-up on my site - http://shiftco.com/features/zippy/zippy_034.html" onclick="window.open(this.href);return false;
Leigh Brooks

http://www.shiftco.com - my blog about cars (and stuff)
Latest post: http://www.shiftco.com/radios/the-test-mule/

67.5 SRL-00139 sleeping
67.5 SPL-11481 suspended animation
67.5 SPL-12961 snoring
67.5 SPL-13622 - H20 PWR!
User avatar
Linda
Fraternal Den Mother-RIP
Posts: 7807
Joined: Sat Nov 05, 2005 11:37 pm
Location: Los Angeles
Model: 1500/1600
Year: High Windshield-68-70

Re: Need help with my E/I Distributor installation [With Pics!]

Post by Linda »

Here's where it talks about the dizzy installation and offset tang etc in the WIKI:
http://www.311s.org/pmwiki-311/pmwiki.p ... tallADizzy" onclick="window.open(this.href);return false;

Linda
Sadly-Linda has passed away 2022. She was the 311's den mother and drove the first Rare-Parts ball joint project. RIP.
User avatar
dbrick
Roadster Fanatic-Site Supporter
Posts: 10084
Joined: Thu Sep 09, 2004 11:05 pm
Location: Kenilworth, New Jersey

Re: Need help with my E/I Distributor installation [With Pics!]

Post by dbrick »

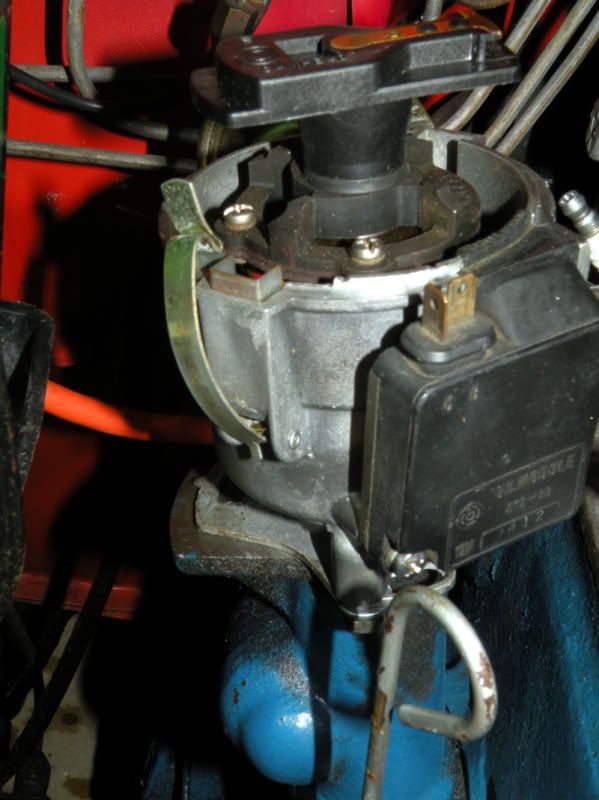
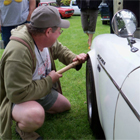
I just went down to the shop and checked, everything in your distributor is in the right place, as far as the relationship between all the parts, so the problem is with the car. The rotor is in the "right" place, 95% of the cars are this way. If it's the same as the old one, it's right. You can do it 180 deg opposite, just reverse the drive on the bottom, the distributor doesn't care, and the plug wires actually fit nicer, personal taste.
Instructions are here, look at page 10 http://www.311s.org/PDFs/InstallRoadsterEIDizzyrev6.pdf
PM'd my phone number.

Does sound like you are off a tooth, but I would verify a few things...
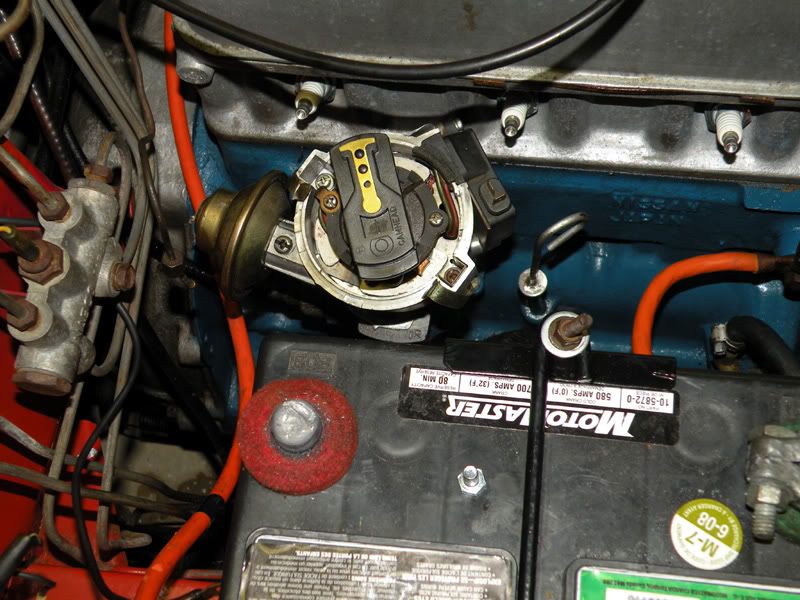
1 Make sure you really are at TDC on #1. I use a plastic straw down the spark plug hole to feel it reach the top. The timing mark and especially the thin metal pointer are not always accurate. When the piston is at the top, pointer should be on TDC, if it's not, remark the pulley, or bend the pointer to the right place.

2. Very important...Only turn the engine in the normal running direction, never backwards. This would be clockwise, standing in front of the car, looking at the engine. Slack in the timing chain and oil pump drive can throw you off quite a few degrees, especially if the chain is getting worn. Turning it to TDC and then backing it to 16 BTDC will slacken the timing chain.

3 Rotate the engine 2 full turns, stopping at the 16 BTDC timing mark, then recheck. Pull the distributor out and check the orientation of the oil pump gear. If you need to change it, you should get a replacment gasket, and while the tower is out, replace the tach seal.

With all the ins and outs, don't forget the O ring on the bottom of the distributor.

Dave Brisco

Take my advice, I'm not using it"

66 2000 The Bobster
64 1500 in pieces for sale
1980 Fiat X1/9
2009 Volvo C-70
08 Expedition EL, STUPID huge but comfy
1962 Thompson Sea Lancer, possible money pit
User avatar
GeoffM
Roadster Fanatic-Site Supporter
Posts: 1596
Joined: Thu May 22, 2008 2:28 pm
Location: Vancouver BC

Re: Need help with my E/I Distributor installation [With Pics!]

Post by GeoffM »

Thanks for the tips Dave. I never thought of the timing chain slack...and I have been turning the engine ccw to get to where I am now.

I'll digest your post and do some wrenching this weekend.

Thanks again!
Geoff
1969 SPL-311
User avatar
GeoffM
Roadster Fanatic-Site Supporter
Posts: 1596
Joined: Thu May 22, 2008 2:28 pm
Location: Vancouver BC

Re: Need help with my E/I Distributor installation [With Pics!]

Post by GeoffM »

Well it's all back together. Thanks for the help.

I advanced the distributor drive by one tooth and it worked perfectly. Getting the cam drive and the oil pump drive to line up was a bit of a bitch...but it only took some patience and trial and error as to where to move the oil pump slot.

It's a mystery to me why my old points dizzy worked fine with the cam drive in the wrong position. Maybe the PO modified the plate...who knows.

Anyway, started-up on the first crank. I noticed that with the choke on, the signs of running rich were gone. No more smoke and also when I put my hand in the exhaust coming out of the tail pipe it didnt get black and sooty/greasy like before. I wouldn't have thought it would have made that much of a difference.
I guess next step is to re-adjust the mixture and idle.

Also, It seems a shame to cut off the flair nut fitting on the OEM vacuum line. I think I'll just bend it so it lines up with the new distributor vacuum port and run some 5/16" rubber hose between the two and use the ferrell as sort of a hose barb.
Geoff
1969 SPL-311
User avatar
dbrick
Roadster Fanatic-Site Supporter
Posts: 10084
Joined: Thu Sep 09, 2004 11:05 pm
Location: Kenilworth, New Jersey

Re: Need help with my E/I Distributor installation [With Pics!]

Post by dbrick »

Glad to hear it's up and running. I was hoping you didn't have THAT much slack in the chain.

GeoffM wrote:Also, It seems a shame to cut off the flair nut fitting on the OEM vacuum line. I think I'll just bend it so it lines up with the new distributor vacuum port and run some 5/16" rubber hose between the two and use the ferrell as sort of a hose barb.
That's what I reccomend, sometimes depending on the OD of the hose, the nut will actually thread over the end of the rubber vacuum hose. A piece of heat shrink can also make it very neat. The new vacuum advances I now use have the vacuum nipple on the bottom, pointing down, so you need a couple of inches of hose to make the U-turn.

As far as the startup etc, with that much more spark energy, it's harder to make it misfire, so you have more leeway on the mixture, and can use less choke. Wait till you drive it, electronic ignition aside, just the proper timing and advance may really be noticable.

Dave Brisco

Take my advice, I'm not using it"

66 2000 The Bobster
64 1500 in pieces for sale
1980 Fiat X1/9
2009 Volvo C-70
08 Expedition EL, STUPID huge but comfy
1962 Thompson Sea Lancer, possible money pit
Post Reply