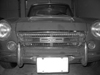
I need to repair the side trim for my car. I got bent when it was removed for painting. I did a search but came up with nothing. I'm not sure how to remove the dents. Does anybody have any advise?
Maggie
Need to repair side trim, HELP!
Moderators: notoptoy, S Allen, Solex68
-
Conner
- Roadsteraholic
- Posts: 621
- Joined: Mon Apr 11, 2005 8:19 pm
- Location: Baltimore, MD
- Model: 2000
- Year: High Windshield-68-70
-
Datsundude

- Roadster Fanatic
- Posts: 367
- Joined: Thu Aug 26, 2004 4:47 pm
- Location: Los Angeles CA
Hi Maggie,
Here’s how I repaired my side moulding all 6pcs the late model type (68-70).
They all have lots of dent on them, so here what I use. I used a “deep socket� the same size as the side moulding half round, lay the side moulding on the plywood and with the socket on the moulding, I carefully hammer it away the dent. Remember be extra careful because if you hammer too hard you will leave the socket impression on your side moulding so take it easy, not too hard.
I did all 6pcs within 2hrs, look good but could be much better if I put more effort in it.
Vinh
-
eastmedia
- Site Supporter
- Posts: 708
- Joined: Sat Aug 14, 2004 7:05 pm
- Location: Whittier, CA.
- Contact:
I believe someone posted that they lay the molding in a 1 1/2-2 inch PVC pipe that has been cut in half (semi-circle) and then do the pounding. The pipe has some curve to it which helps the shape of the molding so its not too flat.
I think Gerado did the write up and a demonstration at Solvang.
Ron
I think Gerado did the write up and a demonstration at Solvang.
Ron
Ron
66 1600 Cherry
69 1600 Beast
69 2000 Rough
67.5 1600 Basket Case (in the family)
66 1600 race car (Steve Allen's)
70 1600 survivor (sold 2020)
68 1600 Beauty (sold 2014)
68 1600 My first (sold 1991)
66 1600 Cherry
69 1600 Beast
69 2000 Rough
67.5 1600 Basket Case (in the family)
66 1600 race car (Steve Allen's)
70 1600 survivor (sold 2020)
68 1600 Beauty (sold 2014)
68 1600 My first (sold 1991)
-
datsun65
- Roadsteraholic
- Posts: 1873
- Joined: Wed Nov 19, 2003 11:55 pm
- Location: Texas
- Model: 2000
- Year: Low Windshield-64-67.5
Here is Joe K's `write-up from his website:
Polishing 101
How's that trim lookin'. That stainless side trim is not cheap, but usually a bit bent up. Don't fret, you can fix it. Which is quite a bit cheaper than replacing it, if you can even find it.
I'll attempt to explain how I straghtened my side molding and window trim. I learnd this technique from a few places. First Gerardo Magnana did a workshop at the 2004 Shasta Roadster Show. I then learned a little more from Mike Young and a little bit more from a some online research. The basic idea is to straighten out those little dings. If your trim has been folded, I'm sorry to say that you should probably continue folding it so it can fit in the refuse can. Once the metal has been stretched beyond a certain degree, all hope is probably lost. You could try heat shrinking techniques, but stainless is such hard stuff, I wouldn't bother. But don't take my word for it, go ahead and try. I'd love to be corrected here.
So, the basic idea is to remove small dents by pushing them outward. I took a 6" long piece of 1" PVC and split it down the middle, thus making a small form to lay the trim in. I then took 3/8" dowels of hardwood and sharpened them a little, then flattened the end, like a pencil with the led cut off. I made a few other shapes as needed, so I could get closer to the edge. Luckily for me, none of my dents were under the folded edge, but if they were, I would have used a small piece of stiff metal to get at the bugger. Anyway, you want to tap the dent outward, working around it from the outside towards the middle. Small taps with a hammer. You're not trying to make it perfect from the outside, that will come later. You are really just trying to make the dent slightly reversed, but not more than the thickness of the metal. Once you have the dent pushed towards the outside, time to hit it with the file it. That's right, take a 8" or 10" medium or fine file and start filing away. The stainless is pretty hard, so moderate pressure is required. The file will ride on the high spots, leaving the low spots still shiny. This is your guide as to how your doing so far, you should be able to tell if some areas are still too low, so tap them out a little more. What you want to see is the file marks across the entire surface where the dent used to be. When you think the file work is done, move on to sandpaper, sanding out those file marks. Move progressively through different grits up to 1200 or 1500, then move on to the polishing wheel.
Stainless steel is very hard stuff and thus a challenge to polish. The fact that the material is thin makes it a little harder, because it's hard to get the parts warm. There are also lots of different types of polishing compounds, so you'll have to find the type that works best for you. Another good option would be to do the "body work" on the parts, then take them to a professional for final polishing. This would save you a considerable amount of money, plus you may have a hard time finding someone who will actually straighten it for you.
Dan
Houston, TX
Houston, TX
-
Maggie
-
ppeters914

- Roadster Fanatic-Site Supporter
- Posts: 3125
- Joined: Mon Jun 28, 2004 5:51 pm
- Location: Lake Forest Park, WA (just north of Seattle)
- Model: 1500/1600
- Year: Low Windshield-64-67.5
Hey, Steve. Perhaps adding that to the Body section Tech Info or Resto Tips would be good.
Just a thought.....
Just a thought.....
Pete
-------------------------------------
'67 1600 - frame off started in 2014. Now I know why roadster projects take so long. What a stupid idea.
'66 1600 - parts car
'66 WPL411 ***SOLD***
A couple of Porsches, a RAV4 Hybrid, and a motorcycle
-------------------------------------
'67 1600 - frame off started in 2014. Now I know why roadster projects take so long. What a stupid idea.
'66 1600 - parts car
'66 WPL411 ***SOLD***
A couple of Porsches, a RAV4 Hybrid, and a motorcycle
-
S Allen
- Site Admin
- Posts: 4572
- Joined: Thu Dec 05, 2002 4:57 pm
- Location: Knoxville, IA(Lake Redrock)Emory, TX
- Model: 1500/1600
- Year: Low Windshield-64-67.5
- Contact:
RE:Body Side Molding
I will ask the authors if they mind and be glad to add the write-ups to the main website. Gerardo and Joe-do you mind???
Steve
Steve
Last edited by S Allen on Fri Mar 10, 2006 5:39 pm, edited 1 time in total.
66 Stroker-Going Orange
67 SRL311-00279-resto project
Stock '72 240Z-Blue
2002 Ford F250 7.3 Diesel 2WD Hauler
2008 Toyota FJ Cruiser
2009 Smart ForTwo Passion Coupe
2013 Fiat 500 Abarth
67 SRL311-00279-resto project
Stock '72 240Z-Blue
2002 Ford F250 7.3 Diesel 2WD Hauler
2008 Toyota FJ Cruiser
2009 Smart ForTwo Passion Coupe
2013 Fiat 500 Abarth
-
S Allen
- Site Admin
- Posts: 4572
- Joined: Thu Dec 05, 2002 4:57 pm
- Location: Knoxville, IA(Lake Redrock)Emory, TX
- Model: 1500/1600
- Year: Low Windshield-64-67.5
- Contact:
RE:Side Trim How To
Cool Joe. Send it when you can and I will add it.
Steve
Steve
66 Stroker-Going Orange
67 SRL311-00279-resto project
Stock '72 240Z-Blue
2002 Ford F250 7.3 Diesel 2WD Hauler
2008 Toyota FJ Cruiser
2009 Smart ForTwo Passion Coupe
2013 Fiat 500 Abarth
67 SRL311-00279-resto project
Stock '72 240Z-Blue
2002 Ford F250 7.3 Diesel 2WD Hauler
2008 Toyota FJ Cruiser
2009 Smart ForTwo Passion Coupe
2013 Fiat 500 Abarth