Picking up from my intro post here: viewtopic.php?t=37738
I picked up a 1968 1600 in pieces, talk about a project... I thought I was getting 90-95% of the pieces but now that I've dug in to things a bit I think I got everything the previous owner got and he only had like 85% of a car. So I'm looking for a parts car to fill in the rest (and to steal a flat dash + mount from)
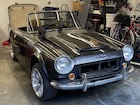
Here she is:
The current plan is to reassemble everything, see what I have and what I'm missing, and most importantly, get some drive time in while I figure out what I want to do long term (engine swap, restomod, etc)
1968 1600 SPL311-20028 "Sally"
Moderators: notoptoy, S Allen, Solex68
-
rbhenderson
- Roadster Nut
- Posts: 73
- Joined: Wed Oct 18, 2023 12:22 am
- Location: Houston
- Model: 1500/1600
- Year: High Windshield-68-70
- Contact:
-
rbhenderson
- Roadster Nut
- Posts: 73
- Joined: Wed Oct 18, 2023 12:22 am
- Location: Houston
- Model: 1500/1600
- Year: High Windshield-68-70
- Contact:
Re: 1968 1600 SPL311-20028 "Sally"
I've been puttering around the garage since bringing Sally home, mostly trying to figure out how to organize the space so I can fit a parts car in here too and still be able to work on things. I think I have that mostly sorted now, did my best to organize the parts I have as well, got all the emblems that came with the car stored safely for later. Not sure why there was a Miata roadster emblem in the pack...
Also finally got most of the insulation installed on the roofline so my mini split won't have to work as hard (it gets HOT here in Houston!)
Last night I attempted to compression test the engine, I borrowed a friends press on compression tester - turns out it's impossible to use when the engine is on a furniture dolly vs installed in the car! I was only able to keep it sealed against the head up to about 150psi so I have the thread in type ordered and on the way... (its also impossible to get pics while holding the tester, starter trigger, and attempting to keep the engine from rolling... At least I pulled the belt so the fan wasn't also in the mix!)
I also discovered that the SU's need some love... The front one has a sticky piston, the rear one has a stuck choke. I'm hoping a light disassemble and clean gets me where I need to be since I don't want to throw lots of money at them. Dashpots also looked pretty empty. Based on all of that I went ahead and pulled them off the engine. That'll be a pile of work, not to worried though, I've worked on the MGB HIF4's so have a decent understanding of the works.
Since I took them off as a complete assembly I was able to look in the intake ports a bit, this engine has the breather routed to the intake, is it normal to have this much oil/carbon build up on everything?
Since I took them off as a complete assembly I was able to look in the intake ports a bit, this engine has the breather routed to the intake, is it normal to have this much oil/carbon build up on everything?
You do not have the required permissions to view the files attached to this post.
-
DAC21
- Roadster Fanatic-Site Supporter
- Posts: 1110
- Joined: Tue Sep 15, 2020 7:44 am
- Location: California
- Model: 1500/1600
- Year: Low Windshield-64-67.5
Re: 1968 1600 SPL311-20028 "Sally"
Those "Datsun 1600" embalmes are not for a 1968. (1965-1967) The can be used but with a different hole pattern in the fenders. Possibly the previous owner already drilled and filled the holes and had been using them?
1967 1600 in waiting SPL311-09002 / R-28178
2018 Hyundai Elantra GT Sport Ultimate
2018 Hyundai Elantra GT Sport Ultimate
-
rbhenderson
- Roadster Nut
- Posts: 73
- Joined: Wed Oct 18, 2023 12:22 am
- Location: Houston
- Model: 1500/1600
- Year: High Windshield-68-70
- Contact:
Re: 1968 1600 SPL311-20028 "Sally"
Good to know! Currently all the holes are filled, the PPO (previous previous owner?) fill all the emblem and trim holes except for the hood. Once I strip it I'll know how they did it, I suspect bondo. I'll probably pick up the correct ones for the year if I decide to put them on.
-
rbhenderson
- Roadster Nut
- Posts: 73
- Joined: Wed Oct 18, 2023 12:22 am
- Location: Houston
- Model: 1500/1600
- Year: High Windshield-68-70
- Contact:
Re: 1968 1600 SPL311-20028 "Sally"
Harbor Freight started their thanksgiving sale today, that ended up being expensive… Bought myself a lift table so I can work on this engine without bending over, and without splitting the transmission. Once I’ve cleaned it up it’s getting moved to that.
Was able to do the full compression test tonight. Ended up getting crazy high numbers, like 260psi, which I didn’t believe so tried a different gauge and read the same! I had put some oil in the chambers since this engine has sat for 5 yrs and I didn’t want to just crank it dry. Did the math and the oil volume works out roughly to increase the compression ration inline with the pressures I was seeing… I’m taking it as a sign that the engine is good to go on that front.
Also, turns out the PO didn’t drain the oil before pulling the engine and I forgot about the oil pressure port. Wish I had remembered BEFORE cranking a half quart of oil onto my garage floor…
Took the valve cover off, it’s cracked at the breather and fill cap. :/ Valves, rods, and rockers all look clean so it’s doing its job at least. Needs a new gasket, current one is hard as a rock.
Happy discovery, engine came with a Pertronix unit! Don’t have to learn about points.
Prep’d the engine for pressure washing tomorrow. I plugged all the holes and covered anything I couldn’t plug with ziplock bags and ties. Anything I should watch out for? Better ways to get this thing cleaned up?
Pics are before I finished sealing things up.
You do not have the required permissions to view the files attached to this post.
-
rbhenderson
- Roadster Nut
- Posts: 73
- Joined: Wed Oct 18, 2023 12:22 am
- Location: Houston
- Model: 1500/1600
- Year: High Windshield-68-70
- Contact:
Re: 1968 1600 SPL311-20028 "Sally"
Cleaned all the gunk off today (and now pulling the head because I don’t trust that I sealed things well enough)
There was at least a 1/4” of built up gunk around the bottom lip where the oil pan mounts, mostly on the non-manifold side, should I be looking for a specific leak? Covered entire engine front to back...
Also got the engine drained of all fluids and loaded up on the cart, should make working on it much more pleasant!
You do not have the required permissions to view the files attached to this post.
-
Gregs672000

- Roadster Fanatic-Site Supporter
- Posts: 9002
- Joined: Fri Aug 07, 2009 11:47 pm
- Location: Tacoma, WA
Re: 1968 1600 SPL311-20028 "Sally"
Coming along well, enjoying your write up. The intakes didn't look bad to me again all... not a lot of carbon build up on the valves. Obviously if you're pulling the head anyway you can check the guides, valves, seats and replace seals if needed. I wonder if the engine has that many miles on it... Doesn't look tired. You have what looks like a gear reduction starter on it... good. Consider replacing the exhaust manifold with a header, or be sure to check it over for cracks, especially where the pipes merge. Regarding the right side oil leak... check the distributor mount, fuel pump to block gasket, but most likely it's the tach cable, or the block to distributor oil line. I believe there's a kit (Datsunparts.com I think, maybe others) to refresh the tach seals etc. The valve cover crack is unfortunate and I think the result of over tightening... seen it on a U20 cover. Noticed there was no oil dripping out the rear of the trans... did you drain it before pulling the motor, or was it already dry, cause otherwise it should have poured oil all over... FYI for future reference/installation.
So far so good I'd say!
So far so good I'd say!
Greg Burrows
'67 2000 #588
Tacoma, WA
'67 2000 #588
Tacoma, WA
-
rbhenderson
- Roadster Nut
- Posts: 73
- Joined: Wed Oct 18, 2023 12:22 am
- Location: Houston
- Model: 1500/1600
- Year: High Windshield-68-70
- Contact:
Re: 1968 1600 SPL311-20028 "Sally"
Thanks for the info! I’ll investigate the leak paths you mentioned and see if there’s anything obvious.Gregs672000 wrote: ↑Sat Nov 04, 2023 10:41 pm Coming along well, enjoying your write up. The intakes didn't look bad to me again all... not a lot of carbon build up on the valves. Obviously if you're pulling the head anyway you can check the guides, valves, seats and replace seals if needed. I wonder if the engine has that many miles on it... Doesn't look tired. You have what looks like a gear reduction starter on it... good. Consider replacing the exhaust manifold with a header, or be sure to check it over for cracks, especially where the pipes merge. Regarding the right side oil leak... check the distributor mount, fuel pump to block gasket, but most likely it's the tach cable, or the block to distributor oil line. I believe there's a kit (Datsunparts.com I think, maybe others) to refresh the tach seals etc. The valve cover crack is unfortunate and I think the result of over tightening... seen it on a U20 cover. Noticed there was no oil dripping out the rear of the trans... did you drain it before pulling the motor, or was it already dry, cause otherwise it should have poured oil all over... FYI for future reference/installation.
So far so good I'd say!
Would love to put a header on it, but since my eventual plan is an engine swap I’ll probably save the money for now. The manifold does have some pretty big dents (about to post that below) so that might sway me toward header also.
When I bought the car it was in pieces, PO told me he drained everything but there was oil in it still and the transmission had some oil in it as well, though it must have just been enough to fill the square sump because it hadn’t poured anything out before that. I’m glad I checked because I plan to get inspect the syncros before putting it all back in the car.
-
rbhenderson
- Roadster Nut
- Posts: 73
- Joined: Wed Oct 18, 2023 12:22 am
- Location: Houston
- Model: 1500/1600
- Year: High Windshield-68-70
- Contact:
Re: 1968 1600 SPL311-20028 "Sally"
Pulled the head, turned out I didn’t get any water in the cylinders, but can’t go back now! Head bolts were a little odd, a few have larger washers than others, and the one in the middle under the valve cover had a larger head size than the rest? Debating reusing them vs replacing, I’m trying to keep this low budget since I think an engine swap is in the cards next year.
Things look okay inside, it does look like cyl1 had some exhaust leakage at the manifold. I didn’t get a picture but it also may have been leaking from the head there too? Dark discoloration, will post a picture tomorrow.
Spent some time cleaning up the block side of things so I could read any markings and check for damage, some nicks and dings but overall looks good. Piston tops had a lot of carbon build up, not sure if that’s rings or if it was running rich or what. Anyway, I put a thin layer of oil on things to protect it while I wait for a head gasket, here’s what it looks like cleanish:
And finally, exhaust manifold… I haven’t gone through the forum yet but I assume this is a big dent and not something that is supposed to be there?
Lastly, any recommendations for safely getting head gasket bits off of an aluminum head?
You do not have the required permissions to view the files attached to this post.
-
rbhenderson
- Roadster Nut
- Posts: 73
- Joined: Wed Oct 18, 2023 12:22 am
- Location: Houston
- Model: 1500/1600
- Year: High Windshield-68-70
- Contact:
Re: 1968 1600 SPL311-20028 "Sally"
Here’s the somewhat cleaned head. Dark discoloration around cyl1:
You do not have the required permissions to view the files attached to this post.
-
sfyks870
- Roadster Nut
- Posts: 47
- Joined: Fri Oct 20, 2023 9:12 pm
- Location: Louisiana, USA
- Model: 2000
- Year: High Windshield-68-70
Re: 1968 1600 SPL311-20028 "Sally"
Maybe I missed it.... but why did you remove and inspect the head? Is this just for safety sake? Or do you plan on building it?
-
rbhenderson
- Roadster Nut
- Posts: 73
- Joined: Wed Oct 18, 2023 12:22 am
- Location: Houston
- Model: 1500/1600
- Year: High Windshield-68-70
- Contact:
Re: 1968 1600 SPL311-20028 "Sally"
As I was pressure washing things I hit the exhaust manifold outlet and saw bubbles and water at the head. Was worried I’d gotten water in the head/cylinders.
-
Gregs672000
- Roadster Fanatic-Site Supporter
- Posts: 9002
- Joined: Fri Aug 07, 2009 11:47 pm
- Location: Tacoma, WA
Re: 1968 1600 SPL311-20028 "Sally"
Definite exhaust leak at #1. No idea on head bolts, no experience with R engines, but U20s use "true stretch" bolts that "should" be replaced every time but often are not. I use head studs which can be reused for that reason. The pistons themselves do not look like stock versions of what I've seen for R or U engines... stock U20s are flat tops, and Rs have a dome, but not what appears to be a valve shaped bump? Piston #2 and #4 both have exhaust valve strikes but it doesn't look bad or new but one wonders how that happened. I didn't like what I saw in #4... looked like rust on the cylinder wall, but maybe that's just the picture? The compression numbers you got suggested it was healthy. The manifold dent is probably in line with the steering shaft? Won't make any power difference, and headers are much more expensive than what V8 guys pay so I hear you on that. They don't weld up well in my experience but if cracks are found that may be an option depending on where. Regarding the head gasket and head, I just use a good, flexible putty knife to carefully clean it, haven't ever damaged one. Are you set up to disassemble the head? Since it's off, I would to check guides and valve stems for wear (based on the pics it should be pretty good with little to no wobble when you wiggle the the extended valve), and if the seats and valve edges look good I'd lap the seats to make sure they are sealing well and don't have any high or low spots, and likely replace stem seals. If you have not disassembled a head before, it is not hard or expensive though you may need to purchase and/or borrow a few tools (valve spring compressor, pen magnet, lapping kit)... looks easier to do than a U20 head. Yes, some more money and time on a motor you may just swap out, but you and any future owners will know it's been done.
I wrote this about 8 hrs ago and never posted it!

I wrote this about 8 hrs ago and never posted it!
Greg Burrows
'67 2000 #588
Tacoma, WA
'67 2000 #588
Tacoma, WA
-
Gregs672000
- Roadster Fanatic-Site Supporter
- Posts: 9002
- Joined: Fri Aug 07, 2009 11:47 pm
- Location: Tacoma, WA
Re: 1968 1600 SPL311-20028 "Sally"
Was definitely running rich. Exhaust valves are black. Is the head flat? Corrosion? Pitting? You can get a general idea of how the valves are sealing by spraying some carb cleaner or WD40 down the ports and watch for leaking past the valves.
Greg Burrows
'67 2000 #588
Tacoma, WA
'67 2000 #588
Tacoma, WA
-
rbhenderson
- Roadster Nut
- Posts: 73
- Joined: Wed Oct 18, 2023 12:22 am
- Location: Houston
- Model: 1500/1600
- Year: High Windshield-68-70
- Contact:
Re: 1968 1600 SPL311-20028 "Sally"
No pitting, some discoloration in #4 as noted… Good call on the valves, will try that as a first check. I don’t really want to pull them all but I probably should… I’ve never gone this deep into a head, it’s probably worth it.
I’m a little worried about the valve contact on the pistons, since I’m putting in a new head gasket, any change in thickness and the contact could get worse. The head has been surfaced, I suspect they took it right to the edge of allowable clearance. I think I need to measure that clearance before reassembling everything.
Tore down the carburetors, rear carb was pretty gummy, front dash pot had lots of carbon in the oil. Needles look straight and not worn. Got a timelapse of most of the teardown: https://youtu.be/qwqxN3VI7y4?feature=shared
Stuck a borescope in the transmission, I think it’s the Borg-Warner style not the servo style. Don’t really feel like digging in to it further.
You do not have the required permissions to view the files attached to this post.