I think what Pebbles meant was that the alignment of the panels with other parts (like the doors) is not typically good from the factory, and when you remove the fender, do work on it, and remount it you will notice what I said about your reflection lines without taking time to get them as good as possible. Getting them "right" means working panels in relation to the entire side of the car, and it is not easy, especially since the doors have a lot of adjustment to them and are not easy to install (easier than some big heavy American car door though!). This is part of the learning process, and later in the body work progression. First you get you major dents, highs and lows worked out. Then you work on blending the panels across each other via alignment and thin skins of plastic. People talk about having "bondo free" bodies, but that is extremely hard to do. These car resto shows make it look easy, but I'm sure they all use at least a thin skin of plastic (body filler) over the entire car, as all it takes is a slightly lower surface on one panel or spot to create a woopie in the reflection. Now, this may be more than you want to get into on a "daily driver" and your first try at body/paint, but it is worth the effort to aline and work your panels some with this in mind. Lay a straight edge like a ruler across and between the doors and the fenders/rear. If they don't lay flat with no gap, the reflection will be different. You may not be visually looking for reflection until you have some primer on the car and have sanded it some. Try laying down a long stick or a broom handle next to the car. Wipe the panels with prep sol and then do the "head bob" kinda thing I was talking about so as to get the reflection to move across the panel... You will be able to see how that stick reflects or distorts on the door in a different spot than the fender. The goal is for that reflection to not change much as you move from panel to panel, reality will be different! But you can improve it through alignment and light applications of filler (and the Evercoat product is sooooo good that it cuts down to a whisper of filler). My car is a cobbled mess (that's how I bought it) and had a ton of "body work" done to it before I started learning on it, plus many replacements of fenders and doors, with addition of flares that looked like two different people had experimented on different sides. I made many mistakes on my car, but that is the learning process! Take a look at the pics of Alvin's car that were posted just the other day on "where did you drive" and you will see how nice the reflections are across panels, or at Kendal's posts on buffing to see the mirror reflections on black paint. Nice huh?
I used a Porter Gable round pad orbital sander with a catch bag all over my car to do rough cuts and reduce labor. No drop off in power. The catch bag reduces dust, but it's not perfect. I did most of my panel work with an 8" wood handled sanding block that uses clamps to hold on 1/3 sheets of sanding paper, along with softer, flexible hand pads for smoothing rounded areas, like the tops of the fenders (you'll use them for wet sanding too). As mentioned, paint alone can get expensive, and I have not painted anything lately with the new more enviro friendly paints available. I hear you on the satisfaction of doing it yourself, but after you get the body work right you may be burned out enough that having someone else paint it may be worth it both economically and physically! After that, wet sanding and buffing is also labor intensive, but for me the most rewarding part of the process (with moments where you go "damn, should have spent just a bit more time on this rocker panel...").
roadster painting advice needed
Moderators: notoptoy, S Allen, Solex68
-
Gregs672000

- Roadster Fanatic-Site Supporter
- Posts: 8983
- Joined: Fri Aug 07, 2009 11:47 pm
- Location: Tacoma, WA
Re: roadster painting advice needed
Greg Burrows
'67 2000 #588
Tacoma, WA
'67 2000 #588
Tacoma, WA
-
ed B
- Roadster Fanatic
- Posts: 454
- Joined: Thu Mar 26, 2015 8:40 pm
- Location: Albany NY
Re: roadster painting advice needed
do I need to use the POR stuff on the area inside the cavity before I spray with the paint? I'd be interested in knowing how you repair the area with the bolts. As I recall there are 2 bolts welded to the inside of the cavity there. Mine just has a hole there with no nuts. How do you locate the position of the nuts? Do you do it in 2 steps by say welding in a flat horizontal piece first and then reattach the fender in place and then draw holes on the underside of the plate, through the holes in the bottom of the fender, then drill holes and then weld the nuts?. And then step two, weld a new curved piece into the vertical area, to close up the hole?kndroy wrote:Ed, that seems to be very common these cars need a very small section lower fender and frame replaced . Over the years the dirt gets trapped between the fender and frame. I have my fenders off and I'm straightening them on my bench. I have a tig welder next to the bench and I made a cardboard template of the bolt hole area and weld in a new small section of metal. On the frame you have to replace a square section with two nuts and weld it in. I'm going to sand blast out the cavity and spray with galvanizing paint. Also, forward floor pans and rear fenders rust out. but all in all it's not too hard once you have done a few. A skim coat of bondo is all that is needed if you do a good job.
One more question for you. How do you weld the nuts to the metal patch? I was working on a birdhouse pole over the weekend and decided to weld a nut to the outside pipe union collar. I was going to add a bolt through the nut and collar to hold the inner pipe tight and it would be easy to remove. Well I went thru 4 nuts and bolts before I gave up. I welded the nut in three spots and then tried the bolt. It went in fine but then froze. Tried to turn it out but broke the bolt off. I cut it off and tried again this time just one small weld and waited for it to cool off - figured the heat warped the nut. Same thing, bolt went it part way and then got stuck. Next I thought I'd try to weld it with the bolt in the nut. Though it might act as a heat sink and there would be less distortion and also with the bolt in the hole I thought it would force the nut to keep its shape. Well that did not work either, could not get the bolt to go in or out all the way. The nut is relatively think compared to what you are welding, so you need a good amount of energy to weld to the nut. I cut off the bolt and nut again and tried a really light weld on each side of the nut, with the bolt in it, and left it to cool. Same issue, got it to move a few threads either way and then it locked up solid. Any ideas? I hope you have better luck than i did.
Last edited by ed B on Mon Jun 27, 2016 4:41 pm, edited 1 time in total.
1969 1600
-
pebbles
- Roadster Fanatic-Site Supporter
- Posts: 3925
- Joined: Thu Dec 16, 2010 12:00 am
- Location: Washington
Re: roadster painting advice needed
I found the fenders terribly difficult to work with off the car. But i had to replace them and repair some rust....C.Costine wrote:
Dave, what do you mean about the fenders are terribly imbalanced? I have mine off in order to weld new metal into them. They are a little awkward to handle due to size, but no more so than various pieces of furniture. Also what color code is your roadster?
I have a partially torn bicep tendon as well.
General Motors WA382E 1999 corvette pewter.
David
"When we were standing next to the motor while on the dyno, and the motor hit VVL, eyes went watery.."
"When we were standing next to the motor while on the dyno, and the motor hit VVL, eyes went watery.."
-
ed B
- Roadster Fanatic
- Posts: 454
- Joined: Thu Mar 26, 2015 8:40 pm
- Location: Albany NY
Re: roadster painting advice needed
The electric sander would save me the cost of getting a new and larger compressor (one I don't have room for anyhow at the moment), and certainly would keep the dust down much better. Does anyone know if there is a difference between "random orbit" and "dual action" sanders?mlwebb wrote:I got all my paint by mail from Southern Polyurethanes - excellent paint at reasonable prices, and the best epoxy primer out there (Google it). They also have a forum on their website with lots of diy advice. Being a woodworker, I used my Bosch 1250DEVS 6" random orbit for some of the sanding, usually with a soft pad. It has a vac hookup. But most of the sanding was with an assortment of hand blocks. I used an Eastwood Concourse gun.
1969 1600
-
mlwebb
- Roadster Fanatic
- Posts: 136
- Joined: Sat Dec 06, 2014 3:52 am
- Location: Eugene, Oregon
- Contact:
Re: roadster painting advice needed
In general, most dual action sanders are air sanders, other than the bosch I mentioned above. True dual actions add an eccentric or elliptical motion to the random orbit motion - which can be more aggressive, but take a lot of air. I did most of the rougher sanding by hand with 6-14" rubber or plywood blocks, and the finer stuff with the orbitals.
67 1600 > 2600
-
RustBucket
- Roadster Fanatic
- Posts: 207
- Joined: Sat May 10, 2014 12:17 am
- Location: Orange County, CA
- Model: 1500/1600
- Year: Low Windshield-64-67.5
Re: roadster painting advice needed
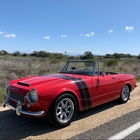
I setup a paint booth in my garage out of 2x4s and plastic sheeting. The red Stucco tape from Lowes is awesome to stick it all together. I think its easier to take off the doors, hood, trunk and sand/paint them separate. I used heater filters (3 I think) on one end and a door made from an old big box. I used two box fans to draw the air out of the booth. Having the air drawn out is very important otherwise if settles everywhere. I used buildable base. Lots of coats and sanding. DA and longer hand blocks. The DA will save you significant elbow grease time, especially removing the old coats. Borrow an air compressor if you can that will keep up. Use the black rattle can GuideCoat (Eastwood) to help you find the high/low spots in the base (very important). I used two part paint and clear coat. 4 coats of red and 4 coats of clear. As I recall it was urethane. I'm not that fond of urethane, but the local auto paint place recommended the base, red, and clear that all worked well together. I bough a two gun set from Eastwood and ended up using only one of them. The color goes on thin and dries very fast. It's difficult to get it to run. The clear is thick and will run slowly so be careful. I didn't get the base right the first time I tried and it made me a little depressed since I spent so long sanding that thing. I did it better the second time, though it's still not perfect. I posted some pictures here of my adventures.
Try number 1: http://www.h3.cc/index.php?d=main.php&gdir=110705Datsun
Try number 2: http://www.h3.cc/index.php?d=main.php&gdir=120721Datsun
I've decided autobody is not my thing, but I did enjoy the actual painting. I've left the booth frame up in my garage (much to my wife's chagrin), its great for hanging parts to dry and storing stuff on top of. It even kept the garage door off my freshly painted car when it fell off the track one day.
Good luck. H3
~~~~~~~~~~~~~~~~~~~~~~~~~~~~~~~~~~~~~~~~~~~~~~~~~~~~~~~~~~
67.5 1600
Orange County, CA
67.5 1600
Orange County, CA
-
pebbles
- Roadster Fanatic-Site Supporter
- Posts: 3925
- Joined: Thu Dec 16, 2010 12:00 am
- Location: Washington
Re: roadster painting advice needed
Sort of. Cut away the rust. Fab a piece that fits and clamp it in place. Fit the fender exactly where it will be forever. Mark the holes in the fabbed piece. Remove the clamps. Drill your holes in the fabbed piece and weld the nuts on the inside. Clamp it back in place and test fit the fender. Remove the fender and weld in the fabbed piece.ed B wrote:I'd be interested in knowing how you repair the area with the bolts. As I recall there are 2 bolts welded to the inside of the cavity there. Mine just has a hole there with no nuts. How do you locate the position of the nuts? Do you do it in 2 steps by say welding in a flat horizontal piece first and then reattach the fender in place and then draw holes on the underside of the plate, through the holes in the bottom of the fender, then drill holes and then weld the nuts?. And then step two, weld a new curved piece into the vertical area, to close up the hole?
I cut the horn bridges off of another body. The bolts and nuts are the same size.
Nice work there bucket!
You do not have the required permissions to view the files attached to this post.
David
"When we were standing next to the motor while on the dyno, and the motor hit VVL, eyes went watery.."
"When we were standing next to the motor while on the dyno, and the motor hit VVL, eyes went watery.."
-
ed B
- Roadster Fanatic
- Posts: 454
- Joined: Thu Mar 26, 2015 8:40 pm
- Location: Albany NY
Re: roadster painting advice needed
Good thinking on using a piece with the nuts already on it, If anyone out there has a piece like this I would be interested in making a deal with you! You can see in my earlier posts that I was not successful in welding the nuts for another project.pebbles wrote:Sort of. Cut away the rust. Fab a piece that fits and clamp it in place. Fit the fender exactly where it will be forever. Mark the holes in the fabbed piece. Remove the clamps. Drill your holes in the fabbed piece and weld the nuts on the inside. Clamp it back in place and test fit the fender. Remove the fender and weld in the fabbed piece.ed B wrote:I'd be interested in knowing how you repair the area with the bolts. As I recall there are 2 bolts welded to the inside of the cavity there. Mine just has a hole there with no nuts. How do you locate the position of the nuts? Do you do it in 2 steps by say welding in a flat horizontal piece first and then reattach the fender in place and then draw holes on the underside of the plate, through the holes in the bottom of the fender, then drill holes and then weld the nuts?. And then step two, weld a new curved piece into the vertical area, to close up the hole?
I cut the horn bridges off of another body. The bolts and nuts are the same size.
image.jpeg
Nice work there bucket!
BTW, I do not want to appear obtuse, but how do you clamp the piece in place and still be able to test fit the fender?
1969 1600
-
ed B
- Roadster Fanatic
- Posts: 454
- Joined: Thu Mar 26, 2015 8:40 pm
- Location: Albany NY
Re: roadster painting advice needed
Thanks for all the info, I am learning a lot and taking notes. Great pictures, the car turned out great and like the stripes too and the temp paint booth (good idea). Looks like a 67.5 car? I can't believe you did that in only 11 or 12 days!RustBucket wrote:I setup a paint booth in my garage out of 2x4s and plastic sheeting. The red Stucco tape from Lowes is awesome to stick it all together. I think its easier to take off the doors, hood, trunk and sand/paint them separate. I used heater filters (3 I think) on one end and a door made from an old big box. I used two box fans to draw the air out of the booth. Having the air drawn out is very important otherwise if settles everywhere. I used buildable base. Lots of coats and sanding. DA and longer hand blocks. The DA will save you significant elbow grease time, especially removing the old coats. Borrow an air compressor if you can that will keep up. Use the black rattle can GuideCoat (Eastwood) to help you find the high/low spots in the base (very important). I used two part paint and clear coat. 4 coats of red and 4 coats of clear. As I recall it was urethane. I'm not that fond of urethane, but the local auto paint place recommended the base, red, and clear that all worked well together. I bough a two gun set from Eastwood and ended up using only one of them. The color goes on thin and dries very fast. It's difficult to get it to run. The clear is thick and will run slowly so be careful. I didn't get the base right the first time I tried and it made me a little depressed since I spent so long sanding that thing. I did it better the second time, though it's still not perfect. I posted some pictures here of my adventures.
Try number 1: http://www.h3.cc/index.php?d=main.php&gdir=110705Datsun
Try number 2: http://www.h3.cc/index.php?d=main.php&gdir=120721Datsun
I've decided autobody is not my thing, but I did enjoy the actual painting. I've left the booth frame up in my garage (much to my wife's chagrin), its great for hanging parts to dry and storing stuff on top of. It even kept the garage door off my freshly painted car when it fell off the track one day.
Good luck. H3
1969 1600
-
ed B
- Roadster Fanatic
- Posts: 454
- Joined: Thu Mar 26, 2015 8:40 pm
- Location: Albany NY
Re: roadster painting advice needed
Thanks for the info.mlwebb wrote:In general, most dual action sanders are air sanders, other than the bosch I mentioned above. True dual actions add an eccentric or elliptical motion to the random orbit motion - which can be more aggressive, but take a lot of air. I did most of the rougher sanding by hand with 6-14" rubber or plywood blocks, and the finer stuff with the orbitals.
1969 1600
-
pebbles
- Roadster Fanatic-Site Supporter
- Posts: 3925
- Joined: Thu Dec 16, 2010 12:00 am
- Location: Washington
Re: roadster painting advice needed
Clamp the lip.
You do not have the required permissions to view the files attached to this post.
David
"When we were standing next to the motor while on the dyno, and the motor hit VVL, eyes went watery.."
"When we were standing next to the motor while on the dyno, and the motor hit VVL, eyes went watery.."
-
ed B
- Roadster Fanatic
- Posts: 454
- Joined: Thu Mar 26, 2015 8:40 pm
- Location: Albany NY
Re: roadster painting advice needed
pebbles wrote:Clamp the lip.
image.jpeg
Got it, thanks for the photo!
1969 1600
-
kndroy
- Roadster Nut
- Posts: 70
- Joined: Mon Aug 17, 2015 10:36 am
- Location: Kern Co. Ca.
Re: roadster painting advice needed
This is a very helpful thread because I'm getting ready to fix my fender and frame and nice work that I'm seeing.
For the frame section where the fenders bolt, I'm planning on doing it in two sections. I'm going to weld in a strip of sheet where the nuts are welded to, temporarily mount fender and mark the holes, drill and weld on the nuts. Then do a second piece of sheet above that to close off the cavity. Of course easier said than done but it should work and because it's hidden behind the fender, it doesn't have to be perfect. I more worried about burning though crappy old metal and making a mess.
For the frame section where the fenders bolt, I'm planning on doing it in two sections. I'm going to weld in a strip of sheet where the nuts are welded to, temporarily mount fender and mark the holes, drill and weld on the nuts. Then do a second piece of sheet above that to close off the cavity. Of course easier said than done but it should work and because it's hidden behind the fender, it doesn't have to be perfect. I more worried about burning though crappy old metal and making a mess.
-
ed B
- Roadster Fanatic
- Posts: 454
- Joined: Thu Mar 26, 2015 8:40 pm
- Location: Albany NY
Re: roadster painting advice needed
Great minds think alike - that is the way I originally thought I'd do it. When you weld the nuts to the plate please pass on some feedback to me. I had no luck in getting the bolts to thread through after it was welded. I think the heat of the weld distorted the thread or hole shape.kndroy wrote:This is a very helpful thread because I'm getting ready to fix my fender and frame and nice work that I'm seeing.
For the frame section where the fenders bolt, I'm planning on doing it in two sections. I'm going to weld in a strip of sheet where the nuts are welded to, temporarily mount fender and mark the holes, drill and weld on the nuts. Then do a second piece of sheet above that to close off the cavity. Of course easier said than done but it should work and because it's hidden behind the fender, it doesn't have to be perfect. I more worried about burning though crappy old metal and making a mess.
1969 1600
-
zippy67roadster

- Roadster Fanatic-Site Supporter
- Posts: 1396
- Joined: Tue Dec 08, 2009 4:43 pm
- Location: Cameron, Texas
- Model: 1500/1600
- Year: Low Windshield-64-67.5
- Contact:
Re: roadster painting advice needed
I welded in a patch panel at the bottom of the rocker where the fender is bolted then I made another piece with new nuts welded to it. I marked everything with the fender in place and then drilled holes in the first patch for the nuts to set in and then welded the second piece with the nuts attached to it. This made lining up the fender easier and made the patched area twice as thick.
1967 Datsun SPL311-08935-vintage race car
1967 Datsun SPL311-10123 project
1967 Datsun 411 wagon
67.5 SPL311 Vintage Race car project
64 NL320 Pickup Truck
Brian
http://www.sincitydatsuns.com
https://www.facebook.com/sincitydatsuns
1967 Datsun SPL311-10123 project
1967 Datsun 411 wagon
67.5 SPL311 Vintage Race car project
64 NL320 Pickup Truck
Brian
http://www.sincitydatsuns.com
https://www.facebook.com/sincitydatsuns