Page 1 of 1
Step #1 on the dash replacement
Posted: Sat Apr 23, 2016 11:05 pm
by Andy_In_SD
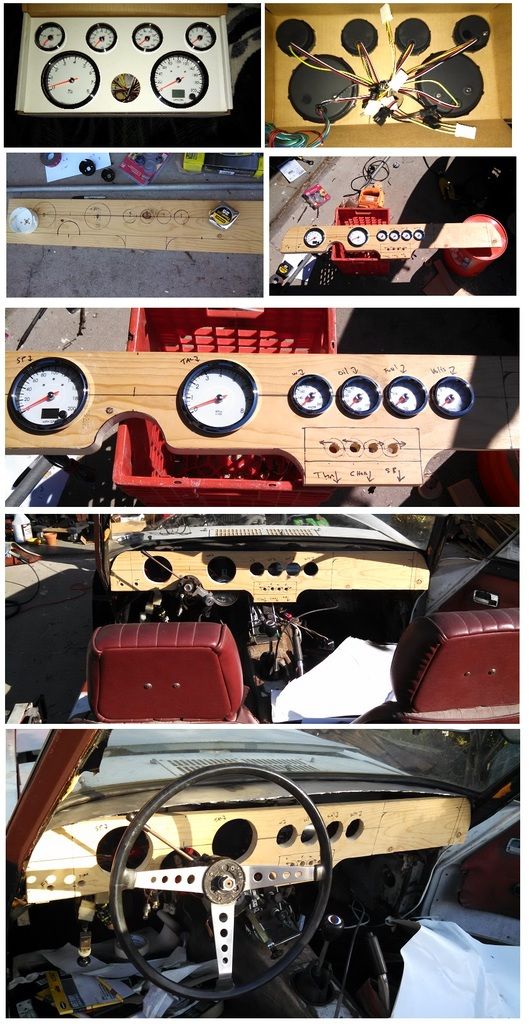
Step #1 is to make a pine template of the new dash. I did that last weekend. Here's a couple of pics on it. I've also already cut and formed the new steel for the top of the dash.
I am going to pull the old dash lights, gauges and gauge wiring out. There are about 4 more pieces of wood to cut and form in order to complete the template. All gauges / swtches etc... will be mounted on the template and it will be installed. I will keep that in place for about 2 weeks to see if I like it, or need to move anything around.
Once I am satisfied, I will then remove the whole thing. Then I will disassemble the pine template and use it to mark out the zebra wood which will be the real thing.
I would sooner hate, change, pitch 20 bucks in pine than a whole lot more in zebra wood.
This is from last weekend, hopefully I'll have time on it tomorrow.
Re: Step #1 on the dash replacement
Posted: Sat Apr 23, 2016 11:16 pm
by spl310
That will definitely have a british flavor to it.
Re: Step #1 on the dash replacement
Posted: Sun Apr 24, 2016 12:47 am
by fj20spl311
I assume you want guidance.....LOL
That's what I do best.....
I think you should move the oil pressure gauges between the speedo and tac a little above the center line.
I would put the fuel gauge on the far left and add 2 5/8 clock to the right.
Re: Step #1 on the dash replacement
Posted: Sun Apr 24, 2016 1:27 am
by Andy_In_SD
Thanks Phil,
Looking at it, I now see the spot between the speedo / tach as a big empty and it should have something (oil would make sense). I'll move the fuel as well. I may not add a clock, but rather use the extra area to position the other 3 better. The area for 4 gauges is perhaps a bit squishy.
The other 3 could go...
Fuel, Temp, Volts
Re: Step #1 on the dash replacement
Posted: Sun Apr 24, 2016 2:16 am
by fj20spl311
Fuel is the least referenced gauge...no need for it to be first.
Temp is more important than Volts.
Re: Step #1 on the dash replacement
Posted: Sun Apr 24, 2016 2:50 am
by Andy_In_SD
We all stress temp with aluminum heads on old cast blocks

Re: Step #1 on the dash replacement
Posted: Sun Apr 24, 2016 10:22 am
by fj20spl311
FYI,
Autometer has a custom gauge App that allows you to customize their gauges and apply them to a virtual dash. It allows you to move them around. You can also print the gauge faces in actual size to cut out and tape on your dash. Its a little bit of a learning curve to get started, but they save your ideas.
http://www.ampcustomshop.com
Re: Step #1 on the dash replacement
Posted: Sun Apr 24, 2016 12:17 pm
by Andy_In_SD
I took a look, nice site, nice gauges! Very cool
Re: Step #1 on the dash replacement
Posted: Thu Apr 28, 2016 1:02 pm
by andyroo
Very cool. What do you plan on using for the center toggle switches? OEM?
Re: Step #1 on the dash replacement
Posted: Thu Apr 28, 2016 7:29 pm
by Kman
Good start. I will also be converting my 69 to a flat dash. Probably walnut. Are you padding the top?
Re: Step #1 on the dash replacement
Posted: Thu Apr 28, 2016 10:04 pm
by Andy_In_SD
andyroo - yes I am planning on a set of 67.5 or prior stock with the face plate. I'll then wire them up appropriately. Below them, I'll have the throttle & choke. The wood where it stops above the console will actually extend down to the trans tunnel (haven't fabricated yet). There will also be a 45 degree (towards the firewall) roughly 2" piece of wood at the bottom of the dash along the length. That will be a bit deeper than 2" at the ends so it bolts onto the existing dash to body bolt ups. The seam between the dash and that 2" part will be hand planed & sanded to be curved.
Kman, yes I'm going to pad it. I am slowly building my order for the interior, I'll be doing all of the interior myself including new seat covers, everything. The plan is red interior with orange stitching to go with the black body. The dash will be foam padded, roughly 3/8" thick on top of the metal and rounded over the lip so it has a similar "feel" to the earlier dashes.
I've been doing test sheets of steel to get the paint / clear combo I want to do. Currently thinking 2 light coats black, hand sand 400,800,1000. Repeat the 2 coats black and sanding. Then repeat again with clear twice (with 800,1000).
Re: Step #1 on the dash replacement
Posted: Thu Apr 28, 2016 11:36 pm
by fj20spl311
Just an Idea, maybe just for your test mule is to use the pull switches from your late dash. They look good and the wiring in a piece of cake.