Front leaf spring bushings
Moderators: notoptoy, S Allen, Solex68
-
PandaSmash
- Roadster Newby
- Posts: 12
- Joined: Wed Dec 24, 2014 10:15 am
- Location: Fillmore, CA
- Model: 1500/1600
- Year: Low Windshield-64-67.5
Front leaf spring bushings
So Datsunparts.com has stopped selling the front bushings separately and Rallye wants $234.15 for the pair for factory bushings. Does anyone have a suggestion for an alternative? I tried searching the forums without much success, and the springs have already be re-arched so I'd rather not get a new pair.
-
pebbles

- Roadster Fanatic-Site Supporter
- Posts: 3931
- Joined: Thu Dec 16, 2010 12:00 am
- Location: Washington
Re: Front leaf spring bushings
There must be an off road urethane/jeep alternative.
David
"When we were standing next to the motor while on the dyno, and the motor hit VVL, eyes went watery.."
"When we were standing next to the motor while on the dyno, and the motor hit VVL, eyes went watery.."
-
fj20spl311

- Roadsteraholic
- Posts: 5038
- Joined: Mon Nov 28, 2005 3:54 pm
- Location: San Diego, Ca
Re: Front leaf spring bushings
Phil
67.5 SRL311-00148 Blue (FJ cruiser VOODOO Blue)
67.5 SPL311 FJ20E teal SDS EFI
69 SRL311 SOLD
19 Raptor SCAB
67.5 SRL311-00148 Blue (FJ cruiser VOODOO Blue)
67.5 SPL311 FJ20E teal SDS EFI
69 SRL311 SOLD
19 Raptor SCAB
-
msampsel

- Roadster Nut-Site Supporter
- Posts: 1812
- Joined: Mon Jul 14, 2014 5:31 pm
- Location: SoAZ
Re: Front leaf spring bushings
Are you looking for the bushings for the leaf springs?PandaSmash wrote:So Datsunparts.com has stopped selling the front bushings separately and Rallye wants $234.15 for the pair for factory bushings. Does anyone have a suggestion for an alternative? I tried searching the forums without much success, and the springs have already be re-arched so I'd rather not get a new pair.
If so there is a set available for 48 bucks. At Deans.
-
PandaSmash
- Roadster Newby
- Posts: 12
- Joined: Wed Dec 24, 2014 10:15 am
- Location: Fillmore, CA
- Model: 1500/1600
- Year: Low Windshield-64-67.5
Re: Front leaf spring bushings
I've read through both that thread and the one linked from there already. They're more talking about making them than an off the shelf alternative and I'm not sure I'm entirely comfortable with an aluminum or delrin solid bushing.fj20spl311 wrote:Start here
http://www.311s.org/phpBB3/viewtopic.ph ... NG#p204262
The set for $48 is for the rear at the shackle, I'm talking about the front bushings which have been removed from the site individually and no longer come in the kits unless you're buying new springs.msampsel wrote:Are you looking for the bushings for the leaf springs?
If so there is a set available for 48 bucks. At Deans.
-
dbrick
- Roadster Fanatic-Site Supporter
- Posts: 10084
- Joined: Thu Sep 09, 2004 11:05 pm
- Location: Kenilworth, New Jersey
Re: Front leaf spring bushings
How bad are they or are they gone?? There is so little rubber in there it isn't much room for it to move around wear out.
Dave Brisco
Take my advice, I'm not using it"
66 2000 The Bobster
64 1500 in pieces for sale
1980 Fiat X1/9
2009 Volvo C-70
08 Expedition EL, STUPID huge but comfy
1962 Thompson Sea Lancer, possible money pit
-
punkzdriver
- Roadster Fanatic
- Posts: 256
- Joined: Mon Jun 04, 2012 12:51 pm
- Location: Long Island New York
Re: Front leaf spring bushings
I think I have a brand new pair that I bought last spring/summer to have my mechanic friend install on my car when I switched to the earlier rear springs. I was going to have him install them but he didnt want to bother with pressing the old ones out, and the new ones in. I would debate selling them. PM me.
Waiting for the bugs to be worked out...
-
ZeroNilNada
- Roadster Fanatic-Site Supporter
- Posts: 193
- Joined: Wed Mar 26, 2008 1:08 pm
- Location: Andover, Kansas
- Model: 1500/1600
- Year: Low Windshield-64-67.5
Re: Front leaf spring bushings
Hi all. Reviving an old post.
My front bushings had the rubber literally melt out of them. Based on the goo on the ground, it doesn’t appear to be from heat but, rather, a chemical reaction. Now my bushings are simply two empty cylinders. Metal on metal.
Dean has the parts back on datsunparts.com for $175 a pair and clearly states they’re vulcanized rubber and not polyurethane. I am absolutely certain that the ones I had installed were from Dean and I do not want to buy the same thing for them to go bad again. Especially at that price.
I, too, have been searching for an aftermarket replacement without luck. Any more insight would be greatly appreciated.
Mannon
1966 SPL311 02870
-
theunz
- Roadster Nut-Site Supporter
- Posts: 2469
- Joined: Sat May 02, 2009 1:54 pm
- Location: Catoosa Ok.
- Model: 2000
- Year: High Windshield-68-70
Re: Front leaf spring bushings
If you don’t find a solution before LGGPR I have a spare set of leafs you can use until you find something. I could even meet you about half way, say Perry Oklahoma or so. No excuses for missing Lake Garnett this year!!
Mike M
Old enough to know better, too old to remember why!
1969 2000 solex mine since 1972, under resurrection. (Finally resurrected as of spring 2019!)
1969 Porsche 911s -worth more, but not as valuable! Gone!
2017 Lotus Evora 400 - Oh my!!
Old enough to know better, too old to remember why!
1969 2000 solex mine since 1972, under resurrection. (Finally resurrected as of spring 2019!)
1969 Porsche 911s -worth more, but not as valuable! Gone!
2017 Lotus Evora 400 - Oh my!!
-
ZeroNilNada
- Roadster Fanatic-Site Supporter
- Posts: 193
- Joined: Wed Mar 26, 2008 1:08 pm
- Location: Andover, Kansas
- Model: 1500/1600
- Year: Low Windshield-64-67.5
Re: Front leaf spring bushings
Thanks, Mike! Sorry I didn't reply sooner. I forgot to since we talked elsewhere.
I figured out a solution (I hope).
After a long and fruitless search for alternate bushings, I ended up ordering a polyurethane kit and re-pouring the bushings myself using the original cylinders.
They're not real attractive but I think they turned out pretty well and I'm 100% sure they're better than the ones with NO rubber in them!
If anyone is interested in the whole story (with pictures and videos), just let me know and I'll post some information.
Mannon
1966 SPL311 02870
-
tjp

- Site Supporter
- Posts: 2587
- Joined: Wed Aug 20, 2008 5:49 am
- Location: Midwest
- Model: 2000
- Year: High Windshield-68-70
Re: Front leaf spring bushings
As long as this reply of mine doesn't get deleted for no provided reason, I think that your story with videos should be saved to this site.ZeroNilNada wrote: Mon Sep 04, 2023 5:39 pm
I figured out a solution (I hope).
After a long and fruitless search for alternate bushings, I ended up ordering a polyurethane kit and re-pouring the bushings myself using the original cylinders.
They're not real attractive but I think they turned out pretty well and I'm 100% sure they're better than the ones with NO rubber in them!
If anyone is interested in the whole story (with pictures and videos), just let me know and I'll post some information.
Mannon
My junk pile:
71 Jeep Gladiator. Restored w/#s matching engine. My WeeBeasty
70 1600 legit 2nd owner. Stroked and bored
Several salvaged w access to a barn full of parts, part cars & whole cars
......What's in the barn is for sale. What do you need?
71 Jeep Gladiator. Restored w/#s matching engine. My WeeBeasty
70 1600 legit 2nd owner. Stroked and bored
Several salvaged w access to a barn full of parts, part cars & whole cars
......What's in the barn is for sale. What do you need?
-
23yrRebuild
- Roadster Fanatic-Site Supporter
- Posts: 1161
- Joined: Sat Oct 25, 2003 2:19 pm
- Location: 3rd rock from the sun
- Model: 1500/1600
- Year: Low Windshield-64-67.5
Re: Front leaf spring bushings
"I think that your story with videos should be saved to this site."
+1...I agree, thanks in advance
+1...I agree, thanks in advance
Mike - '67 Stroker / 5-Speed
-
Gregs672000

- Roadster Fanatic-Site Supporter
- Posts: 9428
- Joined: Fri Aug 07, 2009 11:47 pm
- Location: Tacoma, WA
Re: Front leaf spring bushings
Guess I'm wondering how enough chemical sat on the originals to have them literally melt away. I've seen degradation of various rubbers etc over the years (suspension boots come to mind) but nothing as robust as a bushing. Neither the originals in my old comp springs nor the replacements (surely from Dean many years ago) in my Flexforms have ever shown any issues.
Greg Burrows
'67 2000 #588
Tacoma, WA
'67 2000 #588
Tacoma, WA
-
Datsunparts.comInc
- Roadsteraholic
- Posts: 926
- Joined: Fri Nov 16, 2012 11:17 am
Re: Front leaf spring bushings
The ones we have are vulcanized US made bushings, Never had a return or issueZeroNilNada wrote: Sun Aug 20, 2023 1:53 pm Hi all. Reviving an old post.
My front bushings had the rubber literally melt out of them. Based on the goo on the ground, it doesn’t appear to be from heat but, rather, a chemical reaction. Now my bushings are simply two empty cylinders. Metal on metal.
Dean has the parts back on datsunparts.com for $175 a pair and clearly states they’re vulcanized rubber and not polyurethane. I am absolutely certain that the ones I had installed were from Dean and I do not want to buy the same thing for them to go bad again. Especially at that price.
I, too, have been searching for an aftermarket replacement without luck. Any more insight would be greatly appreciated.
Mannon
https://datsunparts.com/collections/sus ... 9263301816
I have some NOS Nissan for $200.00 a pair
When you see a lined out higher price next to our lower price, that is someone else sale price! 2981 active parts 2025 Inventory piece count- 10,155 parts on hand! "Shop A Movie" at our web-site
-
ZeroNilNada
- Roadster Fanatic-Site Supporter
- Posts: 193
- Joined: Wed Mar 26, 2008 1:08 pm
- Location: Andover, Kansas
- Model: 1500/1600
- Year: Low Windshield-64-67.5
Re: Front leaf spring bushings
Hello all. Sorry for the slow response. I've had stuff keeping me busy.
I'll begin with a text writeup then I'll post pictures. I do have some videos that I have put on YouTube. Links at the very bottom.
OK, first, my experience may be unique. However, because I can't be sure what caused the problem and the ones I bought were from Dean's store, I didn't want a repeat. I am not suggesting that the parts are faulty or sub-par. I just don't want to do this again in a few years.
Second, I searched high and low online to see if there were any off-the-shelf replacements but my experience was that if I found the right length, the ID or OD didn't match. Or if the OD was correct, the ID and/or length weren't compatible, etc.
I watched a number of videos on YouTube on creating homemade polyurethane bushings but most of them were more for what goes in the rear eye of the leaf spring. I figured I could adapt the two to come up with a solution.
My bushings had the rubber literally run out of them in a sticky goo. It took a while to figure out where it was coming from. At first I assumed it was some cavity wax that was melting in the hot midwest sun but the residue on the floor wouldn't harden like wax. It would "dry" to a consistency of used gum. I could peel it off my shop floor pretty easily with a putty knife.
Because there was no rubber to speak of between the inner and outer metal cylinders, it was fairly easy to clean them off to prep them for the replacement. I was able to use brake cleaner as the primary solvent and that made me wonder if the rubber didn't get cured fully because I don't think that brake cleaner would dissolve a hardened rubber. I may be wrong.
I boogered up my "sleeves" a little bit trying to get them out without removing the spring but I ended up just doing the right thing and pressing them out properly. Nothing so bad as to make them unusable. I smoothed out the rough spots then "scuffed" up the outside of the inner cylinder and the inside of the outer cylinder (where the poly would be poured).
I needed a way to hold the parts so I designed in CAD a stand that would do two things: One, hold the two cylinders concentric to one another and, Two, hold the inner cylinder below the upper cylinder since it's longer. I took the difference of the two lengths and divided by two to give me the proper offset. I also lined the bottom with some simple plastic wrap to ensure that the poly didn't stick to my 3D printed parts. Not that I needed to save them, I just didn't want the hassle of trying to peel them off. The plastic was an easy thing to remove.
Based on one video, I bought a Smooth-On trial set of Poly from Douglas and Sturgess (PMC-770 or Shore hardness 70). It cost $43.75 plus $20.00 shipping. I didn't find any store that offered the poly kits that didn't have about a $20 shipping fee (if you find one that doesn't, don't tell me). The directions were clear and straightforward. 2 parts A, one part B, mix well.
Here's a link: https://douglasandsturgess.com/products ... 88ea&_ss=r
I didn't want the poly to run into the inner cylinder so I just plugged it with a wad of paper towel. It actually came in handy because I was then able to pour over that plug and the poly would run into the gap. It's a very small gap and the time to fill was quite long.
I also borrowed a vacuum chamber from a friend to de-gas the poly after mixing. This meant more time for the poly to sit before pouring. That created some minor inconveniences. For example, the poly tends to set faster in a higher temperature setting. My shop is not cool in the summer. I thought I had started early enough in the morning but it was apparent that my prep time took longer than I anticipated and by the time I got the poly mixed, the temperatures were nearing the mid 80s. I would definitely suggest doing this in a cool environment.
Once I was satisfied that the poly was degassed enough, I began my pour. I used paper cups because I could bend the rim into a spout. That worked great for the first bushing. However, by the time I got to the second bushing, it was beginning to thicken. It was the consistency of cool honey. It still poured but the final 0.1" or so got kind of rough. I poked some down in with my stir stick (a plastic knife) just to be sure it was near the top and I was satisfied it was fine.
After it sat (16 hours is the recommended time), I then put them in my oven at 170 degrees F for 4 hours. The recommended temperature is 150 but my oven doesn't go that low. According to the instructions the poly can be baked up to 8 hours. It states it "improves the performance" or something to that effect. I thought it may have been good enough as-is but I baked it anyway. Some on YouTube say that it will stink when baking but I didn't notice any real smell.
I've had them in the car since Saturday so that's not very much time to have any real testing time but I can say that they sure feel better than the ones without any rubber.
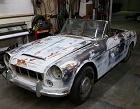
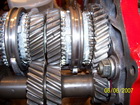
Here are my pictures.
This is what I was seeing on the shop floor. It's sticky so dust sticks to it quite easily: Here is a picture of one of the bushings on the car. The drip is pretty clear but because I didn't suspect it coming from there it took me a while to figure it out: This is my setup prior to pouring: This is the vacuum chamber I borrowed: The first bushing after the pour: The second bushing: Both bushings with the offset for the inner cylinder visible: After baking (no real difference seen or noted): Installed in the leaf eye. There is still a bit of old rubber on the eye but I didn't bother to clean it off. Videos:
https://youtu.be/4ZjRLuzY30Q?si=uMdpGW9T3r4EPX-s
https://youtu.be/YU_ON0S5OCg?si=cjC03ePMy5eZf5SB
I'll begin with a text writeup then I'll post pictures. I do have some videos that I have put on YouTube. Links at the very bottom.
OK, first, my experience may be unique. However, because I can't be sure what caused the problem and the ones I bought were from Dean's store, I didn't want a repeat. I am not suggesting that the parts are faulty or sub-par. I just don't want to do this again in a few years.
Second, I searched high and low online to see if there were any off-the-shelf replacements but my experience was that if I found the right length, the ID or OD didn't match. Or if the OD was correct, the ID and/or length weren't compatible, etc.
I watched a number of videos on YouTube on creating homemade polyurethane bushings but most of them were more for what goes in the rear eye of the leaf spring. I figured I could adapt the two to come up with a solution.
My bushings had the rubber literally run out of them in a sticky goo. It took a while to figure out where it was coming from. At first I assumed it was some cavity wax that was melting in the hot midwest sun but the residue on the floor wouldn't harden like wax. It would "dry" to a consistency of used gum. I could peel it off my shop floor pretty easily with a putty knife.
Because there was no rubber to speak of between the inner and outer metal cylinders, it was fairly easy to clean them off to prep them for the replacement. I was able to use brake cleaner as the primary solvent and that made me wonder if the rubber didn't get cured fully because I don't think that brake cleaner would dissolve a hardened rubber. I may be wrong.
I boogered up my "sleeves" a little bit trying to get them out without removing the spring but I ended up just doing the right thing and pressing them out properly. Nothing so bad as to make them unusable. I smoothed out the rough spots then "scuffed" up the outside of the inner cylinder and the inside of the outer cylinder (where the poly would be poured).
I needed a way to hold the parts so I designed in CAD a stand that would do two things: One, hold the two cylinders concentric to one another and, Two, hold the inner cylinder below the upper cylinder since it's longer. I took the difference of the two lengths and divided by two to give me the proper offset. I also lined the bottom with some simple plastic wrap to ensure that the poly didn't stick to my 3D printed parts. Not that I needed to save them, I just didn't want the hassle of trying to peel them off. The plastic was an easy thing to remove.
Based on one video, I bought a Smooth-On trial set of Poly from Douglas and Sturgess (PMC-770 or Shore hardness 70). It cost $43.75 plus $20.00 shipping. I didn't find any store that offered the poly kits that didn't have about a $20 shipping fee (if you find one that doesn't, don't tell me). The directions were clear and straightforward. 2 parts A, one part B, mix well.
Here's a link: https://douglasandsturgess.com/products ... 88ea&_ss=r
I didn't want the poly to run into the inner cylinder so I just plugged it with a wad of paper towel. It actually came in handy because I was then able to pour over that plug and the poly would run into the gap. It's a very small gap and the time to fill was quite long.
I also borrowed a vacuum chamber from a friend to de-gas the poly after mixing. This meant more time for the poly to sit before pouring. That created some minor inconveniences. For example, the poly tends to set faster in a higher temperature setting. My shop is not cool in the summer. I thought I had started early enough in the morning but it was apparent that my prep time took longer than I anticipated and by the time I got the poly mixed, the temperatures were nearing the mid 80s. I would definitely suggest doing this in a cool environment.
Once I was satisfied that the poly was degassed enough, I began my pour. I used paper cups because I could bend the rim into a spout. That worked great for the first bushing. However, by the time I got to the second bushing, it was beginning to thicken. It was the consistency of cool honey. It still poured but the final 0.1" or so got kind of rough. I poked some down in with my stir stick (a plastic knife) just to be sure it was near the top and I was satisfied it was fine.
After it sat (16 hours is the recommended time), I then put them in my oven at 170 degrees F for 4 hours. The recommended temperature is 150 but my oven doesn't go that low. According to the instructions the poly can be baked up to 8 hours. It states it "improves the performance" or something to that effect. I thought it may have been good enough as-is but I baked it anyway. Some on YouTube say that it will stink when baking but I didn't notice any real smell.
I've had them in the car since Saturday so that's not very much time to have any real testing time but I can say that they sure feel better than the ones without any rubber.
Here are my pictures.
This is what I was seeing on the shop floor. It's sticky so dust sticks to it quite easily: Here is a picture of one of the bushings on the car. The drip is pretty clear but because I didn't suspect it coming from there it took me a while to figure it out: This is my setup prior to pouring: This is the vacuum chamber I borrowed: The first bushing after the pour: The second bushing: Both bushings with the offset for the inner cylinder visible: After baking (no real difference seen or noted): Installed in the leaf eye. There is still a bit of old rubber on the eye but I didn't bother to clean it off. Videos:
https://youtu.be/4ZjRLuzY30Q?si=uMdpGW9T3r4EPX-s
https://youtu.be/YU_ON0S5OCg?si=cjC03ePMy5eZf5SB
You do not have the required permissions to view the files attached to this post.
1966 SPL311 02870