Page 2 of 10
Re: Ok, the official build thread of the budget roadster is
Posted: Wed May 19, 2010 4:29 pm
by notoptoy
Looking good, I understand all the hard work that goes into cleaning the parts up for painting. You're smart not to get impatient and handle them sooner - I have paid the price for this in my engine compartment re-paint! A lot of hard work was ruined by not wanting to wait for the right conditions. Thanks for sharing!
Re: Ok, the official build thread of the budget roadster is
Posted: Wed May 19, 2010 5:54 pm
by Tomakze
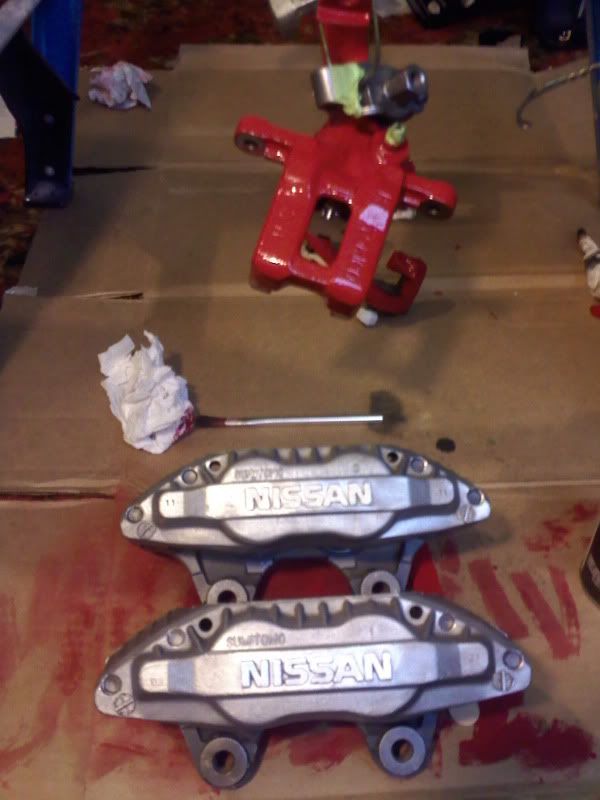
THE RIGHT CALIPER IS FINALLY HERE!!!!!
you have no idea how excited i am about this. I went to Advanced Auto Parts after making the last post just in case the caliper actually arrived on time. I was totally expecting another wrong/messed up caliper... but i opened the box and found a nice, OEM aluminum caliper with "nissan" across the front! I literally yelled "whoo-hoo!!!" and threw my arms into the air. after 3 calipers, 2 stores, about 2 hours on the phone with Rock Auto, and shipping calipers back, let me tell you; it was a relief.
and yeah, waiting for paint to cure is so important! I cant even tell you how many projects i have screwed up because i didnt wait long enough. but after messing up about 100 paint jobs, i finally learned my lesson!

Re: Ok, the official build thread of the budget roadster is
Posted: Mon Oct 04, 2010 7:27 pm
by Tomakze
Sorry I haven't posted anything for so long, I have been really busy with other things. This may be off topic, but I wanted to show you guys what I have been doing since my last post, and I assure you the Datto is next in line on the to do list.
I restored my Mom's old '83 Yamaha XT200 dirtbike, which she had since it was new. She gave it to me a couple years ago, but it is too small for me to really be able to use, so I sold it to my cousin, who is just learning how to ride. Before selling it however, I brought it back to its original glory:

Me riding it in the mountains. This is a "before" pic.

Tearing it down and sanding it. My little brother is helping with the process.

The gas tank after painting and applying decals. I just used a rattle can, and put about 12 coats of paint on it.

Finished product!!! It looks so good!
After selling it, I needed a bike more suitable for my riding ability, so I bought my Dad's old ATK 440 (american made dirt bike!)

This is the "before" picture. I took this pic immediately after riding it home. (It didn't make it though, and broke down. Long story...)

After cleaning it up and fixing it... for the second time. (facepalm)
I decided it needed more style, plus I can't leave anything stock... its a habit of mine to change things once I buy them! Here is what it looked like after many hours of work!

After all that work, I got to play!

I am planning on beginning the brake swap (finally!) next week. Look for updates! I unfortunately lost my job last week, and as unfortunate as that is, it means I might find the time to actually work on my baby. Hopefully despite the bad economy, I will find work again soon! Wish me luck!
Re: Ok, the official build thread of the budget roadster is
Posted: Sat Oct 09, 2010 3:56 am
by Tomakze
Time to get this project moving again! I plan on beginning the process of swapping the front brakes this weekend. I will try to remember to take pictures of the process, and post an update soon. In the meantime, I visited the junkyard earlier this week and found a '89 240sx with the digital dash and HUD! So, like any self respecting junk collector, I bought the gauges and HUD... for a total of $16! It got me thinking what it might look like in the car, so after some photoshop magic, I came up with this:
The original image I used is at the beginning of this topic. I'm still not sure if this is what I want to do, but I really like how it looks. Tell me what you think!
Re: Ok, the official build thread of the budget roadster is
Posted: Sat Oct 09, 2010 9:37 am
by notoptoy
Not my style, but if done as nicely as your photoshop shows, it would look professional and pretty darn good.
Re: Ok, the official build thread of the budget roadster is
Posted: Tue Oct 12, 2010 12:15 am
by Tomakze
notoptoy wrote:Not my style, but if done as nicely as your photoshop shows, it would look professional and pretty darn good.
Thanks! We will see what actually happens, for now it is all theoretical. I don't even know if there is enough room in the dash for the new cluster! I did look at where the HUD would go, and there is definitely no room to the left of the gauges. If I were to use the HUD, it would HAVE to go in the middle of the dash. I'm still not sure how that would look...
As for the brakes, however, I have made massive progress this weekend! I have the rotors on the hubs, repacked the bearings, and the calipers are mounted and painted! I also installed the firewall brace, and test fit the new master cylinder! Then, I removed all the ancient brake lines, and decided on how to route the new ones. I am going to run the rear brake line down the left side of the car as opposed to the right, and I will run the front line into the left fender well where I will mount a T-fitting to split them. I like Spriso's idea of cleaning up the brake line mess! WOW, are there a lot of lines going back and forth on the firewall! They are a pain to fish out, too. Not to mention several of them were stripped, and all of them were seized. I'm pretty sure they were the factory brake lines!!! Based on how they look, I would say some of them haven't moved since the car was new, too... I will have pictures of everything hopefully tomorrow. I'm pretty excited!
Re: Ok, the official build thread of the budget roadster is
Posted: Tue Oct 12, 2010 7:36 am
by notoptoy
I agree on the brake lines, I did re-route mine as well. I wanted to do the rear down the left, but didn't. Mymain concern was running the brake line safely away from the heat of the exhaust, but otherwise just didn't tackle it! For some ideas you might want to check out this:
http://www.311s.org/phpBB3/viewtopic.ph ... rake+Lines" onclick="window.open(this.href);return false;
Re: Ok, the official build thread of the budget roadster is
Posted: Wed Oct 13, 2010 4:10 am
by Tomakze
As promised, here is a brief update!
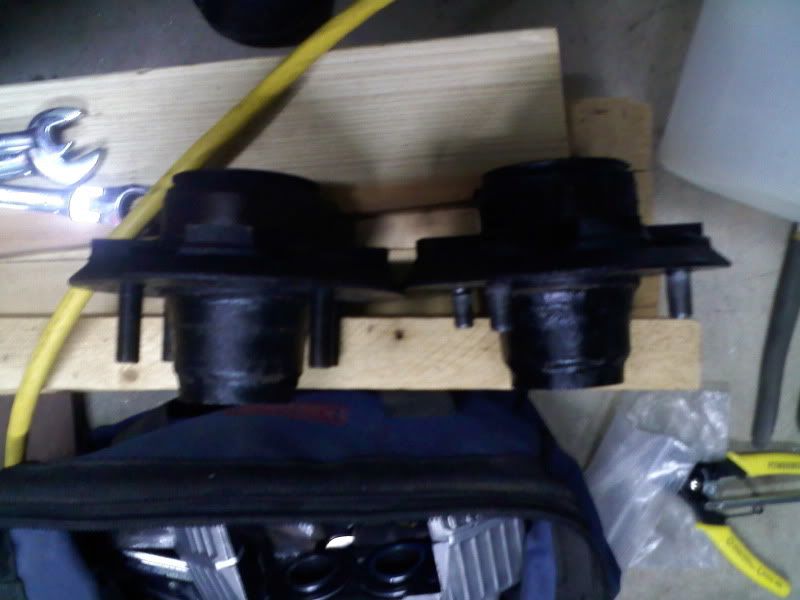
New studs, quite a bit longer! Good thing too, because my wheels will require a spacer for them to fit now... I got a 5mm spacer on order, so no big deal I guess. I was hoping I wouldn't have to do that though!
The bolts I got from Fastenal to mount the rotors to the hubs were about 1/4" too long, so I had to massage them a bit... Saved me from having to get new ones, so thats always good!
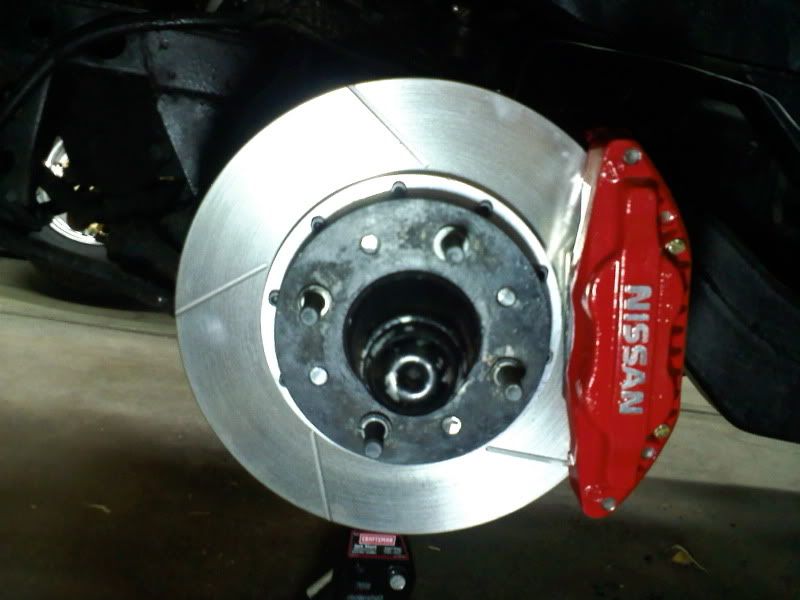
This image is practically pornographic to me! Those brakes are downright sexy now! I can't wait to see how well they work!
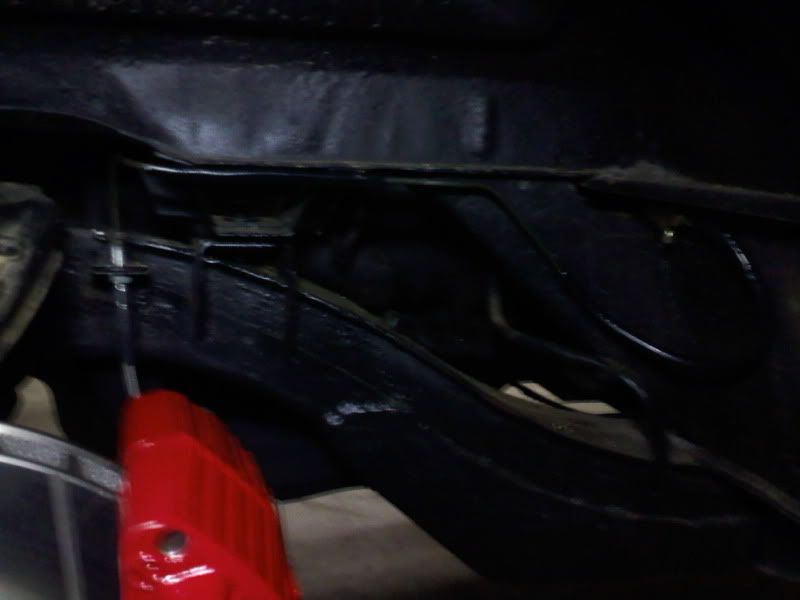
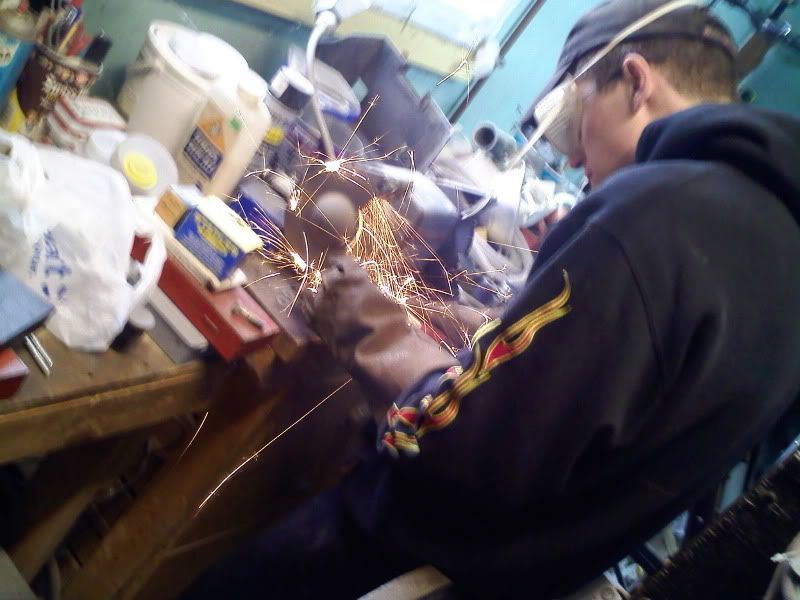
My first attempt at running brake lines! It took about 4 attempts to figure out how to get a good double flare, but part of that was the fact that the tool I loaned from Advance Auto was a major POS. I put two kits together to make it work halfway well! I stole Tom's idea of covering the brake lines in rubber tubing, especially since it is in the wheel well where it could be pelted with rocks. Sorry the picture is so blurry, my phone takes awful pictures. I will try to snap some better ones later!
Re: Ok, the official build thread of the budget roadster is
Posted: Wed Oct 13, 2010 7:27 am
by spl310
Tomakze wrote: I stole Tom's idea of covering the brake lines in rubber tubing, especially since it is in the wheel well where it could be pelted with rocks.
I don't think I would do that. The early brake caliper crossover tubes had a plastic coating on them that caused the steel brake lines to rust out - causing the brakes to fail. The lines will be fine even while being pelted with rocks. I would remove the rubber - no point in making a moisture trap to promote rust.
Re: Ok, the official build thread of the budget roadster is
Posted: Wed Oct 13, 2010 8:01 am
by notoptoy
The key to that is not to encapsulate them in rubber/vinyl, the pieces I put on are to prevent rubbing/vibration, they are "open" and can breathe and are secured with a zip tie, less than an inch or so long, they should not hold in moisture. In other places I used a solid metal bracket to secure the pieces in place on the frame, about 1/2" or so. In addition, the rubber/vinyl pieces I did install were higher up in the engine compartment where they are less likely to get wet in the first place. I agree that one should NOT encapsulate any of the brake lines in plastic or rubber.
Re: Ok, the official build thread of the budget roadster is
Posted: Wed Oct 13, 2010 12:28 pm
by Tomakze
The lines I have are coated already to prevent rust, I was only planning on trying to protect them. The rubber is only where the lines rub against the frame, and on the loop behind the wheel. Otherwise they are bare. My car had the covered brake lines on the caliper (and mine is a '68, is that original?) and all of those lines were fine, no rust. as a matter of fact, none of my brake lines had rust. Maybe it is because I live in Colorado?
These lines will likely only be on the car for a couple of years, until I can afford to swap the body of the 2000 over. I was concerned about the brake line rubbing against the frame and causing a hole, maybe it is still a good idea to leave the rubber line for that purpose?
Re: Ok, the official build thread of the budget roadster is
Posted: Wed Oct 13, 2010 12:36 pm
by shifty
Do you have a picture of the area that is rubbing? Ideally the brake lines would not rub at all.
Re: Ok, the official build thread of the budget roadster is
Posted: Wed Oct 13, 2010 1:22 pm
by notoptoy
Leigh:
Agreed! I re-routed the brake lines, and where they cross the firewall, they are close together, they did not rub, but I was uncomfortable with the vibration of the engine running over time potentially causing some wear, I have seen several of the OEM brake spahgetti with wear marks, even at the metal tabs used to hold them in place on the body. For me it was just a little precaution I guess. I have a pic in the brake line replacement thread.
Re: Ok, the official build thread of the budget roadster is
Posted: Sun Jul 17, 2011 3:51 pm
by pebbles
It looks to me like you've mastered the bomb can. It's time to step up and buy a spray gun. There are some nice guns out there for $100. I bought one back in '79 (3 paychecks) and it still works excellent. You may find yourself doing a little sidework to subsidize your roadster habit.
Re: Ok, the official build thread of the budget roadster is
Posted: Mon Jul 18, 2011 3:24 am
by Tomakze
Thanks! Not every paint job I spray is perfect, but that is why they call it learning! I shot my buddies car today since he replaced some body panels after an accident, and it came out looking awful. The last coat of clear I shot was a bum can, and it ruined the paint.

Made me really consider spending the dough on a nice gun! I plan on buying a nice HVLP gun as soon as I can afford it, but of course, that also requires a fairly large compressor, and the space to do it! I will be painting the Datto red hopefully this winter as the current paint job is falling apart. I would like to do a proper job this time, at least paint wise. (I am just going to slap on some bondo to repair the body... I won't put a huge amount of effort into the current body as it is a rust bucket. Once I get the time and money, the other body will be properly reworked and swapped. The current one is my test mule! lol)
I also replaced the driver side door on the Datto today, using the door off the other car. I fixed all the parts inside the door and then made new seals. I also tinted the windows! The door no longer matches, but it works SO much better!!! More on that later!