As always, my updates are few and far between. I haven't really completed anything per se, but made good progress on a lot of stuff.
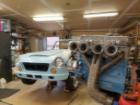
Before the motor went in, I started working on the alternator. In hindsight, I should have just notched the frame and went with the Justy kit from Spriso. But, that's not what I did/am doing. I purchased a mini 70amp from Jegs. It is tiny, and the output should cover my needs. I just hope it puts out enough at lower RPMs. This is a comparison between the new one and the OEM SR20det one. I need to make a 15mm ID and 17mm OD bushing, and the pulleys should swap right on. I welded up a lower mount that makes the alternator hug the block, and the frame clearance is about 3/8". I'm thinking of rigidly mounting the alternator and doing some sort of Idler pulley on the exhaust side for belt tension. I also cleaned up some of the block accessories and started fitting everything in the engine bay.
Cheers,
Wade
1970 SRL311 Resto-mod - SR20DET (Lucy)
Moderators: notoptoy, S Allen, Solex68
-
beebo
- Roadster Fanatic
- Posts: 261
- Joined: Wed Jul 12, 2006 2:10 pm
- Location: Austin, TX
- Model: 2000
- Year: High Windshield-68-70
Re: 1970 SRL311 Resto-mod - SR20DET (Lucy)
You do not have the required permissions to view the files attached to this post.
26.0
-
beebo
- Roadster Fanatic
- Posts: 261
- Joined: Wed Jul 12, 2006 2:10 pm
- Location: Austin, TX
- Model: 2000
- Year: High Windshield-68-70
Re: 1970 SRL311 Resto-mod - SR20DET (Lucy)
So I had a dilemma with my front brakes and wheel combination. The wheels that I had did not provide enough caliper clearance. My plan was to use the 26mm aluminum Z32 calipers and rotors, but after realizing they did not fit, I started laying out my options. Different wheels did not at all sound appealing to me as frame clearance, fitment, scrub radius, having them re mounted and balanced, and just the cost of new wheels is so high and time consuming. I browsed through Wilwood's website, and came up with a few caliper options that were thin enough to fit behind my wheels, but none of them fit the rotors quite right. So basically this would be redoing all of the components. I found that Brembo's website has a really awesome and convenient tool for browsing rotors by lug pattern, diameter, thickness, and rotor to hub offset. I stumbled upon a Ford Explorer rotor that was 5x114.3 and 26mm thick. It was only 4mm larger in diameter, and had about 15mm or so more rotor offset. I then went and found matching drilled and slotted rotors for that same Explorer  . The rotors clear everything on the suspension components, and the calipers now clear the wheels. The way the calipers sit, It looks like I can have the caliper mounting plates out of 1/4" plate. I will be taking measurements, and whip up a plate in CAD to have waterjet.
Cheers,
Wade
Cheers,
Wade
You do not have the required permissions to view the files attached to this post.
26.0
-
beebo
- Roadster Fanatic
- Posts: 261
- Joined: Wed Jul 12, 2006 2:10 pm
- Location: Austin, TX
- Model: 2000
- Year: High Windshield-68-70
Re: 1970 SRL311 Resto-mod - SR20DET (Lucy)
I have also been working on the rear-end links and suspension. I needed the really high up in the air but also with the wight on the wheels to know where the links needed to be. I found these AWESOME things called Liftstands. They are pricey, but well worth the convenience and safety. You jack the car up, and place these under the wheels, and use the jack to lift the Liftstands another 7-8". With the Lucy lifted in the air, I had a comfortable amount of space to work and weld underneath her. I started out working on the Watts link bars. I got these fabbed up, and the mounts welded onto the frame. I still have the cross bracing arm to make, as well as finish up a bit more welding, but for now it is secure and strong.
The rear wheels received 20mm wheel spacers to bring the rear track width a bit closer to the front track width. Also to provide a bit more frame clearance. I will soon be working on the flares/overfenders.
I found a piece of 2" x 3" x 3/16" rectangular tubing that would be perfect for the coilover mount. First, i removed the old round tube that the oem shock mounted to. I cut and notched this tube so that it hugged and sit flush with the rear upper body mounts. The plan is to have the push-rods pass though this bar, and all of the brackets welded to it. I have to break this up to get all of the photos in.
My phone is getting pretty old and busted up, My apologies for the quality of some of these images.
Cheers,
Wade
You do not have the required permissions to view the files attached to this post.
26.0
-
beebo
- Roadster Fanatic
- Posts: 261
- Joined: Wed Jul 12, 2006 2:10 pm
- Location: Austin, TX
- Model: 2000
- Year: High Windshield-68-70
Re: 1970 SRL311 Resto-mod - SR20DET (Lucy)
With the cross bar welded in place, It is clear that I will have some notching to do, as well as grind down some of the rear end housing. There is a lot of unnecessary metal that will interfere when the suspension travels. I took a hole saw, and cut the pass through holes for the push rods. This will be reinforced with round tubing. The shocks are from 2001 Yamaha R1s, and the linkages are flipped around to give approximately 260 lb spring rate. The shocks should almost travel throughout their entire stroke. I'm going to have bolted connections on all of the brackets so if I do not like the shock choice, I wont have to grind off any brackets. I am going to add some brackets to the axle, and the push rods will be heims and tubes like the rest of the links, only 1/2" instead of 5/8". I think its looking pretty cool! I might have to ditch the aluminum pivots, and cut some steel plate brackets to make it fit a bit better. I am getting really excited to get this thing on its wheels and supported by suspension instead of wood blocks.
Cheers,
Wade
Cheers,
Wade
You do not have the required permissions to view the files attached to this post.
26.0
-
beebo
- Roadster Fanatic
- Posts: 261
- Joined: Wed Jul 12, 2006 2:10 pm
- Location: Austin, TX
- Model: 2000
- Year: High Windshield-68-70
Re: 1970 SRL311 Resto-mod - SR20DET (Lucy)
Okay last bit of pictures. I did also buy a couple more nice bits as well  I got a Momo hub adapter and a Prototipo, and a set of 550cc injectors. I almost got a set of gauges, but I'm still not certain the route I want to go. Its either between Stack or VDO cockpits. Also, I am working on rebuilding the T25 turbo. I made a ghetto set of snap ring pliers out of pliers and an allen wrench. i finally got it all apart.
Cheers,
Wade
Cheers,
Wade
You do not have the required permissions to view the files attached to this post.
26.0
-
Mattk

- Roadster Nut-Site Supporter
- Posts: 694
- Joined: Mon Oct 28, 2013 1:49 pm
- Location: DFW, TX
- Model: 2000
- Year: High Windshield-68-70
Re: 1970 SRL311 Resto-mod - SR20DET (Lucy)
Awesome progress!! Your setup is sick!
Can’t wait to see it up are running around!
Cheers
Matthew
Can’t wait to see it up are running around!
Cheers
Matthew
MattK
-
Gregs672000

- Roadster Fanatic-Site Supporter
- Posts: 9428
- Joined: Fri Aug 07, 2009 11:47 pm
- Location: Tacoma, WA
Re: 1970 SRL311 Resto-mod - SR20DET (Lucy)
Waaaaaay beyond me... I know how to use a pop rivet gun...
Greg Burrows
'67 2000 #588
Tacoma, WA
'67 2000 #588
Tacoma, WA
-
Vinnyz
- Roadster Fanatic
- Posts: 273
- Joined: Tue Oct 04, 2016 8:26 pm
- Location: Laguna Beach,Ca.-USA
Re: 1970 SRL311 Resto-mod - SR20DET (Lucy)
Looking awesome !!
73' Datsun 240-Z turbo
70' Datsun SRL-311-1374-SR20det 6 speed
69' Datsun SRL-311-12334-Solex 44 w/B cam
07' BMW Z4 coupe-Daily
70' Datsun SRL-311-1374-SR20det 6 speed
69' Datsun SRL-311-12334-Solex 44 w/B cam
07' BMW Z4 coupe-Daily
-
2mAn
- Roadsteraholic
- Posts: 2238
- Joined: Mon Jan 09, 2017 5:02 pm
- Location: Westchester, CA
- Model: 2000
- Year: High Windshield-68-70
Re: 1970 SRL311 Resto-mod - SR20DET (Lucy)
Love the onboard suspension design, it’s moments like this that I wish I was more disciplined as an engineering student so I could chime with an intelligent response rather than “that looks awesome†hahah
Simon
Current Cars:
-1999 Porsche 911 4/98-build, 3.8L M96
Current Cars:
-1999 Porsche 911 4/98-build, 3.8L M96
-
beebo
- Roadster Fanatic
- Posts: 261
- Joined: Wed Jul 12, 2006 2:10 pm
- Location: Austin, TX
- Model: 2000
- Year: High Windshield-68-70
Re: 1970 SRL311 Resto-mod - SR20DET (Lucy)
I'm definitely learning most of this stuff as I go along. Before I set out do do something, I will try and research as much as possible. Even still, a lot of the stuff isn't perfect or even needs to be redone. I think anyone here is capable of doing whatever the imagine to do to their roadster given enough determination. Thank you guys for the compliments! It really helps keep me motivated to move onward with this project.
I think after I finish the rear suspension, I want to start working on the custom dashboard. I have been researching and researching gauges, and have yet to decide on a manufacturer/set. I am really excited about this part though, and have always been fascinated by a quality gauge layout.
Cheers,
Wade
26.0
-
beebo
- Roadster Fanatic
- Posts: 261
- Joined: Wed Jul 12, 2006 2:10 pm
- Location: Austin, TX
- Model: 2000
- Year: High Windshield-68-70
Re: 1970 SRL311 Resto-mod - SR20DET (Lucy)
I have been going back and forth between gauge styles and manufacturers for months now. It started out with a single stack dash display like i put in my 240SX. so simple. analog tach. everything you need. love it! But, I just don't think that I can make it look at home in a Roadster.
Then I went down the path of wanting to make an old CSP311 Silvia style dash where its kind of angled and plain with nothing but a few gauges directly in front of the driver. The plan was to use the Stack ST700 tachometer which has a little LCD display that can show coolant temp and oil pressure. I was going to pair this with their speedometer and have a smaller boost gauge and fuel gauge. I just didn't like the way the stack speedometer looked compared to the tachometer. Plus, they are really really expensive
I landed on doing some sort of lower profile stripped down version of the earlier flat dash. Since I wont have heater controls, vents, or a radio. Keep in mind, I'm going for a minimalist look, and will not have a center console. just a floating dashboard with gauges. I decided that the gauges will be an oldschool style with black bezels. Speedometer and tachometer would be the primary gauges at 80-100mm, and the instrument gauges would be 52mm. I feel that oil pressure, coolant temp, fuel level, volt meter, and vac/boost will allow me to monitor everything that i feel that I need to without looking too excessive.
I really really liked the RaceTech gauges, but I do not like the fact that you can't get an evenly spaced tachometer. the 0-3k are bunched, and 3k-8k are as they should be. For a street car, I just do not like that.
Speedhut gauges are quality stuff, but something about them just seems too modern. not that that is a bad thing, but I just couldn't quite pull the trigger on a set.
I found that I really liked what VDO had to offer, and the price was reasonable. it was between the Vision, the Cockpit, and the Cockpit International.
I decided i didnt like the backlit gauges so the vision was out. I liked the sidelit as it looked more oldschool. I decided on the cockpit international because they have icons instead of words. a gas pump instead of the word fuel how cool is that!?!
I then started laying out a mockup for how the dash will look. definitely subject to change
That's all for now
Cheers,
Wade
Then I went down the path of wanting to make an old CSP311 Silvia style dash where its kind of angled and plain with nothing but a few gauges directly in front of the driver. The plan was to use the Stack ST700 tachometer which has a little LCD display that can show coolant temp and oil pressure. I was going to pair this with their speedometer and have a smaller boost gauge and fuel gauge. I just didn't like the way the stack speedometer looked compared to the tachometer. Plus, they are really really expensive
I landed on doing some sort of lower profile stripped down version of the earlier flat dash. Since I wont have heater controls, vents, or a radio. Keep in mind, I'm going for a minimalist look, and will not have a center console. just a floating dashboard with gauges. I decided that the gauges will be an oldschool style with black bezels. Speedometer and tachometer would be the primary gauges at 80-100mm, and the instrument gauges would be 52mm. I feel that oil pressure, coolant temp, fuel level, volt meter, and vac/boost will allow me to monitor everything that i feel that I need to without looking too excessive.
I really really liked the RaceTech gauges, but I do not like the fact that you can't get an evenly spaced tachometer. the 0-3k are bunched, and 3k-8k are as they should be. For a street car, I just do not like that.
Speedhut gauges are quality stuff, but something about them just seems too modern. not that that is a bad thing, but I just couldn't quite pull the trigger on a set.
I found that I really liked what VDO had to offer, and the price was reasonable. it was between the Vision, the Cockpit, and the Cockpit International.
I decided i didnt like the backlit gauges so the vision was out. I liked the sidelit as it looked more oldschool. I decided on the cockpit international because they have icons instead of words. a gas pump instead of the word fuel
I then started laying out a mockup for how the dash will look. definitely subject to change
That's all for now
Cheers,
Wade
You do not have the required permissions to view the files attached to this post.
26.0
-
Linda
- Fraternal Den Mother-RIP
- Posts: 7807
- Joined: Sat Nov 05, 2005 11:37 pm
- Location: Los Angeles
- Model: 1500/1600
- Year: High Windshield-68-70
Re: 1970 SRL311 Resto-mod - SR20DET (Lucy)
Not sure if all that is inspirational or depressing! LOL
Your creativity and patience is admirable. Seems like a case of “It’s the journey not just the destinationâ€
Meanwhile I think I fried my alt today. B wire fell out of terminal and shorted on alt with sparks and smoke. Bad sign, eh?
Linda
Your creativity and patience is admirable. Seems like a case of “It’s the journey not just the destinationâ€
Meanwhile I think I fried my alt today. B wire fell out of terminal and shorted on alt with sparks and smoke. Bad sign, eh?
Linda
Sadly-Linda has passed away 2022. She was the 311's den mother and drove the first Rare-Parts ball joint project. RIP.
-
Mattk
- Roadster Nut-Site Supporter
- Posts: 694
- Joined: Mon Oct 28, 2013 1:49 pm
- Location: DFW, TX
- Model: 2000
- Year: High Windshield-68-70
Re: 1970 SRL311 Resto-mod - SR20DET (Lucy)
I like the mock off the dash. I too had a time settling on which gauges to use. I’ve chosen the speedhut ones and am going to customize them. I think I’m going to have 9 gauges when it’s all said and done.
I’ll get more into it on my thread, don’t mean to hijack
Did you finish the rear? What springs did you go with?
Crazy jealous of your progress.
Cheers
Matthew
I’ll get more into it on my thread, don’t mean to hijack

Did you finish the rear? What springs did you go with?
Crazy jealous of your progress.
Cheers
Matthew
MattK
-
cktrap
- Roadsteraholic
- Posts: 964
- Joined: Sun Mar 23, 2008 8:56 pm
- Location: colleyville,tx
-
beebo
- Roadster Fanatic
- Posts: 261
- Joined: Wed Jul 12, 2006 2:10 pm
- Location: Austin, TX
- Model: 2000
- Year: High Windshield-68-70
Re: 1970 SRL311 Resto-mod - SR20DET (Lucy)
Thanks for the compliments everybody!
 ) I hope your roadster is okay and it didn't leave you stranded anywhere. If I hadn't already sold my Datsun alternator, I would be boxing it up right now to ship off to yah.
Cheers,
Wade
It's definitely depressing how far past the budget I set for myself when I started. Still so far to go. I agree with the journey over the destination statement. I absolutely love working with my hands, solving problems, and expressing my creativity. The destination, however, is the enjoyment i get from having something that is the end result of what the journey involves. (which is a pretty satisfying destinationLinda wrote: Tue Apr 23, 2019 10:51 pm Not sure if all that is inspirational or depressing! LOL
Your creativity and patience is admirable. Seems like a case of “It’s the journey not just the destinationâ€
Meanwhile I think I fried my alt today. B wire fell out of terminal and shorted on alt with sparks and smoke. Bad sign, eh?
Linda
Cheers,
Wade
26.0