Orlando Engine Swap Project
Moderators: notoptoy, S Allen, Solex68
-
notoptoy

- Vendor-Site Supporter
- Posts: 9700
- Joined: Fri Oct 02, 2009 2:55 pm
- Location: Winston-Salem, NC and Ocala, FL
- Contact:
Re: Orlando Engine Swap Project
Congrats on hitting so many milestones. It's great to make progress! Looking forward to the pictures.
"When all else fails, force prevails!" Ummm, we're gonna need a bigger hammer here.
67.5 SPL311 H20 w/5 speed
65 Impala Convertible
2017 C43 AMG
67.5 SPL311 H20 w/5 speed
65 Impala Convertible
2017 C43 AMG
-
denniswagnerusa
- Roadster Fanatic
- Posts: 159
- Joined: Mon Dec 26, 2011 9:56 pm
- Location: Orlando, Florida
Re: Orlando Engine Swap Project
Been busy. I'm painting the parts that make up the front and rear suspension. I started with Marine clean which is a degreaser from POR-15 and then used their Clean and Prep which I think is an acid and then a self etching primer and then a satin black spray paint which matches the powder coated frame. For rusty parts I used POR-15 between the Prep and Clean and the primer. I am happy with the result.
I began looking at the bolts and nuts that hold the suspension together and decided I need to replace everything I could. I measured each of these metric bolts and made a list. I used my millimeter rule and determined whether the threads were 1.0 mm apart or 1.25 or 1.5. Then I wrote down the length and went down to my local auto parts place with baggies of my parts and pulled up a 5 gal bucket of Purple Power to sit on and tried to find matches to my measurements. Well it appears my bolts and nuts are from some alien craft because I could not get anything to match up. Bolts that fit in their template did not match for the nuts. Many of the bolts were 10 x 1.0 which didn't have any matches to their stock. I began to think that I will need to revive my old bolts because I could not find matches for them in new so I bought a tap and die set while I was there. Afterwards I went to Ace Hardware where they had all kinds of bolts and nuts including a 10 x 1.0 bolt but they were closing and thankfully I did not have time to select and buy the bolts and nuts. I went home to try the tap and die set on my old bolts and the dies did not match my bolts.
What is going on here? I went to the internet to see if anyone had been kind enough to make a list of bolts needed for the suspension and I found it in the tech section under a discussion of body bolts. My bolts and nuts are not metric! No wonder nothing seemed to match although I did try some on the standard side and they did not seem to fit there either. I copied the list and I am looking forward to going back to Ace to pick up just what I need. I will try to find them in the 8 strength. I guess that is what is recommended for the suspension.
My powder coater did not recommend coating the fenders that had been stripped to bare metal. He said I could better get into the nooks and crannies with liquid POR-15 than with powder coating. I will do that. My wife is getting tired of having the fenders and trunk lid in our living room. I'm storing them there for the air conditioning and lower humidity. We are in the summer mode here with 90 degree temps and high humidity so I cannot store them anywhere else until I get them primed.
I found a RX-7 rear end in South Carolina by Googling auto salvage parts and calling around. I spent much a day on the phone and found that these rear ends were readily available but mostly overpriced. Typical prices were in the $600 range with and without shipping. I found a rear end at #1 Auto Parts in SC for $275 with $100 for shipping and $50 extra for the drive shaft. I figured a local find would probably not be much better when you include gas to pick it up in my Tundra so I bought it today and hope to get it soon. I found a local rear end shop that will shorten the housing but they will not shorten the axle so I guess I will need a machine shop for that. I might take my front rotors along to the machine shop to get the radius reduced to fit the Volvo calipers.
Now I have to figure out how much to shorten the RX-7 axle. I have to decide what tires and wheels I will need before making that decision. I like the Panasports in a 15x6 for wheels. Consensus in the tire and wheel tech section seems to favor a +15 or so offset. I measured the stock wheels and they are around 15 mm offset. With my 165 Michelins on the stock wheels there is around 2 inches clearance on either side in the back so I figure I would be OK to get 195s if I used the +15 offset with the same axle length. Dean at datsunparts.com has Panasport 15x6 wheels with unknown offset. When pressed about the offset he was evasive but said it was right for a roadster and thousand had been sold. Well, which roadster with what sized tires? I will not order wheels without the offset known. I guess I will have to spend another day calling around. I find it unusual that the Panasport website does not list dealers or give you any idea where you can buy them. As for tires I'm looking at the Dunlop Direzza Sport Z1 Star Spec series in 195/55/15 all around. I am going to look at how much room there is with the stock wheels with the old Michelins on the front before I order anything related to tires or wheels. I did order comp springs for the front so the lowering will have to be figured in.
Since it is now painted I will put the steering box back together soon. I got new gaskets and seals from Rallye. I will be putting some photos up soon. I've got to figure a way to use photobucket so that I can add bigger files.
-
notoptoy
- Vendor-Site Supporter
- Posts: 9700
- Joined: Fri Oct 02, 2009 2:55 pm
- Location: Winston-Salem, NC and Ocala, FL
- Contact:
Re: Orlando Engine Swap Project
Can't say enough about the Tech wiki - as you see, the info is there.
Questions on the RX-7 rear end I would direct to Michael Spreadbury at Spriso motor sports.
As far as Tires and wheels there are a ton of threads on these, and there are several good calculators that can help as well.
Again, sounds like you continue to plug right along - great work!
Questions on the RX-7 rear end I would direct to Michael Spreadbury at Spriso motor sports.
As far as Tires and wheels there are a ton of threads on these, and there are several good calculators that can help as well.
Again, sounds like you continue to plug right along - great work!
"When all else fails, force prevails!" Ummm, we're gonna need a bigger hammer here.
67.5 SPL311 H20 w/5 speed
65 Impala Convertible
2017 C43 AMG
67.5 SPL311 H20 w/5 speed
65 Impala Convertible
2017 C43 AMG
-
Alvin

- Roadster Nut-Site Supporter
- Posts: 8381
- Joined: Tue Jan 23, 2007 7:01 pm
Re: Orlando Engine Swap Project
Order the wheels from Dean
I always assumed they were +15, as they have been in the past. The new ones could be +10 to +15.
anyways I've seen them on too many roadsters to count! If you need pictures let me know
If you plan on running that 15x6 wheel you don't need to narrow your axle any more than the width of your current axle , ie. Drum to drum and disc hub to disc hub should be the same overall distance.
It is, however, prudent to narrow the axle in case you ever want to run wider wheels/tires in the future. Now is the time to do it.
Alvin Gogineni
San Jose, CA
1967.5 SPL/SR20
1997 Acura Integra GS-R
2022 Chevy Bolt EUV
zcarblog.com
Instagram
YouTube
My SR20 Build Thread
San Jose, CA
1967.5 SPL/SR20
1997 Acura Integra GS-R
2022 Chevy Bolt EUV
zcarblog.com
YouTube
My SR20 Build Thread
-
denniswagnerusa
- Roadster Fanatic
- Posts: 159
- Joined: Mon Dec 26, 2011 9:56 pm
- Location: Orlando, Florida
Re: Orlando Engine Swap Project
I understand that wheel mounting surface to wheel mounting surface is 48.5" in the stock axle. Of course the axle housing length would need to take into account the rotors and such. That is a good idea to make things a little shorter to allow for growth. Are spacers difficult to find?
Alvin, your info in the tire and wheel section has been invaluable. I'm glad you joined this discussion. Thank you.
Alvin, your info in the tire and wheel section has been invaluable. I'm glad you joined this discussion. Thank you.
-
Alvin
- Roadster Nut-Site Supporter
- Posts: 8381
- Joined: Tue Jan 23, 2007 7:01 pm
Re: Orlando Engine Swap Project
spacers are very easy to find, infinite widthsdenniswagnerusa wrote:I understand that wheel mounting surface to wheel mounting surface is 48.5" in the stock axle. Of course the axle housing length would need to take into account the rotors and such. That is a good idea to make things a little shorter to allow for growth. Are spacers difficult to find?
Alvin, your info in the tire and wheel section has been invaluable. I'm glad you joined this discussion. Thank you.
ps also consider the e-brake mod that Spriso has for the RX-7 rear end...very cool!
Alvin Gogineni
San Jose, CA
1967.5 SPL/SR20
1997 Acura Integra GS-R
2022 Chevy Bolt EUV
zcarblog.com
Instagram
YouTube
My SR20 Build Thread
San Jose, CA
1967.5 SPL/SR20
1997 Acura Integra GS-R
2022 Chevy Bolt EUV
zcarblog.com
YouTube
My SR20 Build Thread
-
denniswagnerusa
- Roadster Fanatic
- Posts: 159
- Joined: Mon Dec 26, 2011 9:56 pm
- Location: Orlando, Florida
Re: Orlando Engine Swap Project
Been busy again but not taking too many photos. Nothing to show right now. Been painting the various suspension parts. Started working on the steering box. I ordered new seals and gaskets for the steering box from Rallye. It came with only one gasket and needed two. I will make the second one. Now I need to figure out how to remove the old oil seals. Do I just pry them out with a screwdriver and destroy them or is there a more subtle way to do that? I read somewhere to always coat the new seal with oil when you install it. Any more advice.
Some of the threads on the ball joints were damaged such that the castle nuts may not start correctly. I have a new tap and die set but wouldn't using it potentially set the cross thread in place, or is that OK? Is there a tool that will start with the intact inner threads and screw off to re-cut the correct pattern? That would seem to be more useful.
I'm going to start a thread in the tech section about how I removed the Pitman arm.
-
spl310

- Roadster Guru
- Posts: 13241
- Joined: Sun Dec 29, 2002 10:38 pm
- Location: In front of this keyboard... in Jacksonville, Florida!
Re: Orlando Engine Swap Project
A knife edge file and some careful work will get you going.
"Wow, a Roadster!" Stuart Little
1967.5 2000
1967.5 2000
1964 1500
1964 1500
1967.5 1600
1968 chassis
2006 Acura MDX
2013 Volkswagen Jetta TDI wagon
1995 F350 Powerstroke!
More...
1967.5 2000
1967.5 2000
1964 1500
1964 1500
1967.5 1600
1968 chassis
2006 Acura MDX
2013 Volkswagen Jetta TDI wagon
1995 F350 Powerstroke!
More...
-
bobd
- Roadster Nut-Site Supporter
- Posts: 456
- Joined: Mon Sep 01, 2008 12:46 pm
- Location: Lakeland, FL
- Model: 2000
- Year: High Windshield-68-70
-
jamesw
- Roadsteraholic
- Posts: 2760
- Joined: Thu Aug 05, 2010 11:06 am
- Location: Houston TX
Re: Orlando Engine Swap Project
I recently picked up some Panasports that are 15 x 7 with a +15 offset. That is what I was running when I had Rota's on my car and they fit very well. I was running them w/ 195 tires which are about the biggest you can go with stock fenders.
I'm sure 15 x 6 would be a good wheel too.
Cheers
James
I'm sure 15 x 6 would be a good wheel too.
Cheers
James
SRL311-00275
'96 Porsche 993 C4
2001 Excursion 7.3l
'96 Porsche 993 C4
2001 Excursion 7.3l
-
denniswagnerusa
- Roadster Fanatic
- Posts: 159
- Joined: Mon Dec 26, 2011 9:56 pm
- Location: Orlando, Florida
Re: Orlando Engine Swap Project
Thanks all for your info. Another question for the forum. When I sent the valve cover from my SR engine to the powder coater a black dab of flexible adhesive that held a small plastic piece to the underside of the valve cover had to be removed. What is it for? Does it need to be replaced? If so, how do I re-attach it? I don't want pieces of plastic floating around inside my engine.
You do not have the required permissions to view the files attached to this post.
-
DatsunBucky

- Roadsteraholic
- Posts: 665
- Joined: Sun Jan 19, 2003 6:09 pm
- Location: Taylorsville, UT
Re: Orlando Engine Swap Project
"Back in the good old days" we would lubricate a seal with whatever it would be sealing against. Engine oil for seals on the engine, transmission fluid for the trans, rear-end grease for the rear axle or steering box fluid for steering.denniswagnerusa wrote:I read somewhere to always coat the new seal with oil when you install it. Any more advice.
Bucky
-
denniswagnerusa
- Roadster Fanatic
- Posts: 159
- Joined: Mon Dec 26, 2011 9:56 pm
- Location: Orlando, Florida
Re: Orlando Engine Swap Project
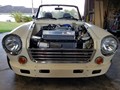
Got my RX-7 axle in last week along with the drive shaft, calipers, and rotor. They looked like they were in good shape as the seller promised.
Of course the housing had all the brackets and such that needed to be removed so I spent the last two days removing all the extra stuff with a reciprocating saw and grinder. Here is the cleaned up axle assembly.
I will bring it and the old axle to a drivetrain shop here in Orlando. I went down there last week to see if they could do what is needed. They said they could. This place was amazing. It must have been there 50 years because they had drive shafts and differentials stacked floor to ceiling. There was a line of people to be served and the phone was ringing off the hook. The guy I talked to, Donnie, was not sure if their machine shop can shorten the axle shafts because they taper so I may have to send them to one of the machine shops that other roadster owners have used.
I've decided that I want a 48 inch axle including the rotor. That should allow a chance to go to wider tires on the back. My plan is to order the 15x6 Panasport wheels from Dean but get only two 195 tires. I will mount the wheels and tires on the rear axle and frame when I get it back and put the old tires and wheels on the front and lower the body onto the frame and see what kind of clearances there are in the back. If I can fit a wider tire then I will order them for the back and use the 195's for the front.
Does anyone have a good idea how much clearance is needed to allow for aggressive turns in street driving?
The powder coating place still has my frame and valve cover. It has been three weeks which seems like a long time. I'm not using any weird colors, just satin black. I'm hoping to get a call this week. Maybe I can pick up my frame and drop off the axles in the same trip since they are near each other.
You do not have the required permissions to view the files attached to this post.
-
denniswagnerusa
- Roadster Fanatic
- Posts: 159
- Joined: Mon Dec 26, 2011 9:56 pm
- Location: Orlando, Florida
Re: Orlando Engine Swap Project
Scratch the idea of trying to go wider than 195s. The tire I want, Direzza Star Spec, is only available up to 205 in the 15 inch wheel and 10mm is not enough extra width to give up tire rotations.
-
denniswagnerusa
- Roadster Fanatic
- Posts: 159
- Joined: Mon Dec 26, 2011 9:56 pm
- Location: Orlando, Florida
Re: Orlando Engine Swap Project
I feel like I lost some momentum on this project. I've been twiddling my thumbs waiting to get the frame and valve cover back from the powder coater. I finally got them back this week after six weeks and $600. I understand that sometimes odd colors need to wait, but satin black? Fortunately it looks great. I spent the Fourth of July putting the front suspension together. I can already feel that the steering is going to be real tight after rebuilding the steering box and replacing the lower ball joints and a tie rod. I got a bit of a scare when I could not turn the wheels past midway at first. I discovered that the Pitman arm was catching because I had not yet tightened its screw. After I tightened it down everything was great.
The original and Rx-7 axles are at the drive train shop waiting to be reworked. I'm in line with a bunch of other projects. These guys are busy. I went to extra expense to get the calipers from the Rx-7 axle included in the axle purchase along with the drive shaft and rotors thinking that I would rebuild the original calipers. When I took them apart I found that one was all rusted inside such that it was unusable. Now maybe they will help with the core charge. The rotors might be usable with a resurfacing. I'm ready to start thinking about the Volvo calipers for the front. I haven't priced remanufactured calipers but I'm hoping they will not be too bad. I'm afraid that the front rotors are too thin for resurfacing. I found an older rotor laying around that was much thicker but I cannot find its mate. I cannot imagine throwing away any parts for this car. I'll have to keep looking. They were probably taken off the car 25 years ago.
I'm beginning to realize that having the fenders alkaline dipped to remove all the paint, rust and undercoating may have been a mistake. Some hard to reach places had rust protection before the dip but now they are vulnerable to moisture. I have got to figure a way to get rust protection into the nooks and crannies. They are sitting in the air conditioned living room, much to the chagrin of my wife, while I sort things out. I cannot convince her that having auto parts in the living room is the newest furniture craze.
I'll share some photos when I can roll the chassis out of the garage for better light. It has been a real bear working on the car in the summer heat. With 95 degree days with 80% humidity and 85 degree nights it has not been too pleasant in my garage. Fortunately fans, beer, and insect repellant go a long way to making things possible.