
What did you do TO or FOR your Datsun today?(Roadsters only)
Moderators: notoptoy, S Allen, Solex68
-
RustyBucket

- Roadster Fanatic
- Posts: 396
- Joined: Mon Jan 01, 2007 6:19 pm
- Location: Maryland
- Model: 1500/1600
- Year: High Windshield-68-70
- Contact:
Re: What did you do TO or FOR your Datsun today?(Roadsters only)
Why am I not surprised. I have photos of the Rust and repairs I had to make on the rockers on the front of the car. Had to learn a new skill- TIG@ MIG welding 
-
ADR
- Roadster Fanatic
- Posts: 189
- Joined: Tue Feb 07, 2023 2:40 pm
- Location: Longwood, FL
- Model: 1500/1600
- Year: Low Windshield-64-67.5
Re: What did you do TO or FOR your Datsun today?(Roadsters only)
Seems like fender liners would be a welcomed addition to our roadsters!
I have mocked up brackets and a fender liner for each side. The CAD work is done too. 16 steel brackets, plastic fender liners, and plastic push clips for mounting have been locked up and test fit. I'll put the first edition on my 66 in the months ahead.
Would anyone else be interested?
My estimates so far are $225 for the laser-cut / cnc-bent brackets (mild steel or galvanized), $75 for the liners, and $20 for the clips. Looks like $320 total to end the water, muck, and debris collecting fender / rocker fiasco. Fix it once and add the fender liners. Seems like a no brainer to me!
1966 SPL311-1139 KA24DE
Longwood, FL
Longwood, FL
-
Curtis

- Site Supporter
- Posts: 4164
- Joined: Fri Jan 01, 2010 2:49 pm
- Location: Des Moines, WA
- Model: 1500/1600
- Year: Low Windshield-64-67.5
Re: What did you do TO or FOR your Datsun today?(Roadsters only)
Ross Mullen told me he wa putting those in while he was still doing restorations. He also said they would just cap off the end and get rid of the bullet nose.
66 stroker, almost done.
67 basket case, paint coming soon.
67 basket case, paint coming soon.
-
ADR
- Roadster Fanatic
- Posts: 189
- Joined: Tue Feb 07, 2023 2:40 pm
- Location: Longwood, FL
- Model: 1500/1600
- Year: Low Windshield-64-67.5
Re: What did you do TO or FOR your Datsun today?(Roadsters only)
Thanks Curtis. The liners will protect the front lights, the rocker area, and the fenders themselves from thrown gravel. Nobody likes fender dings from the inside 
1966 SPL311-1139 KA24DE
Longwood, FL
Longwood, FL
-
RustyBucket
- Roadster Fanatic
- Posts: 396
- Joined: Mon Jan 01, 2007 6:19 pm
- Location: Maryland
- Model: 1500/1600
- Year: High Windshield-68-70
- Contact:
Re: What did you do TO or FOR your Datsun today?(Roadsters only)
Is for a pair of liners or per fender. ?
Do you have an image of what it looks like ?
Do you have an image of what it looks like ?
-
ADR
- Roadster Fanatic
- Posts: 189
- Joined: Tue Feb 07, 2023 2:40 pm
- Location: Longwood, FL
- Model: 1500/1600
- Year: Low Windshield-64-67.5
Re: What did you do TO or FOR your Datsun today?(Roadsters only)
The estimate is for a pair, complete.
There are a few images attached. One is the fender liner template. One is the CAD drawing of the brackets. One is the mocked-up brackets which drove the CAD design.
The brackets self-locate against the raised beads on the tub. Should be a straight forward process to mount each bracket (rivet-nut & bolt or weld).
My guess is that I will install mine in 4-6 months since I am in tear down mode on my 66 now.
You do not have the required permissions to view the files attached to this post.
1966 SPL311-1139 KA24DE
Longwood, FL
Longwood, FL
-
bajaroadster
- Roadster Fanatic-Site Supporter
- Posts: 330
- Joined: Fri Jun 28, 2019 1:29 pm
- Location: Loreto B.C.S. Mexico
- Model: 1500/1600
- Year: Low Windshield-64-67.5
Re: What did you do TO or FOR your Datsun today?(Roadsters only)
Installed hardware for new Robbins tonneau .
You do not have the required permissions to view the files attached to this post.
Ive seen normal. It aint pretty.
-
Stick
- Roadster Fanatic
- Posts: 253
- Joined: Sat Oct 28, 2023 5:27 am
- Location: Savannah, GA
- Model: 2000
- Year: High Windshield-68-70
Re: What did you do TO or FOR your Datsun today?(Roadsters only)
WOW... Beautiful looking ride!
Greg McCarty
1969 SRL311 07324
1969 SRL311 07324
-
RustyBucket
- Roadster Fanatic
- Posts: 396
- Joined: Mon Jan 01, 2007 6:19 pm
- Location: Maryland
- Model: 1500/1600
- Year: High Windshield-68-70
- Contact:
Re: What did you do TO or FOR your Datsun today?(Roadsters only)
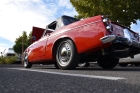
Now that is RED! Looks better than ‘New’
-
ADR
- Roadster Fanatic
- Posts: 189
- Joined: Tue Feb 07, 2023 2:40 pm
- Location: Longwood, FL
- Model: 1500/1600
- Year: Low Windshield-64-67.5
Re: What did you do TO or FOR your Datsun today?(Roadsters only)
Received NOS Nissan clear front parking lenses with chrome trim. Gonna look great on the 66 dressed in black.....
You do not have the required permissions to view the files attached to this post.
1966 SPL311-1139 KA24DE
Longwood, FL
Longwood, FL
-
nismou20
- Roadsteraholic
- Posts: 1523
- Joined: Thu Jul 07, 2005 2:16 pm
- Location: Pasadena, Ca
Re: What did you do TO or FOR your Datsun today?(Roadsters only)
Have you checked your clutch Clevis pin lately? No wonder I was having a catchy weird sounding gear change. I modded a HD pin by grinding out a extra groove for return spring and secured with cotter pin. 5/16 in pin
You do not have the required permissions to view the files attached to this post.
2004 Chevy Tracker
2010 RAV4
1969 Datsun Roadster
2005 Lotus Elise
1995 Toyota Tercel (Poormans Corolla)
2001 Fleetwood Jamboree RV
2010 RAV4
1969 Datsun Roadster
2005 Lotus Elise
1995 Toyota Tercel (Poormans Corolla)
2001 Fleetwood Jamboree RV
-
Nissanman
- Roadster Fanatic-Site Supporter
- Posts: 3453
- Joined: Mon Apr 16, 2007 8:07 pm
- Location: Adelaide, South Australia
- Model: 1500/1600
- Year: Low Windshield-64-67.5
- Contact:
Re: What did you do TO or FOR your Datsun today?(Roadsters only)
You might want to check the hole in the pedal shaft as well: mine was an oval that I had to re drill and fit an oversized pin to suit.
Nissanman, just trying to help.
1965 SP310 Engine No. G-93326 Car No. SP310-10817
https://photos.shutterfly.com/album/60141836519
On the road again!
1965 SP310 Engine No. G-93326 Car No. SP310-10817
https://photos.shutterfly.com/album/60141836519
On the road again!
-
theunz
- Roadster Nut-Site Supporter
- Posts: 2470
- Joined: Sat May 02, 2009 1:54 pm
- Location: Catoosa Ok.
- Model: 2000
- Year: High Windshield-68-70
Re: What did you do TO or FOR your Datsun today?(Roadsters only)
Made a hole to stuff my new 4:11 gears into. I pulled the 4:62’s out today and will take the 3rd member to a differential shop tomorrow to get the new ring and pinion set up. They should cut my 65mph rpm’s by 4 or 5 hundred and hopefully still keep me on the cam (Solex) at the autocross’s.
Mike M
Old enough to know better, too old to remember why!
1969 2000 solex mine since 1972, under resurrection. (Finally resurrected as of spring 2019!)
1969 Porsche 911s -worth more, but not as valuable! Gone!
2017 Lotus Evora 400 - Oh my!!
Old enough to know better, too old to remember why!
1969 2000 solex mine since 1972, under resurrection. (Finally resurrected as of spring 2019!)
1969 Porsche 911s -worth more, but not as valuable! Gone!
2017 Lotus Evora 400 - Oh my!!
-
less frustrated
- Site Supporter
- Posts: 51
- Joined: Fri Feb 10, 2017 1:27 pm
- Location: Wilmington, Delaware
Re: What did you do TO or FOR your Datsun today?(Roadsters only)
I am in the 'thinking' mode also. I think I'll add another ground to the fuel sending unit as it works out of the tank lying on the trunk floor but not installed. I need to think about how to fasten the sort-of-new carpeting so it stops sliding under the pedals. I need to think of a 'way forward' to stop the rough ride at speed. Old American Racing mags refurbished and new Michelins installed a couple years ago.
-
Nissanman
- Roadster Fanatic-Site Supporter
- Posts: 3453
- Joined: Mon Apr 16, 2007 8:07 pm
- Location: Adelaide, South Australia
- Model: 1500/1600
- Year: Low Windshield-64-67.5
- Contact:
Re: What did you do TO or FOR your Datsun today?(Roadsters only)
Well, not just today, but over the last few days I have built a sort of cold air intake for the '65.
The original air filter, as we know, is fully exposed to engine bay air which I would guess is rather warm, especially in our Oz summers.
Soooo, I toyed with the idea of isolating the air intake from the engine bay by using an aluminium shield.
Now, it isn't airtight but sits in close proximity to the hood at the top and body channel at the bottom.
There is a little plate at the leading edge attached to the radiator mounting fastener to help guide air from the front of the car.
Going to a twilight car meet tonight so it will be interesting to see how the little engine behaves on the highway. To measure how tall I could go, I used a sheet of Corflute resting on the top of the carbs at the backside of the air cleaner base.
Add some kebab skewers into the holes in the Corflute and gently close the hood.
Lift the hood and that is where the limit is
Now I have a cardboard template cut to shape.
A little blob of modelling clay on top and close the hood again.
The clay gets squashed down telling me how much wiggle room there is.
Once I had the dimensions right, I cut out the shield from some ally sheet and re-checked the clearances.
Added a length of mini pinchweld along the sharp edges and job done.
(Different phone, different camera, car now a different colour )
)
I will probably add some beads along the perimeter of the panel to stiffen it up and paint it satin black to match my custom radiator shroud.
The next improvement is building a new air cleaner holder with a re-useable foam element.
Anyhoo, I'll see how we go tonight
The original air filter, as we know, is fully exposed to engine bay air which I would guess is rather warm, especially in our Oz summers.
Soooo, I toyed with the idea of isolating the air intake from the engine bay by using an aluminium shield.
Now, it isn't airtight but sits in close proximity to the hood at the top and body channel at the bottom.
There is a little plate at the leading edge attached to the radiator mounting fastener to help guide air from the front of the car.
Going to a twilight car meet tonight so it will be interesting to see how the little engine behaves on the highway. To measure how tall I could go, I used a sheet of Corflute resting on the top of the carbs at the backside of the air cleaner base.
Add some kebab skewers into the holes in the Corflute and gently close the hood.
Lift the hood and that is where the limit is
Now I have a cardboard template cut to shape.
A little blob of modelling clay on top and close the hood again.
The clay gets squashed down telling me how much wiggle room there is.
Once I had the dimensions right, I cut out the shield from some ally sheet and re-checked the clearances.
Added a length of mini pinchweld along the sharp edges and job done.
(Different phone, different camera, car now a different colour
I will probably add some beads along the perimeter of the panel to stiffen it up and paint it satin black to match my custom radiator shroud.
The next improvement is building a new air cleaner holder with a re-useable foam element.
Anyhoo, I'll see how we go tonight
You do not have the required permissions to view the files attached to this post.
Nissanman, just trying to help.
1965 SP310 Engine No. G-93326 Car No. SP310-10817
https://photos.shutterfly.com/album/60141836519
On the road again!
1965 SP310 Engine No. G-93326 Car No. SP310-10817
https://photos.shutterfly.com/album/60141836519
On the road again!