Page 4 of 13
Re: Forgotten Dreams: Restoration of a 1964 Datsun 1500 Road
Posted: Fri Jul 09, 2010 12:50 am
by spriso
Off to Paint
Finally, out of the shadows of the corner of the shop and off to paint!

Flashing lights and flat bed service!


Michael
Re: Forgotten Dreams: Restoration of a 1964 Datsun 1500 Road
Posted: Fri Jul 09, 2010 6:05 am
by spl310
Ok, is it me, or is that rollback a little overkill for the little Roadster body? Lookin good though!
Re: Forgotten Dreams: Restoration of a 1964 Datsun 1500 Road
Posted: Fri Jul 09, 2010 7:13 am
by notoptoy
Looking forward to more pics!!
Re: Forgotten Dreams: Restoration of a 1964 Datsun 1500 Road
Posted: Tue Jul 20, 2010 12:16 am
by spriso
The Frame Rebuild Begins
While the body is at the paint and body shop, the frame will be reassembled and made into a roller so we can put the freshly repainted body onto the powder coated frame for the reassembly.
I have been digging out all the parts that I have been squirreling away for this project (and in some cases trying to figure out where some of the parts went!

) and came across these beauties:
This is a pair of NOS upper ball joints that were sourced directly out of Japan. Amazing as it might seem, but they have never been used-- the rubber boots have disintegrated into some sort of super sticky rubber/tar/indelible ink substance that is VERY difficult to remove from your skin!

A close up:

I will get them cleaned up with new paint, boots and grease, and we should be good to go. I had heard about rotten boots on ball joints before, so I thought the images would be worth sharing!
Michael
Re: Forgotten Dreams: Restoration of a 1964 Datsun 1500 Road
Posted: Tue Jul 20, 2010 12:37 am
by spriso
A Few More Photos
I just realized that I did not post these images:
Here is a shot of Guy painting the underside of the car with DP90 (the seams were later seam sealed, and then it will get a bed-liner undercoat):
 A few other misc shots-- "The Saddle"
1968 and later roadsters frames were improved with additional reinforcement which we call "the saddles". I had saved some of these from a frame that we had cut up and we decided to add them to this car's frame-- mostly to mess with the experts...
(Not that anyone will actually notice!)
Ok, in this shot the frame is mounted upside down, the front is to your left. This is where the frame transitions from the front suspension to the flat section on the underside of the car:

Test fitting the saddles. This actually worked out well, as there was an ugly dent in the frame that was soon to be covered up by the saddle:

And a shot of this section on the freshly powder coated frame:

More details that no one will ever see...
Sway Bar Mount
The passenger side sway bar mount was wasted:

A donor was saved from frame that we cut up:

After careful measuring and aligning, it was tacked and welded into position:

And finished:

One very small step closer...
Michael
Re: Forgotten Dreams: Restoration of a 1964 Datsun 1500 Road
Posted: Tue Jul 20, 2010 7:54 am
by notoptoy
Fantasatic work as always Michael. The ball joint thing is pretty cool, in a bad way. I assume the grease was intact so that there is no fear of internal corrosion?
Thanks for posting!
Re: Forgotten Dreams: Restoration of a 1964 Datsun 1500 Road
Posted: Tue Jul 20, 2010 7:54 am
by spl310
The reinforcements is a great idea.
Re: Forgotten Dreams: Restoration of a 1964 Datsun 1500 Road
Posted: Tue Jul 20, 2010 9:33 pm
by dbrick
Michael, I got a set of ball joints in the same condition, you're not kidding about that muck. Nice work, as always.
BTW, on this 64 is the crossmember welded in or bolted in? I seem to recall the early ones were bolted. Of course I could look at mine, but it's hot outside

Re: Forgotten Dreams: Restoration of a 1964 Datsun 1500 Road
Posted: Tue Jul 20, 2010 10:37 pm
by spriso
Dave wrote:
BTW, on this 64 is the crossmember welded in or bolted in?
No, this frame did not have the bolt-in crossmember-- I have only seen that on the trucks. I have had four 1964/4 1500's now, and none of them had that. The only difference between the 1500 frame and the later early 1600 frame is the front cross beam (in front of the suspension crossmember) is considerably wider than the later 1600's.
Keri's car is getting the later "Type B" steering box (and idler) and I was concerned that it might not fit with the wider front cross beam, but it fit fine after a little massaging on the left side frame rail.
I picked up my new lower ball joints from Nissan today-- ouch! Even at my cost, they are still very expensive! But that being said, I am still grateful that we can still get them... *bitching over*.
Michael
Re: Forgotten Dreams: Restoration of a 1964 Datsun 1500 Road
Posted: Wed Jul 21, 2010 10:30 am
by Chris66
Michael, did this one go in to the bin ?

The inside of my drivers door limiter is trash, looking to get just that part.
Chris
Re: Forgotten Dreams: Restoration of a 1964 Datsun 1500 Road
Posted: Wed Jul 21, 2010 10:51 am
by spriso
Michael, did this one go in to the bin ?
Yes, sorry, this panel was scrapped. I did not think to keep the limiter assembly...
Michael
Re: Forgotten Dreams: Restoration of a 1964 Datsun 1500 Road
Posted: Wed Jul 21, 2010 1:11 pm
by Chris66
Couldn't hurt to ask, if anyone out there is scrapping a body, i'm interested in that part.
Sorry for jacking Michael
Chris
Re: Forgotten Dreams: Restoration of a 1964 Datsun 1500 Road
Posted: Wed Jul 21, 2010 11:46 pm
by dbrick
I meant to ask, any other issues with the B box? is the spline count on the 64 shaft (deathspear) different than the small U-joint, or did you use a late shaft?
Re: Forgotten Dreams: Restoration of a 1964 Datsun 1500 Road
Posted: Wed Aug 25, 2010 11:30 pm
by spriso
End of Summer Update
It has been a crazy summer. Work commitments have kept my shop time to a minimum, but I have still been sneaking out and getting more done on the wife's car. The front suspension is all back together with new parts and hardware:
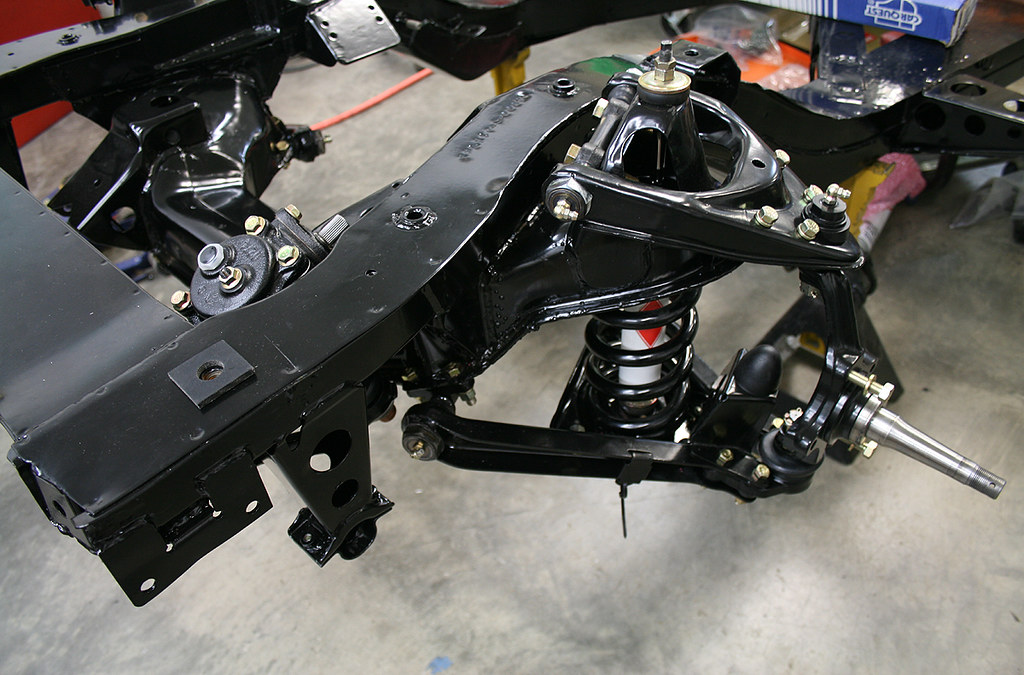
I have updated the steering box to a "Type B" version and wanted to use the matching idler with the steering setup. Unfortunately, the threaded portion of the idler shaft was damaged when I removed the steering arm. Grrr. Bill Cole shared that he had successfully modified an early idler shaft to "Type B" specs and I have done the same-- here are photos of the process:
In this shot you can see the differences between the early "Type A" and later "Type B" idler shafts. The difference is in the large "Washer" that Nissan used to center the shaft in the cast housing. All other dimensions are the same between the shafts:

The "washer" is just welded to the top shoulder on the idler shaft as illustrated below:

To remove the "washer", I chocked the idler shaft in my trusty South Bend lathe and started making metal chips:

And the finished product:

Now I just need to replace the bushing in the idler housing and the threaded keeper, and we should be good to go!
In other progress, the body is slowly coming along as well...

That is the update from here!
Michael
Re: Forgotten Dreams: Restoration of a 1964 Datsun 1500 Road
Posted: Wed Aug 25, 2010 11:33 pm
by spriso
Dave wrote:
I meant to ask, any other issues with the B box? is the spline count on the 64 shaft (deathspear) different than the small U-joint, or did you use a late shaft?
The thread count and spline diameter on the early to late U-joint is different, so we will be using a hybrid early/late steering shaft that will be modified to the correct length. Nearly all our cars get the later steering box conversion, so we have built a lot of these steering shafts-- the trick is to get the right length as they are also different lengths due to the length of the u-joint.
If you don't get the overall length correct, it can be difficult to use the correct turn signal assembly and steering column shell so it all looks "correct"...

Michael