Akpilot's Roadster

Discuss engine swap details here!

Moderators: notoptoy, S Allen, Solex68

Post Reply
Akpilot
Roadster Fanatic
Posts: 169
Joined: Tue Aug 20, 2013 12:05 am
Location: Anchorage, Ak

Re: Akpilot's Roadster

Post by Akpilot »

norgebe91 wrote:I have rust in the exact same places as you....except much worse. Thanks for the inspiration!! I will definitely be following this build! Love the Busa engine by the way.
Thanks for the interest, and I feel sorry for you if your is worse, I have my hands full with what I've got that's for sure. Yea the Busa should be fun!

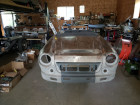
I do need some help from the Roadster community, I'm trying to rebuild the inner fenders where it seems the Datsuns rusts away. It is under the air cleaner and battery. I'm bending up new metal and need to know if both passenger and drivers side are similar. My best side is the drivers side outer, but previously it was in a crash and a little jacked up, I bend it out best I could but need to know how much clearance I need for the shock towers, and if both sides are similar.

Measurements I got is:
From the bottom to the bend out for the air cleaner / battery is 3"
Shortest point to the air cleaner / battery bend out is 2 1/16"
At the front is 2.5" to the "Crease"
Total clearance length is 9.5"

Thanks
Ak
You do not have the required permissions to view the files attached to this post.
User avatar
pebbles
Roadster Fanatic-Site Supporter
Posts: 3931
Joined: Thu Dec 16, 2010 12:00 am
Location: Washington

Re: Akpilot's Roadster

Post by pebbles »

Aka made a jig. Shoot him an email, here are some pics
http://www.311s.org/phpBB3/viewtopic.ph ... 5&start=45" onclick="window.open(this.href);return false;" onclick="window.open(this.href);return false;" onclick="window.open(this.href);return false;

Jtth
As far as i can tell, both sides are similar on the bottom side nearest the frame.
Its not clear to me about where you are measuring to get 3 and 2 1/16
From the frame to the box channel or the width of the lower side of the box channel.
David


"When we were standing next to the motor while on the dyno, and the motor hit VVL, eyes went watery.."
Akpilot
Roadster Fanatic
Posts: 169
Joined: Tue Aug 20, 2013 12:05 am
Location: Anchorage, Ak

Re: Akpilot's Roadster

Post by Akpilot »

Thanks Pebbles, because I needed to hammer out the drivers side I wanted to know if the two sides were similar so I'll make them the same.

Ak
You do not have the required permissions to view the files attached to this post.
Akpilot
Roadster Fanatic
Posts: 169
Joined: Tue Aug 20, 2013 12:05 am
Location: Anchorage, Ak

Re: Akpilot's Roadster

Post by Akpilot »

More...

Ak
You do not have the required permissions to view the files attached to this post.
Akpilot
Roadster Fanatic
Posts: 169
Joined: Tue Aug 20, 2013 12:05 am
Location: Anchorage, Ak

Re: Akpilot's Roadster

Post by Akpilot »

It was a productive weekend, but looking at the pictures I would have rather been at Solvang meeting all you and looking at all the Roadsters. Come to think of it I've only seen the one I'm working on and Zogsters '68.

Ak
You do not have the required permissions to view the files attached to this post.
Akpilot
Roadster Fanatic
Posts: 169
Joined: Tue Aug 20, 2013 12:05 am
Location: Anchorage, Ak

Re: Akpilot's Roadster

Post by Akpilot »

Well, like anything I usually do, I jump in with both feet and figured I'd attack the hard spot. Well it ended up being harder than I originally thought and I'm looking for some advice. Hopefully someone on here has opened up the cowl of the car and been there done that sort of thing.

First the easy part, enough talking on to the pictures.

Ak
You do not have the required permissions to view the files attached to this post.
Akpilot
Roadster Fanatic
Posts: 169
Joined: Tue Aug 20, 2013 12:05 am
Location: Anchorage, Ak

Re: Akpilot's Roadster

Post by Akpilot »

Continuing on.

Ak
You do not have the required permissions to view the files attached to this post.
Akpilot
Roadster Fanatic
Posts: 169
Joined: Tue Aug 20, 2013 12:05 am
Location: Anchorage, Ak

Re: Akpilot's Roadster

Post by Akpilot »

More.
You do not have the required permissions to view the files attached to this post.
Akpilot
Roadster Fanatic
Posts: 169
Joined: Tue Aug 20, 2013 12:05 am
Location: Anchorage, Ak

Re: Akpilot's Roadster

Post by Akpilot »

These last pictures are of the drivers side as the pictures came out better.

Ak
You do not have the required permissions to view the files attached to this post.
User avatar
Roman
Site Supporter
Posts: 1197
Joined: Mon Apr 23, 2012 11:41 pm
Location: Shasta, the lake, in the state of Jefferson!
Contact:

Re: Akpilot's Roadster

Post by Roman »

Wow! you certainly did jump in. Impressed the hell out of me, that's for sure.
Will trade guitars for roadsters, food, shelter, clothes, etc, etc.
Akpilot
Roadster Fanatic
Posts: 169
Joined: Tue Aug 20, 2013 12:05 am
Location: Anchorage, Ak

Re: Akpilot's Roadster

Post by Akpilot »

So now with that done I turned my attention to the cowl. What I'm concerned about is the how to fix the passengers side. It turns out that the bondo was hiding a lot of rust and the wire brush ate more metal away. So now how to fix?

1. Use copper backing and fill weld up the holes and grind smooth? (Original plan) This method I'm worried about heat warping this size of hole especially where the windshield seals.

2. Cut out small pieces of new metal and weld? Again warpage?

3. A guy at work suggested seam glue the cowl to the lower piece and not weld the holes but bondo them. Not sure how that will go and if rust will return. I think he mostly suggested as that's how they attached his side panels to his truck without warpage. Anyone have experience with this?

My plan was fill smaller holes with copper backing, grind and then to pinch the cowl down while spot welding the holes I used to separate then bondo if necessary, but the metal is too far gone for that. It almost needs to be completely replaced but bending, getting right so windshield will seal? Using patch panels underneath and then bondo filling the top will leave a uneven surface to weld to leading to an uneven windshield surface?

Advice anyone?

Ak
You do not have the required permissions to view the files attached to this post.
Akpilot
Roadster Fanatic
Posts: 169
Joined: Tue Aug 20, 2013 12:05 am
Location: Anchorage, Ak

Re: Akpilot's Roadster

Post by Akpilot »

Thanks Roman, but with me working on the floorboards, inner fenders ect seems easy. The cowl needs to seal and to make matters worse it will be a focal point of the project as anyone walking up to the car it's the first thing they'll see.

IDK but maybe I'm overthinking this just weld and grind smooth already.

Ak
User avatar
Roman
Site Supporter
Posts: 1197
Joined: Mon Apr 23, 2012 11:41 pm
Location: Shasta, the lake, in the state of Jefferson!
Contact:

Re: Akpilot's Roadster

Post by Roman »

You got this.

With bonding instead of gluing, wouldn't brazing the holes be better than bondo? wouldn't that be less heat to cause damage, but give better protection?? My bondo in holes always has fallen out later. :lol:
Will trade guitars for roadsters, food, shelter, clothes, etc, etc.
User avatar
S Allen
Site Admin
Posts: 4572
Joined: Thu Dec 05, 2002 4:57 pm
Location: Knoxville, IA(Lake Redrock)Emory, TX
Model: 1500/1600
Year: Low Windshield-64-67.5
Contact:

Re: Akpilot's Roadster

Post by S Allen »

You definitely have so mad metal working skills. I think you will sort it out all on your own. What you have done so far looks to be done by a skilled craftsman. Keep up the great work and do not forget to keep the pictures coming.

Steve
66 Stroker-Going Orange
67 SRL311-00279-resto project
Stock '72 240Z-Blue
2002 Ford F250 7.3 Diesel 2WD Hauler
2008 Toyota FJ Cruiser
2009 Smart ForTwo Passion Coupe
2013 Fiat 500 Abarth
User avatar
Gregs672000
Roadster Fanatic-Site Supporter
Posts: 9428
Joined: Fri Aug 07, 2009 11:47 pm
Location: Tacoma, WA

Re: Akpilot's Roadster

Post by Gregs672000 »

Ya man, all I can say is if anyone can fix this, you can!
Greg Burrows
'67 2000 #588
Tacoma, WA
Post Reply