Forgotten Dreams: Restoration of a 1964 Datsun 1500 Roadster

Here can put pictures and write-ups about your roadster or other vehicles.

Moderators: notoptoy, S Allen, Solex68

Post Reply
User avatar
spriso
Vendor
Posts: 1629
Joined: Wed Jun 04, 2003 9:20 am
Location: Oregon
Contact:

Re: Forgotten Dreams: Restoration of a 1964 Datsun 1500 Roadster

Post by spriso »

Rocker Rebuild Part II

With the majority of the driver's rocker cut off the car, this morning was spent cutting out the remains so the newly rebuilt donor rocker panel could be installed. Since both the A-pillar and the rear quarter panel overlap the rocker panel, it took quite a bit of time to cut out the remains so the new panel could be slipped into place.

The first part that needed to be dealt with was the bottom of the A-pillar. When I cut the old panel out, I just trimmed around the existing welds, and the plan was to die grind the material away. But after seeing what the inside of the rocker panel looked like, plus with my experience with the bottom of the passenger A-pillar, I decided to cut the bottom portion of the A-pillar out-- and in hindsight, I am glad I did, it was full of crud:

Image

Since the kick panel in front of the A-pillar also overlaps the rocker panel, it needed to be carefully spot weld drilled so I could remove the section that is sandwiched between the rocker panel backing plate and the kick panel:

Image

With all of that removed, all the sections were wire wheeled and prepped for the new rocker panel.

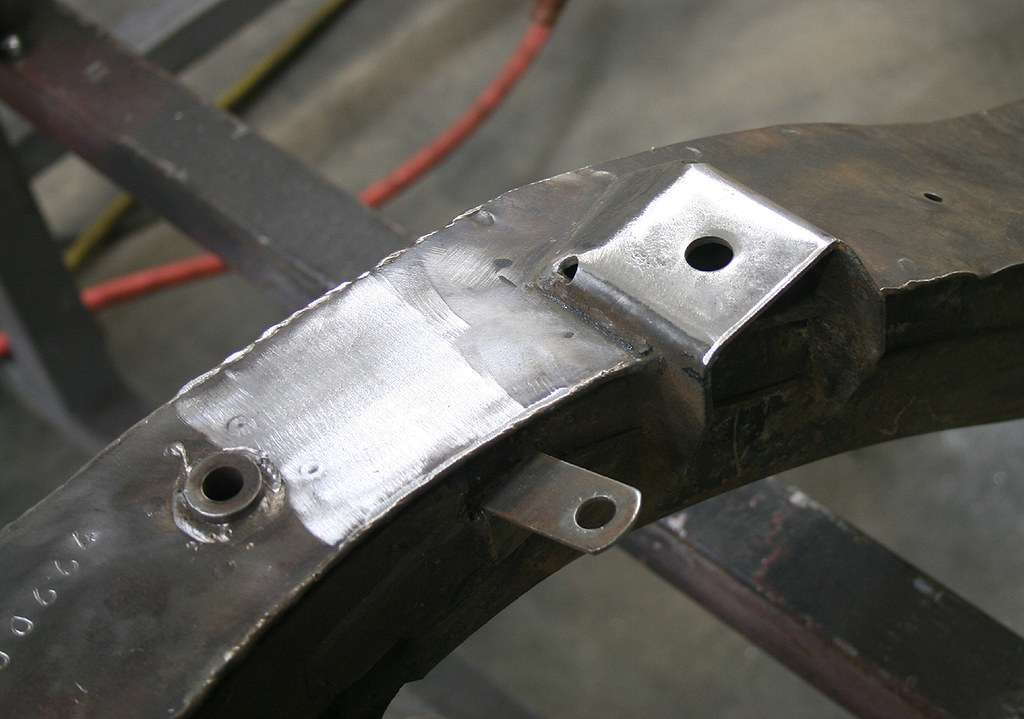
The rear portion of the rocker panel is also overlapped by the quarter panel. Since I did not want to cut any more of the rocker panel out than I had to, I had to figure out a way to get access to the top portion of the rocker panel where it is welded to the backing plate. The only way to do this was to cut an access hole in the inside quarter panel backing plate:

Image

This allowed me to get the plasma cutter in so I could cut out the remains of the original rocker panel:

Image

Then from the bottom side, it was just a matter of using my die grinder with a carbide bit to cut out the remains:

Image

Now I could get inside the quarter panel with my wire wheel and clean and paint it before the new rocker panel was installed.

As I mentioned earlier, a 'new' rocker panel was sourced, but even that needed to have the front and rear sections rebuilt due to rust damage... After that was completed, the entire backside was cleaned, and painted with Zero Rust:

Image

The end that is overlapped by the quarter panel was also painted with Zero Rust as I won't be able to paint it once it is installed:

Image

The rocker panel backing plate was also cleaned up, the jack point hole was welded up (they will be removed from this car), and the panel was masked, and painted with Zero Rust:

Image

Guy Byrd was here helping again today, and with all the grunt work out of the way, I turned him loose with the rocker panel so he could make sure that all the gaps are correct and everything is sitting like it should. He reinstalled the driver's door, and adjusted everything until the gaps were all correct. Then it was just a matter of welding it into place.

Image

And as it sits tonight (still need to finish grind everything, but you get the idea):

Image

Tomorrow we will finish the front half of the quarter panel and I will rebuild the front leg of the A-pillar...

Happy New Year everyone!

Michael
Spriso Motorsports
http://www.spriso.com
Instagram https://instagram.com/spriso/
SR20 Powered Roadsters
Engine swap kits Available! See my website!
User avatar
notoptoy
Vendor-Site Supporter
Posts: 9700
Joined: Fri Oct 02, 2009 2:55 pm
Location: Winston-Salem, NC and Ocala, FL
Contact:

Re: Forgotten Dreams: Restoration of a 1964 Datsun 1500 Roadster

Post by notoptoy »

Thanks again for posting your progress. The detail is great and very informative.

This is going to be one fine looking ride!
"When all else fails, force prevails!" Ummm, we're gonna need a bigger hammer here.

67.5 SPL311 H20 w/5 speed
65 Impala Convertible
2017 C43 AMG
User avatar
spriso
Vendor
Posts: 1629
Joined: Wed Jun 04, 2003 9:20 am
Location: Oregon
Contact:

Re: Forgotten Dreams: Restoration of a 1964 Datsun 1500 Roadster

Post by spriso »

More Fun (or Rust Never Sleeps!)

Today got off to a good start, Guy and I got both rocker panels finished, well nearly finished, I still need to patch the jack point on the driver's side, but here are some pics:

Image

Image

Now that the rockers are basically out of the way, the last major issue was the rust in the trunk drop on the driver's side of the car. From the outside, there were just a few tell-tale pin holes that were on the rear quarter panel fender lip (how bad can it really be?):

Image

And from the rear, more tell-tale holes-- it was rotting from the inside out!:

Image

A look on the inside of the trunk drop tells a different story-- remember, all that is green is converted rust/crud from the acid bath:

Image

Obviously, water and dirt had been sitting in here for a very long time. Since there were so many pin holes, this area needed to be cut out and replaced. I had a donor panel from a car that we had parted (a real Bondo queen!) but it had a very solid trunk drop that I processed off and spent several hours scraping undercoating, body filler removing, and bead blasting to get it to look like this:

Image

From the backside, it was also pretty clean (after bead blasting!):

Image

Now that we had our donor panel, Guy marked the quarter panel and started cutting it out with a die grinder:

Image

It is probably a really good thing we decided to remove this section-- compare it to the 'new' donor panel!

Image

With the original trunk drop removed from the car, I started removing the remains and cleaning everything up. As I started up the fender lip, more and more dirt and crud came out as I scraped the gap. I even found a few dropped (and very rusty) side trim nuts that had been wedged in-between the fender lip and wheel house for who-knows how long. The problem was we could still see way more crud in there, and a few more pin holes developed in the inner fender.

You know what that means... :( Trim, trim, trim, until we hit solid, clean metal:

Image

I really did not want to have to start building outer fender lips, but Guy got to work with his hammer and dolly and whipped out a very nice fender lip that we tacked into the quarter panel-- that will take care of the outside:

Image

The inside is another matter. Here is what we cut out-- the shiny radial marks are how deep I could get with the flat-blade screw driver, as you can see, there was still a lot left to get out! That rust was sandwiched between the wheel house and the outer skin of the quarter panel...

Image

Other than one pin-hole, it did not look that bad from the outside:

Image

A few minutes with the bead blaster got the metal clean again:

Image

The lower third of this part was cut out and replaced, here is the new part coated in Zero Rust and ready to go back in:

Image

And that is where we are tonight-- I will post another update tomorrow-- hopefully we should have a majority of the metal work finally wrapped up tomorrow!

Michael
Spriso Motorsports
http://www.spriso.com
Instagram https://instagram.com/spriso/
SR20 Powered Roadsters
Engine swap kits Available! See my website!
User avatar
notoptoy
Vendor-Site Supporter
Posts: 9700
Joined: Fri Oct 02, 2009 2:55 pm
Location: Winston-Salem, NC and Ocala, FL
Contact:

Re: Forgotten Dreams: Restoration of a 1964 Datsun 1500 Roadster

Post by notoptoy »

Man, can I borrow Guy for a few weeks!?! You two really go to town on this project. Thanks again for the documentation!
"When all else fails, force prevails!" Ummm, we're gonna need a bigger hammer here.

67.5 SPL311 H20 w/5 speed
65 Impala Convertible
2017 C43 AMG
User avatar
spriso
Vendor
Posts: 1629
Joined: Wed Jun 04, 2003 9:20 am
Location: Oregon
Contact:

Re: Forgotten Dreams: Restoration of a 1964 Datsun 1500 Roadster

Post by spriso »

Weekend Wrap Up

More work, more mess, but getting closer!

Just three photos for tonight. In this shot Guy is using one of the many Vice Grips from his bag of tricks. This kept the sheet metal aligned and flat as the quarter panel was welded:

Image

Inside of the trunk looking at the back side of the quarter panel:

Image

And finally, the quarter panel looking like a normal car again:

Image

Next weekend we hope to have the metal work finished up. I need to patch the driver's A-pillar, patch a rust hole on the bottom of the driver's door, and Guy is going to patch the bottom of the driver's fender. Hmmmm. That is starting to sound like more than a weekend... :(

Thanks again for everyone's comments-- I will pass on your compliments to Guy!

Michael
Spriso Motorsports
http://www.spriso.com
Instagram https://instagram.com/spriso/
SR20 Powered Roadsters
Engine swap kits Available! See my website!
sleepyzzz
Roadster Fanatic-Site Supporter
Posts: 687
Joined: Sat Aug 30, 2008 5:43 am
Location: Harrison, AR

Re: Forgotten Dreams: Restoration of a 1964 Datsun 1500 Roadster

Post by sleepyzzz »

metal work,installation, and finish are just beautiful. you and your crew, do some amazing work.
1967 SPL1600 sold
2015 Nissan Rogue
2015 Altima

http://i32.photobucket.com/albums/d29/sleepyzzz56/roadster/IMG_0252-1-1.jpg
User avatar
spriso
Vendor
Posts: 1629
Joined: Wed Jun 04, 2003 9:20 am
Location: Oregon
Contact:

Re: Forgotten Dreams: Restoration of a 1964 Datsun 1500 Roadster

Post by spriso »

Fender Patch

More progress to report-- this time the fender patch on the passenger fender. As I am sure that many of you know, 1500 front fenders are very difficult to come up with. The original fender on this car was straight and clean other than the lower corner which had previous accident damage under the reinforcement rib, as well as rust issues in the lower corner.

Image

After dipping, the fender came back a little lighter than when it went in! The tell-tale pin holes and heavy pitting on the backside needed to be repaired before the car goes to paint.

As part of putting the rocker and A-pillar on the car, we hung all the sheet metal on the car and Guy got busy with the hammer and dolly to get the fender as straight as possible before we cut everything out. He wanted to be sure that it fit properly on the car before we changed things again. With the dents pounded out, the edge now looked like this:

Image

It was straight now, fit the door gap correctly, but the rust still needed to be cut out:

Image

Guy got busy with the die grinder and cut out the rotten portion of the bottom of the fender:

Image

We cut the fender just short of the inner fender lip. 1500's have a very pronounced crease around the lip of the fender and we did not want to disturb it, especially since it was not damaged by rust.

Image

Then over the course of a couple hours, the patch panel was reworked (the edge did not match the profile of the backside of the fender) and tacked into place, allowing the sheet metal to cool between welds to prevent warping:

Image

Weld, cool, grind, cool, hammer and dolly. Repeat until completed!

Image

Again, I would like to thank everyone for their comments. I have a very talented group of people helping with this project and I am very fortunate to have their enthusiasm, energy, and skills!

Michael
Spriso Motorsports
http://www.spriso.com
Instagram https://instagram.com/spriso/
SR20 Powered Roadsters
Engine swap kits Available! See my website!
User avatar
ppeters914
Roadster Fanatic-Site Supporter
Posts: 3125
Joined: Mon Jun 28, 2004 5:51 pm
Location: Lake Forest Park, WA (just north of Seattle)
Model: 1500/1600
Year: Low Windshield-64-67.5

Re: Forgotten Dreams: Restoration of a 1964 Datsun 1500 Roadster

Post by ppeters914 »

spriso wrote:I have a very talented group of people helping with this project and I am very fortunate to have their enthusiasm, energy, and skills!

Michael
I'd call that the Understatement of the Year, but it's still early. :mrgreen:
Pete
-------------------------------------
'67 1600 - frame off started in 2014. Now I know why roadster projects take so long. What a stupid idea. :smt021
'66 1600 - parts car
'66 WPL411 ***SOLD***
A couple of Porsches, a RAV4 Hybrid, and a motorcycle
User avatar
spriso
Vendor
Posts: 1629
Joined: Wed Jun 04, 2003 9:20 am
Location: Oregon
Contact:

Re: Forgotten Dreams: Restoration of a 1964 Datsun 1500 Roadster

Post by spriso »

More Progress

More progress today on the 1500 project. I got the A-pillar rebuilt, and finished, and more finish welding and grinding on the rocker panels. Everything is getting pretty close.

One of the last projects that needed to be dealt with was the driver's door. I am using the original 1500 door on the driver's side of the car, and like nearly every 1500 door that I have seen (in the Northwest) it suffered from rust along the bottom edge of the door where it was wedged against the foam door weatherstrip that the 1500 cars used. (I have not had the same problem with the 1600/2000 cars):

Image

The amazing thing is the rest of the door was clean and rust free!

I cut out the offending rust and made a new patch panel that matched the profile on the door and tacked it into place:

Image

That was then welded and ground (still needs the last finish grind in this image):

Image

A little body filler and it will be good to go...

The door had other issues though. At some point in its life, someone had taken a die grinder and made the holes oblong-- who knows why. I decided to get the holes back in their stock locations for now, and if they need an adjustment when the car goes together, we can do that.

So how do you fix the holes that look like this? I am glad you asked... :wink:

Image

The easiest way to fill the edges of these types of holes is to use a thick chunk of aluminum as a backing plate (behind the hole). You want the backing material something that a typical wire welder won't stick to-- aluminum or copper works best. You want it thick as it will heat up pretty fast if you are doing multiple holes or many tack welds:

Image

Wedge the aluminum behind the hole you want to fill, and do multiple tack welds to fill the side of the hole that is oblong. Try to maintain the original profile of the original hole so you know where it should be located. When you are done, it should look like this-- not pretty, but it does not have to be, all you want to do is fill that hole! Use a 90-degree die grinder with a sharp bit to clean up the weld:

Image

Go easy with the die grinder-- they can get away from you pretty easily! When you are done, the holes should look like this:

Image

Fixed! And there you have it! Hopefully I should have the metal work wrapped up tomorrow...

Michael
Spriso Motorsports
http://www.spriso.com
Instagram https://instagram.com/spriso/
SR20 Powered Roadsters
Engine swap kits Available! See my website!
User avatar
spl310
Roadster Guru
Posts: 13241
Joined: Sun Dec 29, 2002 10:38 pm
Location: In front of this keyboard... in Jacksonville, Florida!

Re: Forgotten Dreams: Restoration of a 1964 Datsun 1500 Roadster

Post by spl310 »

Michael,

I have bad news. I believe that Nissan slotted those holes as the die was a bit off. I hope that you marked where the latches were and used that end of the hole, or you may be modifying linkage pieces. Most of the 1500s (I would say all as nothing is finite on these cars) that I have seen have been slotted - and most were never disassembled prior to my viewing them.
"Wow, a Roadster!" Stuart Little

1967.5 2000
1967.5 2000
1964 1500
1964 1500
1967.5 1600
1968 chassis
2006 Acura MDX
2013 Volkswagen Jetta TDI wagon
1995 F350 Powerstroke!
More...
User avatar
spriso
Vendor
Posts: 1629
Joined: Wed Jun 04, 2003 9:20 am
Location: Oregon
Contact:

Re: Forgotten Dreams: Restoration of a 1964 Datsun 1500 Roadster

Post by spriso »

Sid wrote:
I have bad news. I believe that Nissan slotted those holes as the die was a bit off.
That does not surprise me, and this morning I went down to the shop to check a couple of the other 1500 doors that I have, and sure enough, all the holes are slotted! Grrr.... Oh well, not that big of a deal, I can just slot them again. It was a good exercise anyway! :P

Thanks for your feedback!

Michael
Spriso Motorsports
http://www.spriso.com
Instagram https://instagram.com/spriso/
SR20 Powered Roadsters
Engine swap kits Available! See my website!
User avatar
itsa68
Roadsteraholic
Posts: 832
Joined: Sun Apr 18, 2004 11:24 am
Location: Winnipeg, Manitoba,Canada
Model: 1500/1600
Year: High Windshield-68-70

Re: Forgotten Dreams: Restoration of a 1964 Datsun 1500 Roadster

Post by itsa68 »

We must keep in mind that some parts on these cars were built on the exact science of approximations.

Ray B
Thats not a R16 death rattle....its a dried leaf hitting my heater blower fan.
1968 SPL311 non-smog
User avatar
spl310
Roadster Guru
Posts: 13241
Joined: Sun Dec 29, 2002 10:38 pm
Location: In front of this keyboard... in Jacksonville, Florida!

Re: Forgotten Dreams: Restoration of a 1964 Datsun 1500 Roadster

Post by spl310 »

Sorry about that. I wish I could have gotten word to you before all of that work.
"Wow, a Roadster!" Stuart Little

1967.5 2000
1967.5 2000
1964 1500
1964 1500
1967.5 1600
1968 chassis
2006 Acura MDX
2013 Volkswagen Jetta TDI wagon
1995 F350 Powerstroke!
More...
User avatar
spriso
Vendor
Posts: 1629
Joined: Wed Jun 04, 2003 9:20 am
Location: Oregon
Contact:

Re: Forgotten Dreams: Restoration of a 1964 Datsun 1500 Road

Post by spriso »

Gettin' Jiggy With It!

Since the weather was not cooperating with putting on some DP40 sealer primer, I started work on the frame modifications to put the SR20DE into the chassis. You have probably seen my write up on how to do an SR conversion into a roadster (aka "Bob") http://www.311s.org/phpBB3/viewtopic.php?f=15&t=5128. That was 2006 and since then we have developed a rental JIG for installing the Spriso Motorsports SR20 motor mounts that places the engine in the correct location, at the correct tilt, and takes out all the guess work on installing our kit.

This is "Jiggy":

Image

What Jiggy does is hang two motor mount base plates in space allowing you to trim the motor mount base plates that come with our kit to match your frame. Due to the many minor variations that we have seen in the frames over the years, we have found this to be the best method to get the best fit for individual frames.

After looking at dozens of frames, we have found that the spacing for the body mounts in the engine compartment have been pretty universal and we designed two 9/16" pins that fit into these holes (the roadster holes are about a 1/32 undersized, so we drill them out with a 9/16" drill bit to make a nice secure fit!):

Image

When both holes are drilled out, the pins slide into the holes, and a simple C clamp is used to keep the jig sitting secure and square:

Image

Neither motor mount base plate on the JIG actually touches the frame at this point:

Image

Image

The motor mount base plates that I send out with my kits need to be trimmed to match the profile of the frame (you can see about 1/4"-3/8" of excess material that will need to be trimmed:

Image

After trimming back the overlapping top piece, we actually get to the frame sidewall. The trimmed motor mount base plate is bolted to the JIG using the provided 8mm bolts:

Image

The motor mount base plate is welded in two passes, first a root pass to get things seated to the vertical portion of the frame rail, then a wider top pass to tie the gap together (be careful not to get your weld into the chassis VIN number-- a 1500 VIN is longer so it gets closer to the edge of the frame rail):

Image

The passenger side is a little different. Where the motor mount plate is located the frame actually curves away and has a step in it, so the cut on this is a little more difficult to figure out. I like to make a pattern on card stock so I can figure out the cuts on the base plate:

Image

Then it is just a matter of trimming and lining up the holes to make sure that there is a good fit on the passenger side frame rail:

Image

Trim, adjust, weld, grind... you know the drill! :P

That takes care of the motor mount base plates, then it is just a matter of building some new side gussets to tie them into the frame:

Image

If you are considering a SR20 swap into your roadster, Jiggy makes things much easier as it takes all the guess work out of the project, and will easily save you 8-10 hours of setup time. Contact me directly for rental information! Jiggy has been sent all around the country (even Alaska and Canada!) and feedback has been very positive!

As for the roadster body, the metal work is done, the underside has been hit with scotch brite one last time before sealer primer, and as soon as the weather cooperates, we will get the first coat of sealer on...

Image

That is all from wet and soggy Oregon!

Michael
Last edited by spriso on Sat Dec 31, 2016 11:19 pm, edited 1 time in total.
Spriso Motorsports
http://www.spriso.com
Instagram https://instagram.com/spriso/
SR20 Powered Roadsters
Engine swap kits Available! See my website!
User avatar
windy311
Roadster Fanatic-Site Supporter
Posts: 527
Joined: Sun Aug 01, 2004 6:49 am
Location: NSW Australia
Model: 1500/1600
Year: Low Windshield-64-67.5

Re: Forgotten Dreams: Restoration of a 1964 Datsun 1500 Roadster

Post by windy311 »

Michael
I would just like to add if others want to weld holes and dont have the aluminium you can use brass such as an old pad lock.It works the same way no stick.
1964 1500 H20 powered 5 speed
1965 1600
Rob.
Post Reply