Supercharged KA update
Moderators: notoptoy, S Allen, Solex68
-
Alvin

- Roadster Nut-Site Supporter
- Posts: 8381
- Joined: Tue Jan 23, 2007 7:01 pm
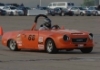
Still awaiting the dyno of the "tube framed, circle track Datsun roadster" 
Alvin Gogineni
San Jose, CA
1967.5 SPL/SR20
1997 Acura Integra GS-R
2022 Chevy Bolt EUV
zcarblog.com
Instagram
YouTube
My SR20 Build Thread
San Jose, CA
1967.5 SPL/SR20
1997 Acura Integra GS-R
2022 Chevy Bolt EUV
zcarblog.com
YouTube
My SR20 Build Thread
-
nomadtrash
- Roadster Fanatic
- Posts: 456
- Joined: Mon Jul 26, 2004 11:30 pm
- Location: Krum, TX
The weather and work schedule hasn't allowed us to run it. The thing is bolted to the dyno and ready to go. I just need to turn it on and rev it up. It is kind of frustrating.
My buddy that owns the dyno is an engineer and has a very expensive engine analysis program. It is like desktop dyno only it is the $10,000 version. We have been playing with the setup and found several small things that should add up to big power gains. The system as installed on a stock motor is simulated at around 215hp. This is consistent with the three other dyno charts of virtually identical setups. We swapped cams around using different combos of factory profiles and found that the 248 degree intake and 232 degree exhaust was in the 250hp range. We then degreed the cams for less overlap and made 275-280hp. These are all with very good torque numbers. The latter combo made bunches of torque from 2000-7000 rpms (over 200 lb.ft.). Just for grins we tried an M90 supercharger and found the cure. It made 315hp at 10 psi which is 3 less than the M62. All the data showed very good knock index without the need for an intercooler. With the addition of water/meth the knock index was even better. At this point I'm not sure if I really need the water/meth. I purchased a 232 exhaust cam today for $25. When the weather clears we'll fire that baby up and see what happens. This program supposedly is very accurate. I think it is a little conservative. Most engineers are.
I'll get some photos of it out at the NASCAR track for Alvin's collection. I've got one in my webshots already of my Dad's roadster at the Las Vegas NASCAR track.
Andy Cost
Roadster-less
Bolt on modification? I did use some bolts!
Roadster-less
Bolt on modification? I did use some bolts!
-
Alvin
- Roadster Nut-Site Supporter
- Posts: 8381
- Joined: Tue Jan 23, 2007 7:01 pm
You rock Andy,
I'm still perplexed what class you can run such a beast in...surely there won't be other Datsuns in the same group
Got my Rx-7 axle awhile back...you've inspired me to try an tackle that project!
I'm still perplexed what class you can run such a beast in...surely there won't be other Datsuns in the same group
Got my Rx-7 axle awhile back...you've inspired me to try an tackle that project!
Alvin Gogineni
San Jose, CA
1967.5 SPL/SR20
1997 Acura Integra GS-R
2022 Chevy Bolt EUV
zcarblog.com
Instagram
YouTube
My SR20 Build Thread
San Jose, CA
1967.5 SPL/SR20
1997 Acura Integra GS-R
2022 Chevy Bolt EUV
zcarblog.com
YouTube
My SR20 Build Thread
-
nomadtrash
- Roadster Fanatic
- Posts: 456
- Joined: Mon Jul 26, 2004 11:30 pm
- Location: Krum, TX
Work on the supercharged motor is coming along slowly but surely. I have it on the dyno. We were trying to get the dyno and motor running properly. I made a brief pull after fighting problems all day. I cranked it down at 3000 rpms and got 195 horsepower. The wideband was reading 7.5 and the pipe was glowing red like a fire poker. After that I decided to swap cams and do some adjusting. I drilled my cam gears and installed an exhaust cam on the intake side. I ended up with 4-1/2 degrees retard on the intake and 5 degrees retard on the exhaust. That should help with the overlap problem that palgues boosted motors. My next trip over there should be a whole day of tuning. I have run the simulations and came out with 280 horsepower. We'll see how well it works. I just bought an IHI Lysholm supercharger that puts out 30 psi. That should make the power I'm looking for. In the mean time I will be running it with the Eaton M62 unless someone offers me too much to refuse for my system. Here are some photos of the motor on the Stuska Dyno.


Andy Cost
Roadster-less
Bolt on modification? I did use some bolts!
Roadster-less
Bolt on modification? I did use some bolts!
-
Alvin
- Roadster Nut-Site Supporter
- Posts: 8381
- Joined: Tue Jan 23, 2007 7:01 pm
Insanity. But I like it! I just got your album a grip more hits as I am about to post your link to the Bluebirds/510 list....they'd love this.
Alvin Gogineni
San Jose, CA
1967.5 SPL/SR20
1997 Acura Integra GS-R
2022 Chevy Bolt EUV
zcarblog.com
Instagram
YouTube
My SR20 Build Thread
San Jose, CA
1967.5 SPL/SR20
1997 Acura Integra GS-R
2022 Chevy Bolt EUV
zcarblog.com
YouTube
My SR20 Build Thread
-
nomadtrash
- Roadster Fanatic
- Posts: 456
- Joined: Mon Jul 26, 2004 11:30 pm
- Location: Krum, TX
Here is the motor on the dyno. I loaded it till it choked the motor. Sounds cool.
http://community.webshots.com/video/300 ... 1685VdgrpN
http://community.webshots.com/video/300 ... 1685VdgrpN
Andy Cost
Roadster-less
Bolt on modification? I did use some bolts!
Roadster-less
Bolt on modification? I did use some bolts!
-
nomadtrash
- Roadster Fanatic
- Posts: 456
- Joined: Mon Jul 26, 2004 11:30 pm
- Location: Krum, TX
I blew the head gasket on the dyno. Actually, it just started weeping water out the side. It didn't lose compression or mix the oil and water. It may have just been built poorly in the past. When I pulled it apart it was 20 overbore so someone has been in there in the past. I have all the parts to put it back together.
Andy Cost
Roadster-less
Bolt on modification? I did use some bolts!
Roadster-less
Bolt on modification? I did use some bolts!
-
Dave
- Turbo Powered
- Posts: 657
- Joined: Fri Aug 01, 2003 12:24 am
- Location: In the refrigerator, to the left of the mayonnaise, behind the pickles and beer.
Andy, is this thing ever going to hit a chassis dyno? I'd love to see what it will put down.
Dave Kaplan
68 2000 Roadster - Now with GT2560R power!
SR20-DET: 223 rwhp, 222 lb-ft.
http://www.cardomain.com/ride/698904
68 2000 Roadster - Now with GT2560R power!
SR20-DET: 223 rwhp, 222 lb-ft.
http://www.cardomain.com/ride/698904
-
nomadtrash
- Roadster Fanatic
- Posts: 456
- Joined: Mon Jul 26, 2004 11:30 pm
- Location: Krum, TX
Classified Employment Ad:
Wanted: Someone to work on my racecar project for free. Must have ESP and be able to read my mind so as to know exactly how I wanted it done. Needs to have expert welding, fabrication, and motor building skills. At the conclusion of the project you will be booted to the curb. Serious applicants only.
It freaking sucks spending all your time at work and having no time to work on your project. Does anyone have a cloning machine or a time machine for sale? I guess it could be worse, I could have every day free to work on the car but no job and no money to spend on the project. How about a million dollar donation to my cause?
Anyone?
Andy Cost
Roadster-less
Bolt on modification? I did use some bolts!
Roadster-less
Bolt on modification? I did use some bolts!
-
ppeters914
- Roadster Fanatic-Site Supporter
- Posts: 3125
- Joined: Mon Jun 28, 2004 5:51 pm
- Location: Lake Forest Park, WA (just north of Seattle)
- Model: 1500/1600
- Year: Low Windshield-64-67.5
Yup, that's where I'm currently at, and it is worse. Job hunting sucks.nomadtrash wrote:I guess it could be worse, I could have every day free to work on the car but no job and no money to spend on the project.
Pete
-------------------------------------
'67 1600 - frame off started in 2014. Now I know why roadster projects take so long. What a stupid idea.
'66 1600 - parts car
'66 WPL411 ***SOLD***
A couple of Porsches, a RAV4 Hybrid, and a motorcycle
-------------------------------------
'67 1600 - frame off started in 2014. Now I know why roadster projects take so long. What a stupid idea.
'66 1600 - parts car
'66 WPL411 ***SOLD***
A couple of Porsches, a RAV4 Hybrid, and a motorcycle
-
nomadtrash
- Roadster Fanatic
- Posts: 456
- Joined: Mon Jul 26, 2004 11:30 pm
- Location: Krum, TX
A little more progress here. I put together the motor this weekend. I did have one small hitch. I bought a set of new head bolts from headbolts.com. They were TopLine brand. One of them failed while I was torqueing it down. I went to 20 then 59. Next I went from 25 to 62. On the last 62 I had one that never got tight. I just kept spinning it. I finally backed it out to find that the bolt was twisting just above the block. It never did snap luckily and the whole thing backed out without needing surgery. We'll see how they perform. I may be doing another head gasket replacement before long.
I put the 248/248 cams back in and retarded them both. I retarded the intake 2-1/2 degrees and the exhaust 5 degrees. This should give me a little less overlap.
I moved the methanol jet from inside the supercharger to the other side of the throttle body. This should keep the methanol system from running under vacuum and allow me to not have a check valve in the system.
I made a new tensioner bracket that puts the supercharger tensioner on the slack side of the belt. I was never happy with the tensioner on the tight side but the alternator was in the way. I moved the alternator to the other side under the distributor.
Next I'm going to swap oil pans with the spare motor because it has fewer dents. I also need to make new motor mounts on the car. I moved the motor and tranny back 4 inches. I made a new drive shaft this weekend as well as installing the body back on the frame. I guess I got a lot done in one week. I still have many more hours before it will be back on the road but it is starting to come together.
Andy Cost
Roadster-less
Bolt on modification? I did use some bolts!
Roadster-less
Bolt on modification? I did use some bolts!
-
nomadtrash
- Roadster Fanatic
- Posts: 456
- Joined: Mon Jul 26, 2004 11:30 pm
- Location: Krum, TX
I got a little done today. I built some motor mounts and installed the motor in the frame. I had to notch the frame near the a-arms for clearance on the supercharger pulley and the alternator. I also had to notch the frame on the x-member for the transmission. The motor is sitting so low and so far back that it required a little clearancing. On the notches I just cut along the corner of the frame rail and then pounded the lip over. Then I welded it back together. It isn't the greatest looking but I'm not making a show car. The motor mounts are solid. You can also see the panhard bar that I made. The car is flipped on it's side so that I could weld and paint underneath. I painted everything with a coat of red oxide and then with Kabota tractor paint. I should be able to put the body back on pretty soon.
The new photos start on page 15.
http://community.webshots.com/album/267 ... ?start=168
Passenger motor mount

Supercharger

Drivers side motor mount

Passenger side motor mount

Boxed in enlarged exhaust hole

Panhard bar mounted to rusty rear end

X-Member notches

Enjoy,
The new photos start on page 15.
http://community.webshots.com/album/267 ... ?start=168
Passenger motor mount
Supercharger
Drivers side motor mount
Passenger side motor mount
Boxed in enlarged exhaust hole
Panhard bar mounted to rusty rear end
X-Member notches
Enjoy,
Andy Cost
Roadster-less
Bolt on modification? I did use some bolts!
Roadster-less
Bolt on modification? I did use some bolts!
-
nomadtrash
- Roadster Fanatic
- Posts: 456
- Joined: Mon Jul 26, 2004 11:30 pm
- Location: Krum, TX
I've been having problems getting motivated. Every spare moment is taken up with work or birthday parties. I have been to 10 birthday parties this summer for all the 4 year olds in my daughter's class. I finally stood up to the wife and refused to go to one. I hope there are not any more coming up. Anyway, I've had a little progress lately and I decided to celebrate by installing the wheels and body work and take a few photos. I have completed the rear axle it is painted and new seals installed. It is now bolted up to the three link but will probably have to come out for unforseen reasons. There is now a driveshaft safety loop. I couldn't get the scattershield to fit. I'm going to run it without for a while. I may have to install something inside the bellhousing. I have installed the exhaust system which is 2" all the way back to the 3" resonator and turbo muffler. I think 2" will be large enough. I have one section of pipe to weld in where it goes over the axle. The pipes run through holes in the frame. I want to make this last section so that it will come apart. The front half will pull out in one piece. The rear half will pull out in one piece. The problem is that I can't get a slip connector to work. The tubing runs through a hole in the frame and I can't move the pipe enough to get it to slip on or off. I considered a flange but that wouldn't slip through the hole in the frame. I'm at an impass. I may try a flexible repair section from Autozone. I may be able to bend it enough to slip over the pipe. The steam roller tires look pretty cool. From the rear it looks like a funny-car. The body work in the photos isn't secured well so the car looks bent like a banana. I am going to build new brake and fuel lines. A frame will be welded behind the passenger rear tire to hold the fuel cell, surge tank, fuel pump, methanol reservoir, and battery box. There will be room back there for the radiator to go between the wheels. I also need to build a new roll bar and cover over the package area with sheet aluminum. There are still a bunch of details to take care of. The front wheels are spaced out too far. I can't bring them in any because they will hit the fat calipers. I am considering replacing the front calipers with some floating calipers that are much lighter and have less overhang on the wheel center side. This will allow me to remove the 3/8" spacers and hopefully eliminate any clearance issues with the fenders. I have some BMW E30 rear brake calipers that I am going to try and install on the front. We'll see how it works out. This project has gone from a little bit of cutting and welding to a complete redesign of every system. At least it still looks like a roadster.
Enjoy the photos,


Enjoy the photos,
Andy Cost
Roadster-less
Bolt on modification? I did use some bolts!
Roadster-less
Bolt on modification? I did use some bolts!
-
Alvin
- Roadster Nut-Site Supporter
- Posts: 8381
- Joined: Tue Jan 23, 2007 7:01 pm
LS7, quit playing around with 4-cylinders with tires that wide.
Alvin Gogineni
San Jose, CA
1967.5 SPL/SR20
1997 Acura Integra GS-R
2022 Chevy Bolt EUV
zcarblog.com
Instagram
YouTube
My SR20 Build Thread
San Jose, CA
1967.5 SPL/SR20
1997 Acura Integra GS-R
2022 Chevy Bolt EUV
zcarblog.com
YouTube
My SR20 Build Thread