Supercharged KA update

Discuss engine swap details here!

Moderators: notoptoy, S Allen, Solex68

User avatar
nomadtrash
Roadster Fanatic
Posts: 456
Joined: Mon Jul 26, 2004 11:30 pm
Location: Krum, TX

Post by nomadtrash »

I got the axle back from the shop that narrowed it. The axles were sent to Moser to be cut and re-splined. The housing was narrowed by Kurt Janish at Janco in Wylie, TX. He did a good job of welding a brace across the back of the housing.

Image

Image

Image

I had to redo the supercharger tensioner. I wasn't happy with the less than 180 degrees of contact with the belt and the close proximity of the belt to the water neck. I got a smooth tensioner pulley from a Chevy truck and installed it in the location where the ribbed tensioner was. Now the belt makes about 270 degrees of contact on the supercharger pulley and is a couple of inches away from the water neck.

I have purchased most of the parts for a homemade methanol injection kit. I will be assembling it over the next few days. I plan to spray before the supercharger. I contacted Snow and they said that they have had no problems with hundreds of installs that spray before the supercharger. I was concerned that the spray might erode the coating on the rotors. My dyno session for the 23rd isn't going to happen. The guy with the dyno in his garage has to work that day. It looks like I'll be setting up for the dyno on the 6th and then tuning the following week at some point.

Later,
Andy Cost
Roadster-less

Bolt on modification? I did use some bolts!
User avatar
TurboRagtop
Roadster Nut-Site Supporter
Posts: 317
Joined: Tue Sep 06, 2005 8:15 pm
Location: Gilbert, AZ
Model: 1500/1600
Year: Low Windshield-64-67.5

Post by TurboRagtop »

Andy,
What rear axle did you have narrowed? Ford, Chevy, Dana, etc.
Looks great BTW.
I'm going down that path myself in the next couple of years; starting to plan now...

Karl
Karl Payne, Gilbert, AZ
1966 1600 roadster, 2.3L EFI Turbo Ford engine, FMIC, 2.5" exhaust, T-5 trans, 300ZX big brakes, stand-alone Megasquirt ECU/TunerStudio
User avatar
nomadtrash
Roadster Fanatic
Posts: 456
Joined: Mon Jul 26, 2004 11:30 pm
Location: Krum, TX

Post by nomadtrash »

84 Mazda RX7 GSL. It comes with lmited slip and disc brakes. It is small and light and can handle a lot of power. If you get the GSL-SE model rear end it has 4x4.5 blt pattern so your current roadster wheels will bolt right up. The GSL is 4x110mm but can be redrilled if necessary.

I got the top and bottom links welded onto the housing. Now I need to work on the tube frame.
Andy Cost
Roadster-less

Bolt on modification? I did use some bolts!
TR

Post by TR »

I may have missed it, what type of suspension do you plan on adding to the Mazda rear diff? 3, 4 link, leafs, coil-overs?

It will be an interesting test bench with the power and mid/low speed handling demands of the autoX you are planning...!
Import_sounds-of-mid-GA

Post by Import_sounds-of-mid-GA »

Why is the rear-end offset?
or is that just an illusion?
User avatar
nomadtrash
Roadster Fanatic
Posts: 456
Joined: Mon Jul 26, 2004 11:30 pm
Location: Krum, TX

Post by nomadtrash »

The stock rear end is offset it is just harder to tell since it is so much longer. The pinion is something like an inch or two to the right just the same as the stock one.

I am using a 3-link. I will be cutting the frame at the body mounting brackets in the front of the rear fender well. There will be a cross member made from 2x4 box steel tubing in approximately the same location where the leaf springs attach. The front attachment points for the 3-link will be welded to the cross member. The top attachment point will have a brace that runs along the side of the transmission and attaches to the X-member. The top link is offset by a couple of inches to the right, which should help with right rear tire spin. I plan to use a rubber donut loaded top link to cushion the shock of acceleration and braking.

The RX7 rear end is fairly strong. A couple of 500 horsepower cars are autocrossing with this unit. It is definitely stronger than the roadster unit, which I broke with a strong U20.

Autocross is structured so that stock cars don't normally exceed 60 mph. In my modified car I have gotten into 4th before which is getting close to 100. I hit 140ish in a Ralt RT41 at the last event. The Ralt had a 12a with 230 hp. I suspect that my supercharged motor will have much more power than that and my power to weight ratio will be better.

I'll be working on it more over the next few days and should have more photos loaded.

Have a Merry Christmas,
Andy Cost
Roadster-less

Bolt on modification? I did use some bolts!
User avatar
nomadtrash
Roadster Fanatic
Posts: 456
Joined: Mon Jul 26, 2004 11:30 pm
Location: Krum, TX

Post by nomadtrash »

The methanol sprayer is now installed. I should have installed it a little farther down because it was really tough to get the wrench on it where I put it. I was skeptical about how much water the little universal replacement windshield washer pump would put out. It is pleanty for sure. I think I will have to put a pressure regulator inline. It flooded a good portion of the supercharger in just one second. The system is fairly low tech. I used a universal washer pump and a universal fluid reservoir. There is one nozzle. The unit is activated by a 5 psi hobbes switch that commonly is used as an hour meter switch on a tractor or forklift. When the switch sees 5 psi in the manifold it turns on the sprayer. I drilled a hole in the side of the supercharger case near the throttle body. The methanol sprays into the vacuum side of the supercharger. I was told by several people including a prominent manufacturer of methanol kits that it is ok to spray through the supercharger. Turbos have a bigger problem because the impeller is spinning so fast that the methanol blasts away the vanes. The Bikirom fuel injection computer has the ability to control switches and log inputs. If I were willing to pay the upgrade fee and install all the sensors I could have the Bikirom switch on the sprayer based on intake temp, boost pressure, rpm's, load, throttle position, or a host of other variables. I think the hobbes switch will work fine. I do plan to have the Bikirom use a clutch switch for an alternate rev limiter. I will use this at the drag strip to set my launch rpm's. I am also going to datalog my air fuel ratio with a Techedge wideband controller that I just bought on Ebay. The 0-5volt output from the Techedge will hook to one of the inputs on the Bikirom board. It will datalog rich/lean while it illuminates the cell where the fuel map is running. I can go back and tweak the fuel map to get the best fuel ratio. The Bikirom is a very useful tool.

Here are some photos of the narrowed rear end and the methanol sprayer. I plan on using windshield washer fluid in the sprayer. It seems to work really well. I will label the reservoir as Nitromethanol in an attempt to rattle the competition. Nitro is illegal in autocross.

Click on the photo for a larger image:

Nozzle in the supercharger
Image

Elbow on the outside of the supercharger
Image

Elbow on the outside of the supercharger
Image

Windshield washer pump
Image

Universal reservoir
Image

Hobbes switch
Image

Top link bracket
Image

Right bottom link bracket upside down
Image

Left bottom link bracket upside down
Image
Andy Cost
Roadster-less

Bolt on modification? I did use some bolts!
User avatar
nomadtrash
Roadster Fanatic
Posts: 456
Joined: Mon Jul 26, 2004 11:30 pm
Location: Krum, TX

Post by nomadtrash »

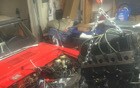
The motor is installed on the dyno. It took the better part of a day to get it all hooked up. The dyno is homemade and designed for a 12a rotary. We had to fabricate motor mounts and install them on the dyno. We also had to figure out how to hook the crank to the dyno. He had a steel plate that bolted to his flywheel in place of the pressure plate. It was attached to the water brake with a short drive shaft. We decided to drill and tap my old stock flywheel for the bolt pattern on his clutch. This serves a dual purpose. His clutch is a 7" dual disc tilton racing clutch. I can now install the tilton pressure plate and clutch disc to my flywheel if I want. The outer edge of the flywheel could be lightened significantly and I would have the benefit of a lightweight flywheel and a racing clutch. For the time being I am going to use the lightweight billet flywheel that I purchased a while back but now I have options.

We got it all installed and running on the dyno. It was getting late and so we couldn't make any pulls. The water brake pumps water in and out of a 500 gallon tank. We would have had to spend several hours filling the tank so we just left the pulls for another day. I hope to get back out there this coming Saturday or Sunday afternoon.

The dyno has a hydraulic load cell with a pressure transducer that is read by a Data Mite data acquisition unit. The data acq. is hooked to a PC that has dyno software installed. The data acq. also captures rpm, temp, A/F, EGT, and a host of other variables. It is a pretty sweet setup to have in your garage. You might only use it once every 5 years but the one with the most toys wins correct?

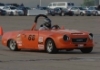
I reached the point of no return on the rear tube frame. I pulled the axle and springs off and then cut through the frame rail with a handheld band saw. It was pretty cool when the frame when clunk onto the floor. I have started fabricating the new tubes and will have them in this week. I have been weighing the parts as they come off and go back on. The stock rear end with leaf springs, shocks, brakes, and torque arm weighed in at 200 pounds. The frame section that I cut off weighed 50 pounds. The narrowed RX7 axle with coilover shocks, disc brakes, and suspension links weighed 150 pounds. I doubt that then new tube frame will be any lighter than what came out. I am building it from 3/16" thick 2x4 box steel tubing. It is pretty heavy stuff. My competition with a similar amount of power and grip keeps ripping the mounting points off his car and axle. I want to be sure the frame is strong enough now instead of having to reinforce it later. It looks like I have some rear comp springs, rear Koni's, complete rear axle with working brakes, and a rear frame section for sale. I guess the frame section would come in handy for someone with frame damage.

I purchased a Tech Edge 2E0 wideband controller. It should be very helpful with tuning and with datalogging my runs for tweaking at the track.

Here are some photos of the frame. I'll get some photos and a video of the motor on the dyno.

Image
Image
Image
Image
Image
Image
Image
Image
Image
Andy Cost
Roadster-less

Bolt on modification? I did use some bolts!
User avatar
nomadtrash
Roadster Fanatic
Posts: 456
Joined: Mon Jul 26, 2004 11:30 pm
Location: Krum, TX

Post by nomadtrash »

I got the rear suspension mocked up. I used 3/4" conduit for the three link. Once I figure out all the lengths then I'll order some inside threaded tubes in the right lengths. I still need to build the frame rails that extend back and the top of the shock will mount to them. A panhard bar, the fuel tank, surge tank, battery, fuel pump, and possibly the radiator will go behind the axle. The exhaust pipe will go through the frame in the normal places. I'll have to cut a hole in the new cross member for the pipe to come through. A notch will be cut in the top of the new cross member for driveshaft clearance. I will weld half of a pipe in the notch for strength and a whole pipe where the exhaust comes through. I'm thinking about using one side of the front top three link mount as a side of my driveshaft safety loop. I may just bend a piece of bar stock in to a U shape and weld it to the cross member. It all depends on whether a portion of the tranny tunnel will need to be removed where the top link pokes through the floorboard.

Enjoy


Image

Image

Image

Image

Image
Andy Cost
Roadster-less

Bolt on modification? I did use some bolts!
User avatar
dat68s
Roadster Fanatic
Posts: 79
Joined: Fri Sep 26, 2003 1:51 am
Location: Sunshine Coast, QLD, Australia
Model: 1500/1600
Year: Low Windshield-64-67.5

Post by dat68s »

Hey Andy,
Checked out all your webshots... they're great.

Good Stuff.
Stuart
User avatar
bmccarthy67
Roadster Fanatic-Site Supporter
Posts: 401
Joined: Thu Feb 05, 2004 11:38 pm
Location: Savannah, GA

Post by bmccarthy67 »

WOW!!! Andy...your work looks incredible. The aggressive look of that rear axel is inspiring...thank you for the continual updates of your build.

Buddy
http://www.mydatsun.com" onclick="window.open(this.href);return false;
67.5 SRL311-00321
67.5 SPL 2000 Transplant
66 SCCA Project
User avatar
TurboRagtop
Roadster Nut-Site Supporter
Posts: 317
Joined: Tue Sep 06, 2005 8:15 pm
Location: Gilbert, AZ
Model: 1500/1600
Year: Low Windshield-64-67.5

Post by TurboRagtop »

Andy,
Got to love that "take no prisoners" approach to building that rear end and suspension.
Should pay off every time you go to the track.
Sweet work...

Karl P.
Karl Payne, Gilbert, AZ
1966 1600 roadster, 2.3L EFI Turbo Ford engine, FMIC, 2.5" exhaust, T-5 trans, 300ZX big brakes, stand-alone Megasquirt ECU/TunerStudio
User avatar
nomadtrash
Roadster Fanatic
Posts: 456
Joined: Mon Jul 26, 2004 11:30 pm
Location: Krum, TX

Post by nomadtrash »

Thanks for the props everyone.

I got a little more done today. I started building the frame arms that go over the rear axle. I wasted several minutes trying to figure out which angles to cut and how to calculate everything. Then I said "Keep it simple stupid!". I don't care what angle anything is. I just want the tube to go from point A to point B. I placed the tube in the position that I wanted it and then drew a line on it referenced from the first tube that was already welded. I then figured out how tall the part needed to be and drew another line at that point. It worked like a charm except that my good steel working tools are at work. I had to cut the steel with the handheld band saw, circular saw with a metal cutting blade, angle grinder, and a sawzall. My cuts aren't exactly perfect. I have a plan for that too. I'll just block it in place or hold it with my hand while I tack it close to the right position. Then I'll come back with the hammer to nudge it to the exact position and finish weld it. I'll use my level, straight edge, and angle finder to put the other one exactly like the first.

You can see in the photos that I put a spherical rod end at the bottom of the dirtbike shock. The threaded end goes through a piece of tubing welded to the lower link. This will allow me to adjust the ride height a little bit if needed. At the top I plan to attach the shock to a bracket that is bolted to the frame rail. There will be several bolt holes that will allow for ride height changes as well. If the bolts start breaking then I'll weld the bracket in place. I really don't know what is going to happen with the ride height. I have estimated the amount of sag that will occur when I get the body and my body on the frame. I still might be off a little so I'm making it fairly adjustable.

I'm more of a blacksmith than an engineer. I'll do it the easy way and make it very adjustable to make up for any unforseen wierd stuff that happens. That is a lot safer than calculating everything out only to find that it doesn't work the way you planned.

It is turning pretty cold and nasty here in Texas. I was going to Dyno the motor this weekend but it will be below freezing. The 500 gallon water tank needs to be empty because it is outside and has frozen once before. We don't put any chemicals in the water because of the environmental problem of having to drain a bunch of ethylene glycol. 500 gallons of water is cheap to refill at a later date.

I worked on the tune for the motor last night. I changed the ignition map to retard .75 degrees per PSI of boost. I estimated the boost levels and will fine tune the map while on the dyno. I found a neat spreadsheet online that helped me perform the retard function. It isn't a difficult spreadsheet to develop but I didn't want to enter all 256 boxes of stock timing advance numbers. The one online already had the S13 KA24DE stock map installed. I verified against my bikirom map that it was the correct one.

Here are the photos:

Image

Image

Image

Image
Andy Cost
Roadster-less

Bolt on modification? I did use some bolts!
User avatar
nomadtrash
Roadster Fanatic
Posts: 456
Joined: Mon Jul 26, 2004 11:30 pm
Location: Krum, TX

Post by nomadtrash »

Not much happening here today. The weather is pretty nasty. I did get out this morning and buy some grade 8 3/4" nuts and bolts to secure the rod ends. Tractor Supply has some great stuff. I thought about getting some hitch pins but decided on the bolts instead. Maybe I'll cut and weld a little tomorrow.
Andy Cost
Roadster-less

Bolt on modification? I did use some bolts!
User avatar
nomadtrash
Roadster Fanatic
Posts: 456
Joined: Mon Jul 26, 2004 11:30 pm
Location: Krum, TX

Post by nomadtrash »

I've done a little more work on the rear tube frame. I got the tubing all cut and welded together. I welded a pipe through the frame in three places. Two of the places are where the exhaust pipe will go through the frame and the third is where the driveshaft needed a little notch for clearance. I gussetted the joints. My welds came out fairly ugly. My mig welder started acting strangely. It was almost like there was flux in the weld. It was popping and making little chimney's. The welds had a bunch of holes and didn't seem to flow together well. The gas was on and working. It may have been a problem with the red oxide paint on the tubing. I had to go over all the welds a second time with it on high heat and high feed rate. The welds are really wide and tall but have a lot of heat and penetration. I'm not concerned with the strength but wish they had been prettier.

The top section seems a little high but I think it will all line up well when the body is back on and the suspension is loaded. I still need to weld the tube frame to the existing frame, build a panhard mount, build a driveshaft safety loop, make a mount for the fuel cell and the battery, and a host of other detials. I've got some new rear calipers on the way and some screw-in studs for the rear hubs.


Image

Image

Image

Image

Image

Image

Image

Image
Andy Cost
Roadster-less

Bolt on modification? I did use some bolts!
Post Reply