Amazing detail Michael. The path towards excellence is so brightly lit by you and your team. Thank you!
Is there a good source for well casing pipe that you can share? If not. What will thickness is appropriate for the new exhaust tubes?
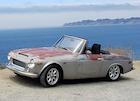
Project Mako - 1967 Datsun 1600 Restmod with SR20DE Power!
Moderators: notoptoy, S Allen, Solex68
-
ADR
- Roadster Fanatic
- Posts: 188
- Joined: Tue Feb 07, 2023 2:40 pm
- Location: Longwood, FL
- Model: 1500/1600
- Year: Low Windshield-64-67.5
Re: Project Mako - 1967 Datsun 1600 Restmod with SR20DE Power!
1966 SPL311-1139 KA24DE
Longwood, FL
Longwood, FL
-
funkaholik
- Roadsteraholic
- Posts: 546
- Joined: Fri May 10, 2013 6:40 pm
- Location: Concord, CA, USA
- Model: 1500/1600
- Year: High Windshield-68-70
Re: Project Mako - 1967 Datsun 1600 Restmod with SR20DE Power!
Love your exhaust-through-frame solution. Mine was similar. Not as elegant as yours, but it allowed me to fit my 2.25" pipe through with clearance.
Before shot after it had been hacked by a previous torch-happy exhaust guy, and I'd cut out the slag and uneven parts:

After welding in some oval pipe and end caps:

After grinding, blasting, and ready for paint:

Sorry for the hijack - I just wanted people to know that these "sins of the PO" are all fixable. For the through-pipes I used 16 gauge stainless and repeatedly pressed it in a vice until it held the oval shape I needed.
Before shot after it had been hacked by a previous torch-happy exhaust guy, and I'd cut out the slag and uneven parts:
After welding in some oval pipe and end caps:
After grinding, blasting, and ready for paint:
Sorry for the hijack - I just wanted people to know that these "sins of the PO" are all fixable. For the through-pipes I used 16 gauge stainless and repeatedly pressed it in a vice until it held the oval shape I needed.
Erik Miller
Concord, CA
1970 Datsun SPL311-29945, owned since '95. Back on the road in 2022!
Two 1967 Mustangs
1981 VW Rabbit Truck, 1.6 turbo diesel
...Oh, and a daily driver.
viewtopic.php?t=19067
Concord, CA
1970 Datsun SPL311-29945, owned since '95. Back on the road in 2022!
Two 1967 Mustangs
1981 VW Rabbit Truck, 1.6 turbo diesel
...Oh, and a daily driver.
viewtopic.php?t=19067
-
spriso

- Vendor
- Posts: 1629
- Joined: Wed Jun 04, 2003 9:20 am
- Location: Oregon
- Contact:
Re: Project Mako - 1967 Datsun 1600 Restmod with SR20DE Power!
Get the grip
As Project Mako is an early frame, it does not have the later traction control rod from the frame to the differential. I like to add these to the SR20 powered cars to help with the axle wrap issue. As I am sure you are aware, these brackets often break on the original frame from over enthusiastic hooning, so I wanted to make sure that I could build something robust, and would handle some abuse-- here is what we did on this project.
First the original design (from a frame that we scrapped a few years ago):


These typically fail where the lightning hole is in the support bracket, or the welds just fail where it was connected to the frame. I decided only to reuse the bracket where the traction control rod attaches (from yet another donor), and would build from there.
First I had to locate where the arm would need to attach to the frame-- Dave Neal gave me a bare late axle housing so I could use it for reference dimensions (thanks Dave!) and I loaded the the frame with some comp profile (ie. flat) rear springs, and the bare housing-- the frame rotisserie made this a very simple and quick job!

Then flip it over:

Now I could see where the traction control rod bracket will need to attach to the frame:

I decided to use some rectangular tubing the same width of the bracket and welded that and the bracket to the frame (in the correct location-- using reference dimensions from my other donor piece):


And then add some gussets-- using the dimensions from the donor frame section (you need to watch this area as the body fits very close to this). These were made from thicker material than the original brackets, and fully TIG welded in (and plug welded on the support bracket) for full penetration:


And all sorted-- the traction control rod easily slips in and out and I can easily get a wrench it to tighten up the hardware-- I'll call this one done.

Michael
As Project Mako is an early frame, it does not have the later traction control rod from the frame to the differential. I like to add these to the SR20 powered cars to help with the axle wrap issue. As I am sure you are aware, these brackets often break on the original frame from over enthusiastic hooning, so I wanted to make sure that I could build something robust, and would handle some abuse-- here is what we did on this project.
First the original design (from a frame that we scrapped a few years ago):
These typically fail where the lightning hole is in the support bracket, or the welds just fail where it was connected to the frame. I decided only to reuse the bracket where the traction control rod attaches (from yet another donor), and would build from there.
First I had to locate where the arm would need to attach to the frame-- Dave Neal gave me a bare late axle housing so I could use it for reference dimensions (thanks Dave!) and I loaded the the frame with some comp profile (ie. flat) rear springs, and the bare housing-- the frame rotisserie made this a very simple and quick job!
Then flip it over:
Now I could see where the traction control rod bracket will need to attach to the frame:
I decided to use some rectangular tubing the same width of the bracket and welded that and the bracket to the frame (in the correct location-- using reference dimensions from my other donor piece):
And then add some gussets-- using the dimensions from the donor frame section (you need to watch this area as the body fits very close to this). These were made from thicker material than the original brackets, and fully TIG welded in (and plug welded on the support bracket) for full penetration:
And all sorted-- the traction control rod easily slips in and out and I can easily get a wrench it to tighten up the hardware-- I'll call this one done.
Michael
Spriso Motorsports
http://www.spriso.com
Instagram https://instagram.com/spriso/
SR20 Powered Roadsters
Engine swap kits Available! See my website!
http://www.spriso.com
Instagram https://instagram.com/spriso/
SR20 Powered Roadsters
Engine swap kits Available! See my website!
-
mojorising84
- Roadster Nut
- Posts: 41
- Joined: Thu Jun 25, 2020 8:04 am
- Location: USA
- Model: 1500/1600
- Year: High Windshield-68-70
Re: Project Mako - 1967 Datsun 1600 Restmod with SR20DE Power!
Wait, you welded stainless to mild steel?funkaholik wrote: Tue Nov 26, 2024 6:14 pm Love your exhaust-through-frame solution. Mine was similar. Not as elegant as yours, but it allowed me to fit my 2.25" pipe through with clearance.
Before shot after it had been hacked by a previous torch-happy exhaust guy, and I'd cut out the slag and uneven parts:
After welding in some oval pipe and end caps:
After grinding, blasting, and ready for paint:
Sorry for the hijack - I just wanted people to know that these "sins of the PO" are all fixable. For the through-pipes I used 16 gauge stainless and repeatedly pressed it in a vice until it held the oval shape I needed.
Cheers,
David
70 Roadster Project Car
Olympia, WA
David
70 Roadster Project Car
Olympia, WA
-
funkaholik
- Roadsteraholic
- Posts: 546
- Joined: Fri May 10, 2013 6:40 pm
- Location: Concord, CA, USA
- Model: 1500/1600
- Year: High Windshield-68-70
Re: Project Mako - 1967 Datsun 1600 Restmod with SR20DE Power!
Absolutely. I use ER309 TIG rod which is specifically used for joining dissimilar metals. Works great.
https://www.lincolnelectric.com/en/prod ... 9309l_gtaw
Erik Miller
Concord, CA
1970 Datsun SPL311-29945, owned since '95. Back on the road in 2022!
Two 1967 Mustangs
1981 VW Rabbit Truck, 1.6 turbo diesel
...Oh, and a daily driver.
viewtopic.php?t=19067
Concord, CA
1970 Datsun SPL311-29945, owned since '95. Back on the road in 2022!
Two 1967 Mustangs
1981 VW Rabbit Truck, 1.6 turbo diesel
...Oh, and a daily driver.
viewtopic.php?t=19067
-
mojorising84
- Roadster Nut
- Posts: 41
- Joined: Thu Jun 25, 2020 8:04 am
- Location: USA
- Model: 1500/1600
- Year: High Windshield-68-70
Re: Project Mako - 1967 Datsun 1600 Restmod with SR20DE Power!
OK cool. I was worried there for a sec. I'm not an expert welder but have done my fair share of welding stainless, alu, titanium etc. I know it can be done but my understanding is that you have to have the right stuff and as with anything, preparation (and cleanliness) is key.
OK, nuff outta me, back to the regularly scheduled program!
OK, nuff outta me, back to the regularly scheduled program!
Cheers,
David
70 Roadster Project Car
Olympia, WA
David
70 Roadster Project Car
Olympia, WA
-
spriso
- Vendor
- Posts: 1629
- Joined: Wed Jun 04, 2003 9:20 am
- Location: Oregon
- Contact:
Re: Project Mako - 1967 Datsun 1600 Restmod with SR20DE Power!
Finishing the Frame
With all the major fabrication out of the way, I just needed to finish all the small details before the frame can go out to powder coating-- all of these modifications are from years of doing these swaps, and are just little improvements that make life easier when doing these types of conversions.
Speed Sensor Notch-- The SR20DE/T transmission has a speed sensor that is mounted at the rear of the transmission-- We have converted these to mechanical heads (to run a stock roadster speedo), but speedometer cables are a PITA, and since we have a digital signal already built into the transmission, we might has well use it. The problem is that the speed sensor (depending on which one you use), can be difficult to remove with the transmission mounted in the car-- we do a little simple notch to allow for an easy removal if necessary;

The speed sensor gets mounted in the lower hole-- its length is very close to the frame when installed-- so I like to make a simple channel for it to sit into:

This just needs a simple cut into the skin of the X-Frame, and then weld in:

Gas Tank Mounts: As I am sure you are aware, Nissan hung the gas tank off of the trunk floor, and that is why most roadster trunk floors are cracked out at that point-- we have been building simple brackets to mount the gas tank off of the frame to eliminate those kind of cracks-- this is just a simple bracket welded to the rear frame crossmember:

You don't want the bracket to stick out too far, otherwise it would be difficult to mount the fuel tank--so the hole for the J hook is just clear of the edge of the frame (as viewed from the underside):

And right side up:

Fuel Line and Brake Line Notches:
I make all new fuel and brake lines with our conversions, and to make their profile a little nicer where they cross the frame, I make simple notches to allow the line to cross over without having to stick out too far:


The Final Details:
These cars have had a hard life-- lots of scrapes, dents, and other blemishes are all over the underside of the frame-- I took the opportunity to clean up a lot of them for a cleaner appearance when the car is on the lift. First up was removing this deep scar on the side of one of the frame rails:

And then straightening up the bent up body mount on the same side:

This one took some creative bracing to get it back to presentable condition:

And complete-- not perfect, but presentable now:

The sway bar towers also had evidence of being hooked up to a tow strap at some point too:

More hammer and dolly work got those all smooth again too:

And then it was just hours of cleaning up original welding slag, and other blemishes such as getting the frame edges nice and smooth and straight again-- no one wants to see this:

Last up was adding some ground studs for the rear battery box, engine to frame ground and the front turn signal/headlight ground:


With that complete-- it was just a matter of drilling a few drain holes in a few of the new brackets, and this thing is ready to go to powder coat!
Michael
With all the major fabrication out of the way, I just needed to finish all the small details before the frame can go out to powder coating-- all of these modifications are from years of doing these swaps, and are just little improvements that make life easier when doing these types of conversions.
Speed Sensor Notch-- The SR20DE/T transmission has a speed sensor that is mounted at the rear of the transmission-- We have converted these to mechanical heads (to run a stock roadster speedo), but speedometer cables are a PITA, and since we have a digital signal already built into the transmission, we might has well use it. The problem is that the speed sensor (depending on which one you use), can be difficult to remove with the transmission mounted in the car-- we do a little simple notch to allow for an easy removal if necessary;
The speed sensor gets mounted in the lower hole-- its length is very close to the frame when installed-- so I like to make a simple channel for it to sit into:
This just needs a simple cut into the skin of the X-Frame, and then weld in:
Gas Tank Mounts: As I am sure you are aware, Nissan hung the gas tank off of the trunk floor, and that is why most roadster trunk floors are cracked out at that point-- we have been building simple brackets to mount the gas tank off of the frame to eliminate those kind of cracks-- this is just a simple bracket welded to the rear frame crossmember:
You don't want the bracket to stick out too far, otherwise it would be difficult to mount the fuel tank--so the hole for the J hook is just clear of the edge of the frame (as viewed from the underside):
And right side up:
Fuel Line and Brake Line Notches:
I make all new fuel and brake lines with our conversions, and to make their profile a little nicer where they cross the frame, I make simple notches to allow the line to cross over without having to stick out too far:
The Final Details:
These cars have had a hard life-- lots of scrapes, dents, and other blemishes are all over the underside of the frame-- I took the opportunity to clean up a lot of them for a cleaner appearance when the car is on the lift. First up was removing this deep scar on the side of one of the frame rails:
And then straightening up the bent up body mount on the same side:
This one took some creative bracing to get it back to presentable condition:
And complete-- not perfect, but presentable now:
The sway bar towers also had evidence of being hooked up to a tow strap at some point too:
More hammer and dolly work got those all smooth again too:
And then it was just hours of cleaning up original welding slag, and other blemishes such as getting the frame edges nice and smooth and straight again-- no one wants to see this:
Last up was adding some ground studs for the rear battery box, engine to frame ground and the front turn signal/headlight ground:
With that complete-- it was just a matter of drilling a few drain holes in a few of the new brackets, and this thing is ready to go to powder coat!
Michael
Spriso Motorsports
http://www.spriso.com
Instagram https://instagram.com/spriso/
SR20 Powered Roadsters
Engine swap kits Available! See my website!
http://www.spriso.com
Instagram https://instagram.com/spriso/
SR20 Powered Roadsters
Engine swap kits Available! See my website!
-
spriso
- Vendor
- Posts: 1629
- Joined: Wed Jun 04, 2003 9:20 am
- Location: Oregon
- Contact:
Re: Project Mako - 1967 Datsun 1600 Restmod with SR20DE Power!
Weekend Update
I was lucky enough to get some hours in the shop over the Thanksgiving break-- and finally finished the frame modifications-- but had to wait until today to drop off the frame at the powder coating shop. That gave me some time to tear down the front suspension and prep it all for powder coating, so I can have a build party when the frame returns... the tear down begins:

Other than the shock mount on this side, the suspension was in pretty good condition-- but this car was parked in 1980 so it did not have that many miles on it....
With everything ready to go, I unbolted the front half of the frame rotisserie, put a stool under the middle and drove the truck into the shop and easily loaded the frame:

And the whole lot was dropped off today for a beautiful coat of semi-gloss black-- I cannot wait to see it back!

Next up, build an RX7 rear end for this car!
Michael
I was lucky enough to get some hours in the shop over the Thanksgiving break-- and finally finished the frame modifications-- but had to wait until today to drop off the frame at the powder coating shop. That gave me some time to tear down the front suspension and prep it all for powder coating, so I can have a build party when the frame returns... the tear down begins:
Other than the shock mount on this side, the suspension was in pretty good condition-- but this car was parked in 1980 so it did not have that many miles on it....
With everything ready to go, I unbolted the front half of the frame rotisserie, put a stool under the middle and drove the truck into the shop and easily loaded the frame:
And the whole lot was dropped off today for a beautiful coat of semi-gloss black-- I cannot wait to see it back!
Next up, build an RX7 rear end for this car!
Michael
Spriso Motorsports
http://www.spriso.com
Instagram https://instagram.com/spriso/
SR20 Powered Roadsters
Engine swap kits Available! See my website!
http://www.spriso.com
Instagram https://instagram.com/spriso/
SR20 Powered Roadsters
Engine swap kits Available! See my website!
-
Stick
- Roadster Fanatic
- Posts: 253
- Joined: Sat Oct 28, 2023 5:27 am
- Location: Savannah, GA
- Model: 2000
- Year: High Windshield-68-70
Re: Project Mako - 1967 Datsun 1600 Restmod with SR20DE Power!
OUTSTANDING.....glued to this thread!
Greg McCarty
1969 SRL311 07324
1969 SRL311 07324
-
spriso
- Vendor
- Posts: 1629
- Joined: Wed Jun 04, 2003 9:20 am
- Location: Oregon
- Contact:
Re: Project Mako - 1967 Datsun 1600 Restmod with SR20DE Power!
Aaaaaand we're back!
Got the call yesterday (sadly not in time for me to pick it up), that the frame was done-- so got out of job #1 a little early and picked up the frame-- a little bit later, it was all set up in the shop ready for re-assembly...

I always love the smooth and consistent finish that powder coating provides:


Still waiting on some more parts to arrive, so it won't be a huge re-assembly weekend, but we'll pick away at it...
Michael
Got the call yesterday (sadly not in time for me to pick it up), that the frame was done-- so got out of job #1 a little early and picked up the frame-- a little bit later, it was all set up in the shop ready for re-assembly...
I always love the smooth and consistent finish that powder coating provides:
Still waiting on some more parts to arrive, so it won't be a huge re-assembly weekend, but we'll pick away at it...
Michael
Spriso Motorsports
http://www.spriso.com
Instagram https://instagram.com/spriso/
SR20 Powered Roadsters
Engine swap kits Available! See my website!
http://www.spriso.com
Instagram https://instagram.com/spriso/
SR20 Powered Roadsters
Engine swap kits Available! See my website!
-
Alvin

- Roadster Nut-Site Supporter
- Posts: 8381
- Joined: Tue Jan 23, 2007 7:01 pm
Re: Project Mako - 1967 Datsun 1600 Restmod with SR20DE Power!
so good
Alvin Gogineni
San Jose, CA
1967.5 SPL/SR20
1997 Acura Integra GS-R
2022 Chevy Bolt EUV
zcarblog.com
Instagram
YouTube
My SR20 Build Thread
San Jose, CA
1967.5 SPL/SR20
1997 Acura Integra GS-R
2022 Chevy Bolt EUV
zcarblog.com
YouTube
My SR20 Build Thread
-
funkaholik
- Roadsteraholic
- Posts: 546
- Joined: Fri May 10, 2013 6:40 pm
- Location: Concord, CA, USA
- Model: 1500/1600
- Year: High Windshield-68-70
Re: Project Mako - 1967 Datsun 1600 Restmod with SR20DE Power!
Erik Miller
Concord, CA
1970 Datsun SPL311-29945, owned since '95. Back on the road in 2022!
Two 1967 Mustangs
1981 VW Rabbit Truck, 1.6 turbo diesel
...Oh, and a daily driver.
viewtopic.php?t=19067
Concord, CA
1970 Datsun SPL311-29945, owned since '95. Back on the road in 2022!
Two 1967 Mustangs
1981 VW Rabbit Truck, 1.6 turbo diesel
...Oh, and a daily driver.
viewtopic.php?t=19067
-
spriso
- Vendor
- Posts: 1629
- Joined: Wed Jun 04, 2003 9:20 am
- Location: Oregon
- Contact:
Re: Project Mako - 1967 Datsun 1600 Restmod with SR20DE Power!
Weekend Progress
Got a little done between other projects on Project Mako over the weekend-- still waiting on some parts, so I was able to assemble just the upper A-arm assemblies, but they went together nicely and got those bolted on:


Looking for a few more things that I could bolt onto the frame, I made an interesting discovery-- I had an alarming mix-n-match of rear spring hangers in my collection:


Hmmm. That's not good (no wonder some of these roadsters sit so crooked!) Thankfully I had another pair that matched perfectly and they have since been dropped off for powder coating-- I should have them back for the weekend and I'll get those bolted on the frame while we wait for other parts.
I will dive into the RX7 axles this weekend (it was nice to take a break from the dirty work), they are a ton of work, but I owe a few to some customers and need to build one for this car too. More fun stuff...
Michael
Got a little done between other projects on Project Mako over the weekend-- still waiting on some parts, so I was able to assemble just the upper A-arm assemblies, but they went together nicely and got those bolted on:
Looking for a few more things that I could bolt onto the frame, I made an interesting discovery-- I had an alarming mix-n-match of rear spring hangers in my collection:
Hmmm. That's not good (no wonder some of these roadsters sit so crooked!) Thankfully I had another pair that matched perfectly and they have since been dropped off for powder coating-- I should have them back for the weekend and I'll get those bolted on the frame while we wait for other parts.
I will dive into the RX7 axles this weekend (it was nice to take a break from the dirty work), they are a ton of work, but I owe a few to some customers and need to build one for this car too. More fun stuff...
Michael
Spriso Motorsports
http://www.spriso.com
Instagram https://instagram.com/spriso/
SR20 Powered Roadsters
Engine swap kits Available! See my website!
http://www.spriso.com
Instagram https://instagram.com/spriso/
SR20 Powered Roadsters
Engine swap kits Available! See my website!
-
spriso
- Vendor
- Posts: 1629
- Joined: Wed Jun 04, 2003 9:20 am
- Location: Oregon
- Contact:
Re: Project Mako - 1967 Datsun 1600 Restmod with SR20DE Power!
December Updates
I typed these next few posts as one large update-- but accidentally deleted it, so here we go again (shorter updates this time):
This month has been starting and stopping due to waiting on parts, waiting on finishing (such as zinc or powder coating), but when I had parts, I have been steadily picking away at this project. First up was getting more zinc components for the frame (and brakes, etc.) back from the plater:


This allowed me to build more of the front end, but unfortunately, I discovered that the lower pivot shafts threads were worn enough on the rear side that the new bushings would not screw on nicely. With no new pivot shafts easily available, I reached out to Jim Tyler (of Datsun Restoration Products) who kindly offered to touch up the threads on his lathe so the new bushings would screw onto the shafts as intended. While I sent those off to Jim for refurbishment, I started the tear down on other components such as the front hubs:

Thankfully, these were in beautiful shape (once you got the layers of dirt off of them) and they cleaned up beautifully in the blast cabinet:

These were then painted, and new bearings and seals installed-- all I need now is the new front wheel studs to arrive, and they will be ready for our Spriso Motorsports 26mm big brake kit. Speaking of that-- I sent the brake hats out to be black anodized, and they came back looking awesome:

The new rotors were installed using aviation grade hardware:

Today, the re-worked lower pivot shafts came back from Jim Tyler, and I got busy building the front suspension:

And a few hours later, I had this-- Datsun Restoration Product's awesome Bilstein front shocks, and all new upper pivot shaft bushings, new upper and lower ball joints, new grease seals, etc.

I still have the steering box and idler to sort out (and then I can install the tie rods and center link), but I'm feeling pretty good where things sit. Speaking of the center link-- we do a different modification on these that I'll share.
Years ago, I bought a lot of close out Circle 555 (made in Japan) steering center links for a Datsun 620. These have the same taper as the roadster, but are too wide-- but this is easily sorted.

By disassembling and shortening the center link, you can easily make this the same width as the roadster unit. A quick 1" cut with the bandsaw on the center section and a few minutes cutting new threads with a die and the modification is complete, the new threads now allow the center link to be adjusted as necessary to work with a roadster:

And assembled again for a test fit:

Satisfied with the fit, this was disassembled and the center rod sent out for zinc plating, and the tie rod bodies painted black-- ready for install now!
Next up, fuel lines!
Michael
I typed these next few posts as one large update-- but accidentally deleted it, so here we go again (shorter updates this time):
This month has been starting and stopping due to waiting on parts, waiting on finishing (such as zinc or powder coating), but when I had parts, I have been steadily picking away at this project. First up was getting more zinc components for the frame (and brakes, etc.) back from the plater:
This allowed me to build more of the front end, but unfortunately, I discovered that the lower pivot shafts threads were worn enough on the rear side that the new bushings would not screw on nicely. With no new pivot shafts easily available, I reached out to Jim Tyler (of Datsun Restoration Products) who kindly offered to touch up the threads on his lathe so the new bushings would screw onto the shafts as intended. While I sent those off to Jim for refurbishment, I started the tear down on other components such as the front hubs:
Thankfully, these were in beautiful shape (once you got the layers of dirt off of them) and they cleaned up beautifully in the blast cabinet:
These were then painted, and new bearings and seals installed-- all I need now is the new front wheel studs to arrive, and they will be ready for our Spriso Motorsports 26mm big brake kit. Speaking of that-- I sent the brake hats out to be black anodized, and they came back looking awesome:
The new rotors were installed using aviation grade hardware:
Today, the re-worked lower pivot shafts came back from Jim Tyler, and I got busy building the front suspension:
And a few hours later, I had this-- Datsun Restoration Product's awesome Bilstein front shocks, and all new upper pivot shaft bushings, new upper and lower ball joints, new grease seals, etc.
I still have the steering box and idler to sort out (and then I can install the tie rods and center link), but I'm feeling pretty good where things sit. Speaking of the center link-- we do a different modification on these that I'll share.
Years ago, I bought a lot of close out Circle 555 (made in Japan) steering center links for a Datsun 620. These have the same taper as the roadster, but are too wide-- but this is easily sorted.
By disassembling and shortening the center link, you can easily make this the same width as the roadster unit. A quick 1" cut with the bandsaw on the center section and a few minutes cutting new threads with a die and the modification is complete, the new threads now allow the center link to be adjusted as necessary to work with a roadster:
And assembled again for a test fit:
Satisfied with the fit, this was disassembled and the center rod sent out for zinc plating, and the tie rod bodies painted black-- ready for install now!
Next up, fuel lines!
Michael
Last edited by spriso on Tue Dec 24, 2024 7:34 pm, edited 2 times in total.
Spriso Motorsports
http://www.spriso.com
Instagram https://instagram.com/spriso/
SR20 Powered Roadsters
Engine swap kits Available! See my website!
http://www.spriso.com
Instagram https://instagram.com/spriso/
SR20 Powered Roadsters
Engine swap kits Available! See my website!
-
spriso
- Vendor
- Posts: 1629
- Joined: Wed Jun 04, 2003 9:20 am
- Location: Oregon
- Contact:
Re: Project Mako - 1967 Datsun 1600 Restmod with SR20DE Power!
Fuel Hard Lines
Fuel injected engines run both a feed and a return line to get fuel to the engine and back to the gas tank. These need to be 5/16" in diameter, and I like to build new ones for these cars to prevent any issues with trying to use long rusted, neglected or damaged fuel lines.
First up I like to get the fuel filter and bracket sorted. I really like these stainless steel fuel filter brackets found on 80s and 90s Nissan's.

The fuel filter is a EFI rated (remember these run 40+ psi) so we need to have EFI rated fuel line, rubber hose, and special clamps-- this is a high pressure system, so generic stuff won't do. The fuel filter is a low maintenance item, so I like to keep them out of the engine compartment, but still accessible by mounting them to the side of the frame (right behind the front body mount)-- this also makes a perfect junction for the hard lines (in 60" lengths).

Now that is mounted, I could build the hard lines for the feed and return. First up is to mount the lines using a clamp and making the transition from across the top (right behind the rear shock crossmember) to the side of the frame-- this is why we add that little notch:

Then both lines run parallel down the side of the frame, using the factory tabs (with heat shrink over them to protect the finish on the lines):

Then to the filter (for the feed side), or the coupler (for the return side):

When the body is back on the frame, we will build the front half of the fuel lines (up to the engine), but for now, another thing is done so we can mount the body back on the frame again!
Michael
Fuel injected engines run both a feed and a return line to get fuel to the engine and back to the gas tank. These need to be 5/16" in diameter, and I like to build new ones for these cars to prevent any issues with trying to use long rusted, neglected or damaged fuel lines.
First up I like to get the fuel filter and bracket sorted. I really like these stainless steel fuel filter brackets found on 80s and 90s Nissan's.
The fuel filter is a EFI rated (remember these run 40+ psi) so we need to have EFI rated fuel line, rubber hose, and special clamps-- this is a high pressure system, so generic stuff won't do. The fuel filter is a low maintenance item, so I like to keep them out of the engine compartment, but still accessible by mounting them to the side of the frame (right behind the front body mount)-- this also makes a perfect junction for the hard lines (in 60" lengths).
Now that is mounted, I could build the hard lines for the feed and return. First up is to mount the lines using a clamp and making the transition from across the top (right behind the rear shock crossmember) to the side of the frame-- this is why we add that little notch:
Then both lines run parallel down the side of the frame, using the factory tabs (with heat shrink over them to protect the finish on the lines):
Then to the filter (for the feed side), or the coupler (for the return side):
When the body is back on the frame, we will build the front half of the fuel lines (up to the engine), but for now, another thing is done so we can mount the body back on the frame again!
Michael
Spriso Motorsports
http://www.spriso.com
Instagram https://instagram.com/spriso/
SR20 Powered Roadsters
Engine swap kits Available! See my website!
http://www.spriso.com
Instagram https://instagram.com/spriso/
SR20 Powered Roadsters
Engine swap kits Available! See my website!