67.5 1600 Wiring Q

Tech tips and how to's

Moderators: notoptoy, S Allen, Solex68

Post Reply
User avatar
vorpal
Roadster Fanatic
Posts: 260
Joined: Fri Sep 21, 2012 2:32 pm
Location: Edmonton, Alberta, Canada

67.5 1600 Wiring Q

Post by vorpal »

Hey All,

Finally finishing off my 67.5 1600... been a while since I played with it, it's starting to come back to me :wink:

Finishing off installing a stock wiring harness I got from Ross after removing the butchered abomination that had been hacked by every previous owner...

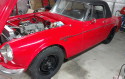
So with the help of Curtis's diagram, everything has been fairly straightforward for installation and connections. So I've come down to the last 4 wire subharness to connect to the coil. Comes through the firewall here:
20220721_202246.jpg


So this has 4 wires:
20220721_202242.jpg


Long Yellow/Black stripe with C connector... this goes to the Oil Pressure Sensor.
Short Black/White Stripe with female spade connector
Short Black with female spade connector
Long Black with female spade connector

I can connect the B/Y one to the oil pressure sender:
20220721_203249.jpg


But then the short two with the spade connectors are too short to connect to the terminals on the ballast resistor with the double spade terminal on it:
20220721_202251.jpg


I can connect the longer black one with a spade connector to the resistor, but then the other two are just hanging with no obvious place to connect. Also not sure where the longer black one would go in any event.

Any pointers appreciated... sorry about the pic rotations, they are fine on my computer but are rotated as attachments.

Cheers,
You do not have the required permissions to view the files attached to this post.
Last edited by vorpal on Fri Jul 22, 2022 1:49 pm, edited 3 times in total.
Rob
1969 Datsun 2000 Solex # 12921
1967.5 Datsun 1600 # 14262
1990 300ZX Twin Turbo
another 1990 300ZX Turbo
1993 300ZX Convertible
new garage DONE Oct 2019!!!
Edmonton, Canada
User avatar
Habitat.pat
Roadsteraholic
Posts: 605
Joined: Thu Jul 07, 2016 8:29 pm
Location: Central Texas
Model: 1500/1600
Year: Low Windshield-64-67.5

Re: 67.5 1600 Wiring Q

Post by Habitat.pat »

I’m out of pocket right now so I can’t get colors for you but I believe the 2 short ones go to the ballast, with one also connecting to the coil + terminal. Then there is another wire from the distributor to the coil - terminal.

Peace,
Pat
67.5 SPL311 Stroker Restomod
Pat Horne, Near Austin, TX
We support Habitat for Humanity
A hand UP, not a hand OUT
User avatar
Curtis
Site Supporter
Posts: 4065
Joined: Fri Jan 01, 2010 2:49 pm
Location: Des Moines, WA
Model: 1500/1600
Year: Low Windshield-64-67.5

Re: 67.5 1600 Wiring Q

Post by Curtis »

Black/white wire to ballast resistor. black/white jumper wire about 8" long from ballast to coil, shorter black wire to coil, longer black wire to distributor.

If it doesn't reach then you probably didn't pull it through the firewall enough.
66 stroker, almost done.
67 basket case, paint coming soon.
User avatar
vorpal
Roadster Fanatic
Posts: 260
Joined: Fri Sep 21, 2012 2:32 pm
Location: Edmonton, Alberta, Canada

Re: 67.5 1600 Wiring Q

Post by vorpal »

Thanks for the replies...

Upon further inspection, it's a 12V coil and what looks like an upgraded electronic dizzy. Thin pair of red and black wires from the distributor run to the + and - on the coil. Coil body has 12V stamped on it.

So the reading I've done says to bypass the ballast resistor entirely with this setup and wire black/white and black directly to the black lead from the coil that's currently attached to the ballast resistor... sounds correct?
You do not have the required permissions to view the files attached to this post.
Rob
1969 Datsun 2000 Solex # 12921
1967.5 Datsun 1600 # 14262
1990 300ZX Twin Turbo
another 1990 300ZX Turbo
1993 300ZX Convertible
new garage DONE Oct 2019!!!
Edmonton, Canada
User avatar
dads311
Roadster Fanatic-Site Supporter
Posts: 203
Joined: Sun Dec 04, 2016 9:24 pm
Location: Emmett, Id.
Model: 1500/1600
Year: Low Windshield-64-67.5

Re: 67.5 1600 Wiring Q

Post by dads311 »

Those wires from the dizzy to the coil remind me of my pertronix system which does not require a ballast resistor. If it is indeed a pertronix you may want to get a high voltage coil to go with it, and you for sure don't want to leave the key on, with out it being started, for any length of time. It will fry it. That said I have pertronoix in my 52GMC, 65 Mustang and my 67.5 roadster and never had a problem with them ( knock on wood).
Mike
rebuilt dads 67.5 1600
1952 GMC 302ci 6cyl w/cam and 3 deuces
1965 Mustang (Wife's)
1971 Nova (Son Claimed)
User avatar
vorpal
Roadster Fanatic
Posts: 260
Joined: Fri Sep 21, 2012 2:32 pm
Location: Edmonton, Alberta, Canada

Re: 67.5 1600 Wiring Q

Post by vorpal »

Thanks,

Pulled the dizzy cap and it is indeed a Pertronix. So now I'm not sure about the coil, will remove it and see if its the correct high voltage one, there's a label on it but i have to remove it to read it.
Rob
1969 Datsun 2000 Solex # 12921
1967.5 Datsun 1600 # 14262
1990 300ZX Twin Turbo
another 1990 300ZX Turbo
1993 300ZX Convertible
new garage DONE Oct 2019!!!
Edmonton, Canada
User avatar
Bwk2000
Roadsteraholic
Posts: 912
Joined: Mon Aug 23, 2021 3:09 pm
Location: Halifax, Nova Scotia
Model: 1500/1600
Year: High Windshield-68-70

Re: 67.5 1600 Wiring Q

Post by Bwk2000 »

You could also just disconnect the wires from the coil and measure it’s resistance. If it’s 3 Ohms you don’t need the ballast resistor and can bypass it. If it’s any less than that, you should keep it and rewire the EI using the resistor to avoid burning out the coil (or the EI).
Kai
Halifax, N.S.
’69 SPL311 Sports 1600

Classic Cars - Because clean fingernails, free weekends, intact knuckles and financial stability are totally overrated.
User avatar
vorpal
Roadster Fanatic
Posts: 260
Joined: Fri Sep 21, 2012 2:32 pm
Location: Edmonton, Alberta, Canada

Re: 67.5 1600 Wiring Q

Post by vorpal »

Thanks, did measure the coil resistance: 2.5 Ohm. The label on the bottom of the 12V coil said it requires a ballast resistor, so that settles that.

Now, more fun with the harness... checked the 4 wires from the bundle I brought through the firewall, and the two solid black wires had continuity! Unwrapped some tape and found it was a single black wire with two spade ends taped up in the bundle! Removed it.

So I'm left with a yellow/black stripe with a C connector end and a black/white stripe with a spade end... blue highlighted ends are the single wire in the attached pic and has been removed.

Following Curtis's diagram for the 67.5

Yellow/black stripe connects to the oil pressure sender... this reaches and connects fine
Black/white stripe connects to the ballast resistor, also reaches and connects.

There are no other wires in the bundle for ignition/start and run and the diagram only shows the single Black/white stripe going to the ballast resistor... this seem correct for the 67.5?
You do not have the required permissions to view the files attached to this post.
Rob
1969 Datsun 2000 Solex # 12921
1967.5 Datsun 1600 # 14262
1990 300ZX Twin Turbo
another 1990 300ZX Turbo
1993 300ZX Convertible
new garage DONE Oct 2019!!!
Edmonton, Canada
User avatar
Curtis
Site Supporter
Posts: 4065
Joined: Fri Jan 01, 2010 2:49 pm
Location: Des Moines, WA
Model: 1500/1600
Year: Low Windshield-64-67.5

Re: 67.5 1600 Wiring Q

Post by Curtis »

This is what your are supposed to have for a stock setup. The black wire belongs there and goes from the coil to the distributor loops around via the split with the oil pressure wire. Ignore the other two wires that you might be able to see in the photo at the split as they are brake light switch wires for 66-67. Also shown is the black/white jumper wire from resistor to coil.

IMG_3247.JPG
You do not have the required permissions to view the files attached to this post.
66 stroker, almost done.
67 basket case, paint coming soon.
User avatar
Curtis
Site Supporter
Posts: 4065
Joined: Fri Jan 01, 2010 2:49 pm
Location: Des Moines, WA
Model: 1500/1600
Year: Low Windshield-64-67.5

Re: 67.5 1600 Wiring Q

Post by Curtis »

Here is new, correct wiring for the the ignition and sender. Only difference is I use a bullet connect for the sender.

IMG_3249.JPG
IMG_3250.JPG
You do not have the required permissions to view the files attached to this post.
66 stroker, almost done.
67 basket case, paint coming soon.
Post Reply