I thought that I could probably make one myself, too. Then I realized that by the time I sourced the chromoly tubing, pressed the ends flat so the tubing only extends to the front and doesn't interfere with the radiator or crossbraces, got all the measurements right, and welded it up, I felt I'd be ahead of the game just ordering one.
Someone with better acces to materials and better fab skills than me could probably whip one up, no problem.
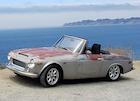
1970 SPL resto finally started...
Moderators: notoptoy, S Allen, Solex68
-
funkaholik
- Roadsteraholic
- Posts: 546
- Joined: Fri May 10, 2013 6:40 pm
- Location: Concord, CA, USA
- Model: 1500/1600
- Year: High Windshield-68-70
Re: 1970 SPL resto finally started...
Erik Miller
Concord, CA
1970 Datsun SPL311-29945, owned since '95. Back on the road in 2022!
Two 1967 Mustangs
1981 VW Rabbit Truck, 1.6 turbo diesel
...Oh, and a daily driver.
viewtopic.php?t=19067
Concord, CA
1970 Datsun SPL311-29945, owned since '95. Back on the road in 2022!
Two 1967 Mustangs
1981 VW Rabbit Truck, 1.6 turbo diesel
...Oh, and a daily driver.
viewtopic.php?t=19067
-
spl310

- Roadster Guru
- Posts: 13241
- Joined: Sun Dec 29, 2002 10:38 pm
- Location: In front of this keyboard... in Jacksonville, Florida!
Re: 1970 SPL resto finally started...
I have driven a few roadsters in excess of 100 mph. I have not seen a need for that brace, but if you do hey rock on with bad yourself.
"Wow, a Roadster!" Stuart Little
1967.5 2000
1967.5 2000
1964 1500
1964 1500
1967.5 1600
1968 chassis
2006 Acura MDX
2013 Volkswagen Jetta TDI wagon
1995 F350 Powerstroke!
More...
1967.5 2000
1967.5 2000
1964 1500
1964 1500
1967.5 1600
1968 chassis
2006 Acura MDX
2013 Volkswagen Jetta TDI wagon
1995 F350 Powerstroke!
More...
-
S Allen
- Site Admin
- Posts: 4572
- Joined: Thu Dec 05, 2002 4:57 pm
- Location: Knoxville, IA(Lake Redrock)Emory, TX
- Model: 1500/1600
- Year: Low Windshield-64-67.5
- Contact:
Re: 1970 SPL resto finally started...
Hardy does lots of nice pieces for our roadsters. Inner rockers front and rear. I got some for both the 66 and the 67 2 liter. Aussie dollars versus our funny money make it reasonable. The planned-demic has had a negative impact on Australia for sure. Especially the shipping from. Ruth and Hardy are super nice people.
Steve
Steve
66 Stroker-Going Orange
67 SRL311-00279-resto project
Stock '72 240Z-Blue
2002 Ford F250 7.3 Diesel 2WD Hauler
2008 Toyota FJ Cruiser
2009 Smart ForTwo Passion Coupe
2013 Fiat 500 Abarth
67 SRL311-00279-resto project
Stock '72 240Z-Blue
2002 Ford F250 7.3 Diesel 2WD Hauler
2008 Toyota FJ Cruiser
2009 Smart ForTwo Passion Coupe
2013 Fiat 500 Abarth
-
C.Costine
- Roadster Nut-Site Supporter
- Posts: 1737
- Joined: Fri Feb 13, 2015 8:08 pm
Re: 1970 SPL resto finally started...
Are you going to paint the inner fenders silver as original?
located in Chester NH
1967 1600 in restoration
2013 Arctic Cat F-1100 turbo
Ford F-350 6.0
Ford 9000 puller, Ford 960 puller, Ford 901show, Ford 971 worker, Oliver 70 waiting its turn
1967 1600 in restoration
2013 Arctic Cat F-1100 turbo
Ford F-350 6.0
Ford 9000 puller, Ford 960 puller, Ford 901show, Ford 971 worker, Oliver 70 waiting its turn
-
funkaholik
- Roadsteraholic
- Posts: 546
- Joined: Fri May 10, 2013 6:40 pm
- Location: Concord, CA, USA
- Model: 1500/1600
- Year: High Windshield-68-70
Re: 1970 SPL resto finally started...
No. I've painted the inner fenders and bottom of the entire body tub with a black rubberized undercoating to help with sound deadening and rock chips. That's how they are going to stay. The exception is that I sprayed the body tub area above the exhaust pipe and muffler with lizard skin ceramic heat protective coating.
Erik Miller
Concord, CA
1970 Datsun SPL311-29945, owned since '95. Back on the road in 2022!
Two 1967 Mustangs
1981 VW Rabbit Truck, 1.6 turbo diesel
...Oh, and a daily driver.
viewtopic.php?t=19067
Concord, CA
1970 Datsun SPL311-29945, owned since '95. Back on the road in 2022!
Two 1967 Mustangs
1981 VW Rabbit Truck, 1.6 turbo diesel
...Oh, and a daily driver.
viewtopic.php?t=19067
-
RustyBucket

- Roadster Fanatic
- Posts: 396
- Joined: Mon Jan 01, 2007 6:19 pm
- Location: Maryland
- Model: 1500/1600
- Year: High Windshield-68-70
- Contact:
Re: 1970 SPL resto finally started...
The coat above tge muffler is an excellent idea. Much better that the strip of fiberglass insulation I found on my car.
Was the fiberglass a ‘OEM’ solution of the time? On a long ride, your biscuits were burnt!!
Was the fiberglass a ‘OEM’ solution of the time? On a long ride, your biscuits were burnt!!

-
funkaholik
- Roadsteraholic
- Posts: 546
- Joined: Fri May 10, 2013 6:40 pm
- Location: Concord, CA, USA
- Model: 1500/1600
- Year: High Windshield-68-70
Re: 1970 SPL resto finally started...
Yes. There are little metal tabs around the edges of the muffler area to hold that insulation pad on. Wasn't very effective, especially with the driver's seat being right above it, and about 2mm off the floor.
I coated the top and bottom of that area of the tub with the ceramic insulation - hoping for no more burning biscuits!
I coated the top and bottom of that area of the tub with the ceramic insulation - hoping for no more burning biscuits!
Erik Miller
Concord, CA
1970 Datsun SPL311-29945, owned since '95. Back on the road in 2022!
Two 1967 Mustangs
1981 VW Rabbit Truck, 1.6 turbo diesel
...Oh, and a daily driver.
viewtopic.php?t=19067
Concord, CA
1970 Datsun SPL311-29945, owned since '95. Back on the road in 2022!
Two 1967 Mustangs
1981 VW Rabbit Truck, 1.6 turbo diesel
...Oh, and a daily driver.
viewtopic.php?t=19067
-
Mochi
- Roadster Fanatic
- Posts: 167
- Joined: Mon Aug 10, 2020 6:02 pm
- Location: Vancouver Washington
- Model: 1500/1600
- Year: Low Windshield-64-67.5
Re: More progress!
funkaholik wrote: Thu Jan 20, 2022 8:13 pm Got a bunch done the last couple of days:
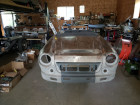
I degreased, sanded, primed, and sprayed rubberized undercoat on the whole bottom of the pan, except for a stripe right above the exhaust, which is coated in Lizard Skin ceramic heat barrier.
I degreased, sanded, and coated the insides of the fenders with rust encapsulator, then epoxy primer. They look a million times better.
And, last, but certainly not least, I got black rubber caps on all the sharp metal tabs that have been slicing my hands open whenever I'm working in the engine bay. I feel so much safer now. The rubber caps I used are from McMaster-Carr. Part numbers 85945K23 and 85945K46. These 2 bags are enough to do the whole frame and body with leftovers for a total of about $27.
Requisite photos...


holy smokes that looks good! I have the body off as well and need help with technique on how you sanded the bottom of the car and engine bay so that I don't waste time. i was thinking of trailering the body to get the bottom and engine bay sandblasted. I
-
funkaholik
- Roadsteraholic
- Posts: 546
- Joined: Fri May 10, 2013 6:40 pm
- Location: Concord, CA, USA
- Model: 1500/1600
- Year: High Windshield-68-70
Re: 1970 SPL resto finally started...
Here is my technique: sand, sand, sand. Seriously, it's a tedious process and I hate it, but it's SO important to get a good base for your primer/paint to bite into. I degreased everything with brake cleaner, a wire brush, rags, and a headlamp until it was grease and dirt free. Then I sanded with 180 until I couldn't stand it anymore, and followed up with maroon colored Scotch-Brite pads, which are about 320-400 grit equivalent. Wiped it all down with panel prep and fresh microfiber cloths and then primed and painted. It helps to have your favorite music turned up loud, and to walk away when you're sick of sanding, and come back later to sand some more. It also really helps to have a lift...
When taping off, do not use regular masking tape or painter's tape. the automotive paint will attack it. Use only automotive masking tape. I found a great low-tack one on Amazon, 3M precision tape, #06528. It is pricey, but it's great for taping irregular lines, very thin so it leaves less of a paint line, and won't pull up the paint you taped it over (I learned this the hard way with other tape). I use this 3M tape to do all the edges, then use the cheaper "regular" automotive masking tape to attach the plastic sheeting to the 3M tape.
I hope some of that is helpful.
Erik Miller
Concord, CA
1970 Datsun SPL311-29945, owned since '95. Back on the road in 2022!
Two 1967 Mustangs
1981 VW Rabbit Truck, 1.6 turbo diesel
...Oh, and a daily driver.
viewtopic.php?t=19067
Concord, CA
1970 Datsun SPL311-29945, owned since '95. Back on the road in 2022!
Two 1967 Mustangs
1981 VW Rabbit Truck, 1.6 turbo diesel
...Oh, and a daily driver.
viewtopic.php?t=19067
-
Mochi
- Roadster Fanatic
- Posts: 167
- Joined: Mon Aug 10, 2020 6:02 pm
- Location: Vancouver Washington
- Model: 1500/1600
- Year: Low Windshield-64-67.5
Re: 1970 SPL resto finally started...
that info is so much appreciated! i like the scotch brite pad idea. will help with the engine bay tight areasfunkaholik wrote: Sun Feb 06, 2022 3:36 pm Here is my technique: sand, sand, sand. Seriously, it's a tedious process and I hate it, but it's SO important to get a good base for your primer/paint to bite into. I degreased everything with brake cleaner, a wire brush, rags, and a headlamp until it was grease and dirt free. Then I sanded with 180 until I couldn't stand it anymore, and followed up with maroon colored Scotch-Brite pads, which are about 320-400 grit equivalent. Wiped it all down with panel prep and fresh microfiber cloths and then primed and painted. It helps to have your favorite music turned up loud, and to walk away when you're sick of sanding, and come back later to sand some more. It also really helps to have a lift...
When taping off, do not use regular masking tape or painter's tape. the automotive paint will attack it. Use only automotive masking tape. I found a great low-tack one on Amazon, 3M precision tape, #06528. It is pricey, but it's great for taping irregular lines, very thin so it leaves less of a paint line, and won't pull up the paint you taped it over (I learned this the hard way with other tape). I use this 3M tape to do all the edges, then use the cheaper "regular" automotive masking tape to attach the plastic sheeting to the 3M tape.
I hope some of that is helpful.
-
funkaholik
- Roadsteraholic
- Posts: 546
- Joined: Fri May 10, 2013 6:40 pm
- Location: Concord, CA, USA
- Model: 1500/1600
- Year: High Windshield-68-70
Re: 1970 SPL resto finally started...
The Scotch-Brite pads are great, and they come in several grit equivalents. Here is a chart...

Erik Miller
Concord, CA
1970 Datsun SPL311-29945, owned since '95. Back on the road in 2022!
Two 1967 Mustangs
1981 VW Rabbit Truck, 1.6 turbo diesel
...Oh, and a daily driver.
viewtopic.php?t=19067
Concord, CA
1970 Datsun SPL311-29945, owned since '95. Back on the road in 2022!
Two 1967 Mustangs
1981 VW Rabbit Truck, 1.6 turbo diesel
...Oh, and a daily driver.
viewtopic.php?t=19067
-
RustyBucket
- Roadster Fanatic
- Posts: 396
- Joined: Mon Jan 01, 2007 6:19 pm
- Location: Maryland
- Model: 1500/1600
- Year: High Windshield-68-70
- Contact:
Re: 1970 SPL resto finally started...
The pads are great , and they don't clog up !
3M used to make a super aggressive dark grey pad to be used by Meat processing plants. Should you forget to keep your other hand out of the way, it would shread the skin off your hand on first contact !!
i haven't seen them in years,... Maybe they banned them ...:-O
3M used to make a super aggressive dark grey pad to be used by Meat processing plants. Should you forget to keep your other hand out of the way, it would shread the skin off your hand on first contact !!
i haven't seen them in years,... Maybe they banned them ...:-O
-
funkaholik
- Roadsteraholic
- Posts: 546
- Joined: Fri May 10, 2013 6:40 pm
- Location: Concord, CA, USA
- Model: 1500/1600
- Year: High Windshield-68-70
More parts going back on
Got some more work done: removed hacked up old dash wiring harness, mounted the parking brake handle, pivots, and cables, and installed center carpet piece. Also got a bunch of work done on my gauge pod conversion - swapping ammeter for voltmeter (done!) and swapping electric oil pressure gauge for the stock tube-full-of-hot-oil-behind-the-dash type (almost done).
Center carpet piece installed, holes cut:

Old parking brake bits:

Freshly plated parking brake bits:

Cutting out the holes in the carpet for everything from the gearshift lever to small console screws is easy if you use something like this $10 "Hobby Woodburner" from Harbor Freight: https://www.harborfreight.com/30-watt-5 ... 63850.html It's basically a soldering iron with different ends you can swap on, like a knife blade, chisel, pin, etc. Melts the hole edge so there's less chance of fraying & running. Goes through the carpet and rubber backing like warm butter.
Center carpet piece installed, holes cut:
Old parking brake bits:
Freshly plated parking brake bits:
Cutting out the holes in the carpet for everything from the gearshift lever to small console screws is easy if you use something like this $10 "Hobby Woodburner" from Harbor Freight: https://www.harborfreight.com/30-watt-5 ... 63850.html It's basically a soldering iron with different ends you can swap on, like a knife blade, chisel, pin, etc. Melts the hole edge so there's less chance of fraying & running. Goes through the carpet and rubber backing like warm butter.
Erik Miller
Concord, CA
1970 Datsun SPL311-29945, owned since '95. Back on the road in 2022!
Two 1967 Mustangs
1981 VW Rabbit Truck, 1.6 turbo diesel
...Oh, and a daily driver.
viewtopic.php?t=19067
Concord, CA
1970 Datsun SPL311-29945, owned since '95. Back on the road in 2022!
Two 1967 Mustangs
1981 VW Rabbit Truck, 1.6 turbo diesel
...Oh, and a daily driver.
viewtopic.php?t=19067
-
bmccarthy67
- Roadster Fanatic-Site Supporter
- Posts: 401
- Joined: Thu Feb 05, 2004 11:38 pm
- Location: Savannah, GA
Re: 1970 SPL resto finally started...
Very nice, I got to almost that exact point on my build over the Christmas break at home...even the red carpet on the trans tunnel! I had to get that piece installed so I could install the heater box for final connection to the heater hoses so I could run the engine (are you leaving the interior in the lizard skin?). Yours will be a VERY clean and complete resto when you finish.
v/r
Buddy
v/r
Buddy
http://www.mydatsun.com" onclick="window.open(this.href);return false;
67.5 SRL311-00321
67.5 SPL 2000 Transplant
66 SCCA Project
67.5 SRL311-00321
67.5 SPL 2000 Transplant
66 SCCA Project
-
funkaholik
- Roadsteraholic
- Posts: 546
- Joined: Fri May 10, 2013 6:40 pm
- Location: Concord, CA, USA
- Model: 1500/1600
- Year: High Windshield-68-70
Re: 1970 SPL resto finally started...
Thanks for the comments. I have the whole carpet set to install once I'm done under the dash.
I checked out your site - there are some great writeups and photos there. A very helpful reference for those of us doing the same things you did. My hat is off to you for doing all that plating yourself.
I think there will be enough modifications and upgrades on my car that it will classify as a "restomod".
Erik Miller
Concord, CA
1970 Datsun SPL311-29945, owned since '95. Back on the road in 2022!
Two 1967 Mustangs
1981 VW Rabbit Truck, 1.6 turbo diesel
...Oh, and a daily driver.
viewtopic.php?t=19067
Concord, CA
1970 Datsun SPL311-29945, owned since '95. Back on the road in 2022!
Two 1967 Mustangs
1981 VW Rabbit Truck, 1.6 turbo diesel
...Oh, and a daily driver.
viewtopic.php?t=19067