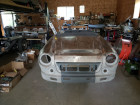
Got a bit done today. Pretty much finished the passenger side front end. Just need to grease some zerks and bend a couple of cotter pins. Started on the drivers side before I quit for the day. I should be able to finish the front end tomorrow barring any interruptions. Reassembly is actually quite rewarding. Seeing the fruits of your labor is always a motivator. A few pics from today.
Steve
1840cc 66 Roadster Build
Moderators: notoptoy, S Allen, Solex68
-
S Allen
- Site Admin
- Posts: 4572
- Joined: Thu Dec 05, 2002 4:57 pm
- Location: Knoxville, IA(Lake Redrock)Emory, TX
- Model: 1500/1600
- Year: Low Windshield-64-67.5
- Contact:
Re: 1840cc 66 Roadster Build
You do not have the required permissions to view the files attached to this post.
66 Stroker-Going Orange
67 SRL311-00279-resto project
Stock '72 240Z-Blue
2002 Ford F250 7.3 Diesel 2WD Hauler
2008 Toyota FJ Cruiser
2009 Smart ForTwo Passion Coupe
2013 Fiat 500 Abarth
67 SRL311-00279-resto project
Stock '72 240Z-Blue
2002 Ford F250 7.3 Diesel 2WD Hauler
2008 Toyota FJ Cruiser
2009 Smart ForTwo Passion Coupe
2013 Fiat 500 Abarth
-
funkaholik
- Roadsteraholic
- Posts: 546
- Joined: Fri May 10, 2013 6:40 pm
- Location: Concord, CA, USA
- Model: 1500/1600
- Year: High Windshield-68-70
Re: 1840cc 66 Roadster Build
Looking good! Can't wait until I'm at this stage. Oh, what a feeling! (Oops, sorry. That's a Toyota slogan, not Datsun.)
Erik Miller
Concord, CA
1970 Datsun SPL311-29945, owned since '95. Back on the road in 2022!
Two 1967 Mustangs
1981 VW Rabbit Truck, 1.6 turbo diesel
...Oh, and a daily driver.
viewtopic.php?t=19067
Concord, CA
1970 Datsun SPL311-29945, owned since '95. Back on the road in 2022!
Two 1967 Mustangs
1981 VW Rabbit Truck, 1.6 turbo diesel
...Oh, and a daily driver.
viewtopic.php?t=19067
-
S Allen
- Site Admin
- Posts: 4572
- Joined: Thu Dec 05, 2002 4:57 pm
- Location: Knoxville, IA(Lake Redrock)Emory, TX
- Model: 1500/1600
- Year: Low Windshield-64-67.5
- Contact:
Re: 1840cc 66 Roadster Build
Thanks. I really enjoy working on it.
S
S
66 Stroker-Going Orange
67 SRL311-00279-resto project
Stock '72 240Z-Blue
2002 Ford F250 7.3 Diesel 2WD Hauler
2008 Toyota FJ Cruiser
2009 Smart ForTwo Passion Coupe
2013 Fiat 500 Abarth
67 SRL311-00279-resto project
Stock '72 240Z-Blue
2002 Ford F250 7.3 Diesel 2WD Hauler
2008 Toyota FJ Cruiser
2009 Smart ForTwo Passion Coupe
2013 Fiat 500 Abarth
-
notoptoy

- Vendor-Site Supporter
- Posts: 9700
- Joined: Fri Oct 02, 2009 2:55 pm
- Location: Winston-Salem, NC and Ocala, FL
- Contact:
Re: 1840cc 66 Roadster Build
Top notch work and you are really cruising putting it back together so quickly. This will be great when you are done!
"When all else fails, force prevails!" Ummm, we're gonna need a bigger hammer here.
67.5 SPL311 H20 w/5 speed
65 Impala Convertible
2017 C43 AMG
67.5 SPL311 H20 w/5 speed
65 Impala Convertible
2017 C43 AMG
-
S Allen
- Site Admin
- Posts: 4572
- Joined: Thu Dec 05, 2002 4:57 pm
- Location: Knoxville, IA(Lake Redrock)Emory, TX
- Model: 1500/1600
- Year: Low Windshield-64-67.5
- Contact:
Re: 1840cc 66 Roadster Build
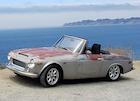
Got a late start today. The wife wanted to go shopping as the sales started today. She went to start her Smart and it would not turn over. Got it started and gave her my battery pack jumper in case it happened again. I ended up replacing the battery as it was original to the car going on 8 years. Napa tested it and the charging system. Both tested okay but this has happened several times over the last year so I figured a new battery was a prudent move. Smart batteries are located in the passenger side foot-well and are a real pain in the ass to get out but I won eventually.
Next up the carpenter ants were having a hay day on one of the pine headers in the small garage. There was lots of wood dust which was a pretty obvious sign I had a problem. Got some spray to deal with them and boy-they were not happy. The little bastards bite. I got them cleared out and will keep an eye on it. I might have to treat the area again. Not too much damage but they are destructive little creatures.
Finally got to the roadster after lunch. I got the drivers side all buttoned up. Installed all of the cotter pins, thought about using finish nails but that was a fleeting thought. I went to install the 23mm sway bar and realized one of the mounts was stripped. Guess they had a bolt and nut holding it on. Oh, now I remember. This was the side that had the hose clamp holding the sway bar on. I ordered some time-serts 1/4-28 so I can fix it correctly. None of the local stores had that size. Tried Amazon but they were too pricey. Ended up using Fleabay which I hardly ever use any more. I prefer Amazon these days.
A couple of shots from today.
Will have to wait until the time-serts show up to install the sway bar. Next up is the rear axles. Installing new bearings, seals and pressing new collars on. I will need to make up some new brake lines as I destroyed one side trying to take it off of the old rear wheel cylinder.
Steve
Next up the carpenter ants were having a hay day on one of the pine headers in the small garage. There was lots of wood dust which was a pretty obvious sign I had a problem. Got some spray to deal with them and boy-they were not happy. The little bastards bite. I got them cleared out and will keep an eye on it. I might have to treat the area again. Not too much damage but they are destructive little creatures.
Finally got to the roadster after lunch. I got the drivers side all buttoned up. Installed all of the cotter pins, thought about using finish nails but that was a fleeting thought.
A couple of shots from today.
Will have to wait until the time-serts show up to install the sway bar. Next up is the rear axles. Installing new bearings, seals and pressing new collars on. I will need to make up some new brake lines as I destroyed one side trying to take it off of the old rear wheel cylinder.
Steve
You do not have the required permissions to view the files attached to this post.
66 Stroker-Going Orange
67 SRL311-00279-resto project
Stock '72 240Z-Blue
2002 Ford F250 7.3 Diesel 2WD Hauler
2008 Toyota FJ Cruiser
2009 Smart ForTwo Passion Coupe
2013 Fiat 500 Abarth
67 SRL311-00279-resto project
Stock '72 240Z-Blue
2002 Ford F250 7.3 Diesel 2WD Hauler
2008 Toyota FJ Cruiser
2009 Smart ForTwo Passion Coupe
2013 Fiat 500 Abarth
-
S Allen
- Site Admin
- Posts: 4572
- Joined: Thu Dec 05, 2002 4:57 pm
- Location: Knoxville, IA(Lake Redrock)Emory, TX
- Model: 1500/1600
- Year: Low Windshield-64-67.5
- Contact:
Re: 1840cc 66 Roadster Build
Another late start today. Got the rear brake lines fixed. I noticed I had the junction fitting backwards. Took it off and fixed it. Packed both rear wheel bearings. Then I made sure I had everything in order before I pressed the new bearing and collar on. That would suck to get that one wrong. Got the drivers side all bolted up. Need to install the brake cylinder, brake shoes, springs and rear drum to finish then off to the drivers side. It is nice to have my own press. Brother gave it to me. Works great for pressing the bearings and collars on. Hope to finish up the rear tomorrow.
Steve
Steve
You do not have the required permissions to view the files attached to this post.
66 Stroker-Going Orange
67 SRL311-00279-resto project
Stock '72 240Z-Blue
2002 Ford F250 7.3 Diesel 2WD Hauler
2008 Toyota FJ Cruiser
2009 Smart ForTwo Passion Coupe
2013 Fiat 500 Abarth
67 SRL311-00279-resto project
Stock '72 240Z-Blue
2002 Ford F250 7.3 Diesel 2WD Hauler
2008 Toyota FJ Cruiser
2009 Smart ForTwo Passion Coupe
2013 Fiat 500 Abarth
-
ppeters914
- Roadster Fanatic-Site Supporter
- Posts: 3125
- Joined: Mon Jun 28, 2004 5:51 pm
- Location: Lake Forest Park, WA (just north of Seattle)
- Model: 1500/1600
- Year: Low Windshield-64-67.5
Re: 1840cc 66 Roadster Build
You going to mount the body before installing the engine and trans?
What you using for frame pads?
What you using for frame pads?
Pete
-------------------------------------
'67 1600 - frame off started in 2014. Now I know why roadster projects take so long. What a stupid idea.
'66 1600 - parts car
'66 WPL411 ***SOLD***
A couple of Porsches, a RAV4 Hybrid, and a motorcycle
-------------------------------------
'67 1600 - frame off started in 2014. Now I know why roadster projects take so long. What a stupid idea.
'66 1600 - parts car
'66 WPL411 ***SOLD***
A couple of Porsches, a RAV4 Hybrid, and a motorcycle
-
S Allen
- Site Admin
- Posts: 4572
- Joined: Thu Dec 05, 2002 4:57 pm
- Location: Knoxville, IA(Lake Redrock)Emory, TX
- Model: 1500/1600
- Year: Low Windshield-64-67.5
- Contact:
Re: 1840cc 66 Roadster Build
No, I am going to install the tranny and engine. Then drag it to a muffler shop to get the exhaust installed. I plan on working on the body on the old frame. Engine bay needs cleaned and painted. The trunk pan is probably the worst I have ever seen. I have a 66 donor that has a good trunk pan that will get grafted into the car. I have damage to repair on the passenger side door and rocker. Jack slipped and did some damage. Also both doors are cracked under where the wing window sits. Pretty common from folks using the wing windows as handles. I bought the body pads from Dean.
Steve
Steve
66 Stroker-Going Orange
67 SRL311-00279-resto project
Stock '72 240Z-Blue
2002 Ford F250 7.3 Diesel 2WD Hauler
2008 Toyota FJ Cruiser
2009 Smart ForTwo Passion Coupe
2013 Fiat 500 Abarth
67 SRL311-00279-resto project
Stock '72 240Z-Blue
2002 Ford F250 7.3 Diesel 2WD Hauler
2008 Toyota FJ Cruiser
2009 Smart ForTwo Passion Coupe
2013 Fiat 500 Abarth
-
ppeters914
- Roadster Fanatic-Site Supporter
- Posts: 3125
- Joined: Mon Jun 28, 2004 5:51 pm
- Location: Lake Forest Park, WA (just north of Seattle)
- Model: 1500/1600
- Year: Low Windshield-64-67.5
Re: 1840cc 66 Roadster Build
So, not worried about wiring, hydraulics, firewall stuff, etc. with the engine in the way?S Allen wrote: Fri Jun 05, 2020 7:51 pm No, I am going to install the tranny and engine. Then drag it to a muffler shop to get the exhaust installed. I plan on working on the body on the old frame. Engine bay needs cleaned and painted. The trunk pan is probably the worst I have ever seen. I have a 66 donor that has a good trunk pan that will get grafted into the car. I have damage to repair on the passenger side door and rocker. Jack slipped and did some damage. Also both doors are cracked under where the wing window sits. Pretty common from folks using the wing windows as handles. I bought the body pads from Dean.
Steve
Not the square pads the bolts go through, but the old horse hair pads.
Pete
-------------------------------------
'67 1600 - frame off started in 2014. Now I know why roadster projects take so long. What a stupid idea.
'66 1600 - parts car
'66 WPL411 ***SOLD***
A couple of Porsches, a RAV4 Hybrid, and a motorcycle
-------------------------------------
'67 1600 - frame off started in 2014. Now I know why roadster projects take so long. What a stupid idea.
'66 1600 - parts car
'66 WPL411 ***SOLD***
A couple of Porsches, a RAV4 Hybrid, and a motorcycle
-
S Allen
- Site Admin
- Posts: 4572
- Joined: Thu Dec 05, 2002 4:57 pm
- Location: Knoxville, IA(Lake Redrock)Emory, TX
- Model: 1500/1600
- Year: Low Windshield-64-67.5
- Contact:
Re: 1840cc 66 Roadster Build
No, I will put all that stuff on once I get the body fixed and painted. The only thing I will have to do is remove the carbs as they will not clear the body. I ordered some neopreme from McMaster-Carr to replace the horse hair crap.
Also, I am welding in a couple of metal tabs to the rear of the frame to take the load off of the trunk floor to support the weight of the gas tank. Will take some pics when I get it done.
Steve
Also, I am welding in a couple of metal tabs to the rear of the frame to take the load off of the trunk floor to support the weight of the gas tank. Will take some pics when I get it done.
Steve
66 Stroker-Going Orange
67 SRL311-00279-resto project
Stock '72 240Z-Blue
2002 Ford F250 7.3 Diesel 2WD Hauler
2008 Toyota FJ Cruiser
2009 Smart ForTwo Passion Coupe
2013 Fiat 500 Abarth
67 SRL311-00279-resto project
Stock '72 240Z-Blue
2002 Ford F250 7.3 Diesel 2WD Hauler
2008 Toyota FJ Cruiser
2009 Smart ForTwo Passion Coupe
2013 Fiat 500 Abarth
-
S Allen
- Site Admin
- Posts: 4572
- Joined: Thu Dec 05, 2002 4:57 pm
- Location: Knoxville, IA(Lake Redrock)Emory, TX
- Model: 1500/1600
- Year: Low Windshield-64-67.5
- Contact:
Re: 1840cc 66 Roadster Build
Got a rolling frame completed today. Axles installed, wheel cylinders, brake shoes and drums. Brake lines run and e-brake linkage installed. Tomorrow I will weld on the gas tank support tabs and make some modifications to the tranny mount for the 5 speed. After that I will mate the tranny to the motor and get them installed. Then I can make an appointment with the muffler shop to get the exhaust completed. Then I can start on the body. I think I am ahead of schedule which is a good thing.
Steve
Steve
You do not have the required permissions to view the files attached to this post.
66 Stroker-Going Orange
67 SRL311-00279-resto project
Stock '72 240Z-Blue
2002 Ford F250 7.3 Diesel 2WD Hauler
2008 Toyota FJ Cruiser
2009 Smart ForTwo Passion Coupe
2013 Fiat 500 Abarth
67 SRL311-00279-resto project
Stock '72 240Z-Blue
2002 Ford F250 7.3 Diesel 2WD Hauler
2008 Toyota FJ Cruiser
2009 Smart ForTwo Passion Coupe
2013 Fiat 500 Abarth
-
S Allen
- Site Admin
- Posts: 4572
- Joined: Thu Dec 05, 2002 4:57 pm
- Location: Knoxville, IA(Lake Redrock)Emory, TX
- Model: 1500/1600
- Year: Low Windshield-64-67.5
- Contact:
Re: 1840cc 66 Roadster Build
Got the gas tank support tabs fabricated and welded to the back of the frame. No more cracked trunk floor pan. Also got the extensions to the tranny mount welded on and drilled out. In order to put a 5 speed in the early car like a '66 you need to drop the tranny mount down to the lower bolt holes. Leaving you with just four bolts holding the mount on instead of eight. Per Dave P's recommendation I welded an extension to the top to allow me to put four more bolts on so I have eight bolts holding the tranny mount. Took a few pics of the cracked trunk floor pan from different angles. I suppose I could attempt to fix it but the donor floor pan is in excellent shape so I will probably go with my original plan of removing the cracked and grafting in the replacement. Tomorrow I hope to get the engine and tranny mounted together and place into the frame. Pretty excited about the progress.
Steve
Steve
You do not have the required permissions to view the files attached to this post.
66 Stroker-Going Orange
67 SRL311-00279-resto project
Stock '72 240Z-Blue
2002 Ford F250 7.3 Diesel 2WD Hauler
2008 Toyota FJ Cruiser
2009 Smart ForTwo Passion Coupe
2013 Fiat 500 Abarth
67 SRL311-00279-resto project
Stock '72 240Z-Blue
2002 Ford F250 7.3 Diesel 2WD Hauler
2008 Toyota FJ Cruiser
2009 Smart ForTwo Passion Coupe
2013 Fiat 500 Abarth
-
Curtis

- Site Supporter
- Posts: 4164
- Joined: Fri Jan 01, 2010 2:49 pm
- Location: Des Moines, WA
- Model: 1500/1600
- Year: Low Windshield-64-67.5
Re: 1840cc 66 Roadster Build
This is my solution for my 5 speed. Three bolts per side and can use either the Datsun rubber mount or inexpensive GM one.
You do not have the required permissions to view the files attached to this post.
66 stroker, almost done.
67 basket case, paint coming soon.
67 basket case, paint coming soon.
-
S Allen
- Site Admin
- Posts: 4572
- Joined: Thu Dec 05, 2002 4:57 pm
- Location: Knoxville, IA(Lake Redrock)Emory, TX
- Model: 1500/1600
- Year: Low Windshield-64-67.5
- Contact:
Re: 1840cc 66 Roadster Build
That looks great. Nice solution.
S
S
66 Stroker-Going Orange
67 SRL311-00279-resto project
Stock '72 240Z-Blue
2002 Ford F250 7.3 Diesel 2WD Hauler
2008 Toyota FJ Cruiser
2009 Smart ForTwo Passion Coupe
2013 Fiat 500 Abarth
67 SRL311-00279-resto project
Stock '72 240Z-Blue
2002 Ford F250 7.3 Diesel 2WD Hauler
2008 Toyota FJ Cruiser
2009 Smart ForTwo Passion Coupe
2013 Fiat 500 Abarth
-
Curtis
- Site Supporter
- Posts: 4164
- Joined: Fri Jan 01, 2010 2:49 pm
- Location: Des Moines, WA
- Model: 1500/1600
- Year: Low Windshield-64-67.5
Re: 1840cc 66 Roadster Build
Thanks. I looked at original and read about lowering the stock mount. Add to that at the time the price of rubber mounts and the wiki on the GM mount at maybe $10. The original isn't very thick metal but of course gets strength from the bends. Not even welded. And the eight bolts are a pain. So I built it out of a little thicker steel bar. I guess I'll find out if it is enough.
What I don't understand is why the later ones that bolt on from the bottom are built like a tank?
What I don't understand is why the later ones that bolt on from the bottom are built like a tank?
66 stroker, almost done.
67 basket case, paint coming soon.
67 basket case, paint coming soon.