Hi folks --
Back again with a new problem. I am in the process of removing the last of the " smog parts", the ones the Tech Wiki showed me were used in mounting the GM alt on the passenger side of the car. I want to clean all the stuff up & re-paint the two steel "plates", before re-assembling with the proper spacing rods & washers.
The front smog-pump bolts, swing-arm & (blue) triangular plate were no problem, but the sturdy triangular fixture mounted to the engine block is not so easy. I am probably just too lazy, but I find I cannot remove the lower of the three bolts, without removing the fuel pump. If that is the correct procedure, I will bite my lip & pull it off, but that will require taping a cover over the engine block, to prevent dirt from entering.
If there is a common tool available, to get around the boss on the fuel pump inlet, I would like that info, but my 1/2" drive 14mm socket setup won't clear it, nor any of my 14mm box & end wrenches. My 3/8" drive extender ( 6" ) is too long, but shorter one might clear the boss, and allow the wrench to fit without hitting the fender.
All suggestions/advice appreciated, Thanks
Garry
GM alt swap parts removal sequence
Moderators: notoptoy, S Allen, Solex68
-
Geistfahrar
- Roadster Nut
- Posts: 60
- Joined: Tue Sep 11, 2018 1:50 pm
- Location: S G Valley, So Cal
GM alt swap parts removal sequence
Location Southern Cal
69' 2000 Roadster, being repaired by O/O
2001 Mercedes ML430; Was Wife's ride, now Grocery-hauler
2005 Jeep Wrangler X; Was Motor-home Toad, now local shopper
2005 33' Dolphin motor-home; Was vacation home, now guest house
69' 2000 Roadster, being repaired by O/O
2001 Mercedes ML430; Was Wife's ride, now Grocery-hauler
2005 Jeep Wrangler X; Was Motor-home Toad, now local shopper
2005 33' Dolphin motor-home; Was vacation home, now guest house
-
Nissanman
- Roadster Fanatic-Site Supporter
- Posts: 3364
- Joined: Mon Apr 16, 2007 8:07 pm
- Location: Adelaide, South Australia
- Model: 1500/1600
- Year: Low Windshield-64-67.5
- Contact:
Re: GM alt swap parts removal sequence
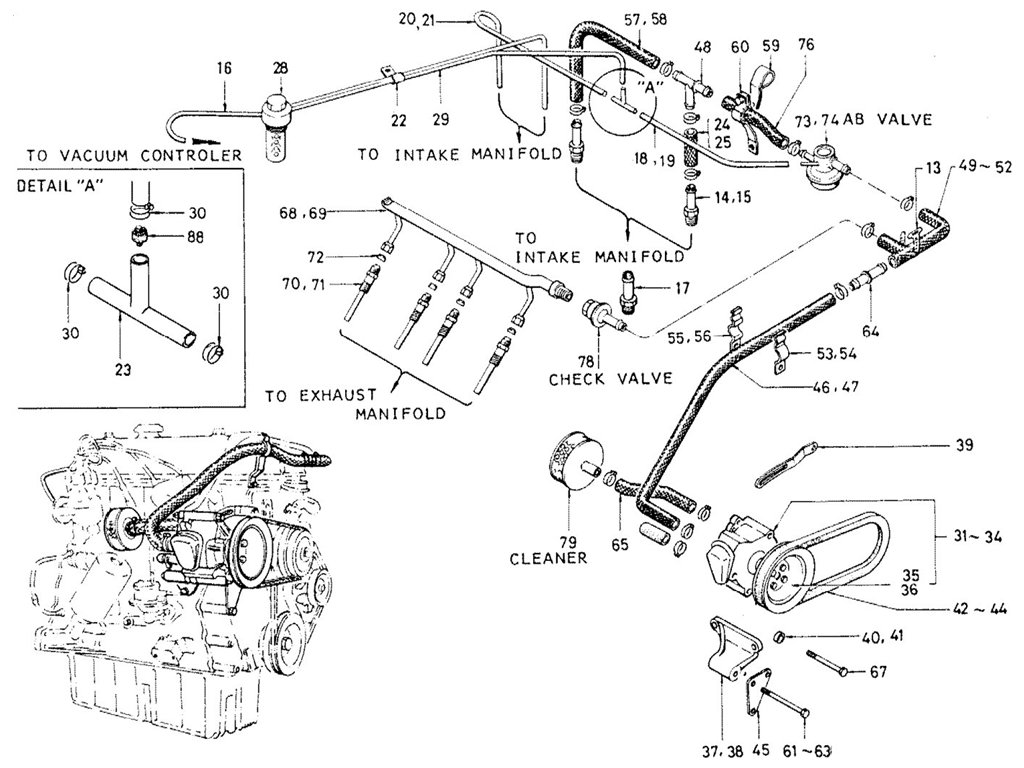
So, is it p/n 37,38 that is the problem?
Nissanman, just trying to help.
1965 SP310 Engine No. G-93326 Car No. SP310-10817
https://photos.shutterfly.com/album/60141836519
On the road again!
1965 SP310 Engine No. G-93326 Car No. SP310-10817
https://photos.shutterfly.com/album/60141836519
On the road again!
-
Geistfahrar
- Roadster Nut
- Posts: 60
- Joined: Tue Sep 11, 2018 1:50 pm
- Location: S G Valley, So Cal
Re: GM alt swap parts removal sequence
Yes ---
That is the part. The inlet to the fuel pump ( to the left & below part 37 ) protrudes in front of the bottom bolt. I hesitate to try and remove the inlet pipe from the body of the pump, as I believe I cemented it in with Permatex red, when I replaced the pump many years ago,
Garry
That is the part. The inlet to the fuel pump ( to the left & below part 37 ) protrudes in front of the bottom bolt. I hesitate to try and remove the inlet pipe from the body of the pump, as I believe I cemented it in with Permatex red, when I replaced the pump many years ago,
Garry
Location Southern Cal
69' 2000 Roadster, being repaired by O/O
2001 Mercedes ML430; Was Wife's ride, now Grocery-hauler
2005 Jeep Wrangler X; Was Motor-home Toad, now local shopper
2005 33' Dolphin motor-home; Was vacation home, now guest house
69' 2000 Roadster, being repaired by O/O
2001 Mercedes ML430; Was Wife's ride, now Grocery-hauler
2005 Jeep Wrangler X; Was Motor-home Toad, now local shopper
2005 33' Dolphin motor-home; Was vacation home, now guest house
-
mraitch

- Roadsteraholic
- Posts: 3629
- Joined: Mon Oct 02, 2006 7:03 pm
- Location: Lake Balboa (SFV) - CA
- Model: 1500/1600
- Year: High Windshield-68-70
- Contact:
Re: GM alt swap parts removal sequence
you have lost me, give me a call, come over to van nuys and we will sort it out.
818 448 3181
peter
818 448 3181
peter
Peter Harrison
1970 1600 (Stroker) - TOAD SAN (Eliza)
1970 1600 (Stock) - As Yet Unnamed
Lake Balboa (SFV) , California
1970 1600 (Stroker) - TOAD SAN (Eliza)
1970 1600 (Stock) - As Yet Unnamed
Lake Balboa (SFV) , California
-
FergO2k
- Roadster Fanatic-Site Supporter
- Posts: 1731
- Joined: Thu Apr 29, 2004 12:18 pm
- Location: SoCal
Re: GM alt swap parts removal sequence
Don't remove the pipe from the body of the pump, as later on vibrations will do that, and now you have a fuel faucet, which is a recipe for fire.
(BTDT in an aircooled VW)
Try a crows-foot tool, it effectively joggles your ratchet extension over to one side.
Heating and bending an open end wrench might be an option too.
Alternatively, isn't this where the alt is going to be mounted now? (so leave it on is an option, right? Oh, cleaning, now I read closer)
https://www.sears.com/tools-wrenches-cr ... 1214364367
(wow, Sears still good for something?)
Fergus O
69 2L, SUs (driver, not susceptible to polish)
02 Tacoma 4 door (sold at 300k miles!)
2017 Honda Ridgeline (2021 purchase)
Los Alamitos, CA
69 2L, SUs (driver, not susceptible to polish)
02 Tacoma 4 door (sold at 300k miles!)
2017 Honda Ridgeline (2021 purchase)
Los Alamitos, CA
-
Geistfahrar
- Roadster Nut
- Posts: 60
- Joined: Tue Sep 11, 2018 1:50 pm
- Location: S G Valley, So Cal
Re: GM alt swap parts removal sequence
Thanks for the "heads up" Fergus. I was preparing to remove the inlet pipe from the fuel pump, to get more clearance for removal tools, and sprayed some PB Blaster on the threads. But then, I got to thinking "what if I screw up the pipe, and need to replace it?" I went to the carparts.com explosion of the fuel pump, & checked for the proper P/N for the inlet pipe, & found 4 variations ( index # 66, p/n 17103-65000 fit my car ). An online search for the part came up dry, so I wondered if the part was even available, separate from the whole pump assembly.
Dean's web-page for fuel systems showed a pump for the late SRL's, that showed the pipe as part of the assembly, but no listing of the solo pipe. He alluded to variation in web thickness of the OEM pumps, and mentioned the need for a spacer ( and 2 gaskets ), but did not say they were required for his part. The web page did not include a spacer.
Rallye's web page for the late 2000 pump did NOT show an inlet pipe on the assembly, & his narrative cautioned to "save the fitting from the old pump, & get new gaskets, and a spacer, if the old pump did not have one." Rallye's web page did include gaskets & spacers. An extensive search of the posts on this forum turned up numerous comments about the necessity of a spacer for replacement pumps, and several pictures showed pumps with both thin & thick webs, but no actual dimensions given. Ouch! -- What the heck is on my car anyhow?
I scraped away the crud from the top of my pump, and the junction of the pump & the engine block. The top cover, secured with four peripheral & one central phillips screws, had the name "Kyosan Denki" on it, plus the correct inlet & outlet arrows on the fitting bosses ( but no part numbers ). The flange of the pump at the engine block is 1/2" thick, with one gasket & no spacer. I find it hard to believe, that I have run the car for 130,699 miles with a
completely OEM pump. I either replaced the entire pump, or re-built it "somewhere along the way " ( my memory is not what it used to be ). In any case, I have driven the car thousands of miles with a no-spacer fuel pump, with no fuel supply or leakage problems. BTW, I replaced the jackshaft & re-mounted the "current" pump onto it in 1984.
In conclusion, I am going back to ground zero -- leaving the smog-bracket on the car & cleaning it in place. I intend to keep the existing fuel pump on the car, until it either leaks or fails to deliver fuel, or the folks on the forum with more experience than me can convince me I have "beaten all the odds" by running with an improper pump. All comments ( including correction to my commentary ) are welcome.
Garry
Location Southern Cal
69' 2000 Roadster, being repaired by O/O
2001 Mercedes ML430; Was Wife's ride, now Grocery-hauler
2005 Jeep Wrangler X; Was Motor-home Toad, now local shopper
2005 33' Dolphin motor-home; Was vacation home, now guest house
69' 2000 Roadster, being repaired by O/O
2001 Mercedes ML430; Was Wife's ride, now Grocery-hauler
2005 Jeep Wrangler X; Was Motor-home Toad, now local shopper
2005 33' Dolphin motor-home; Was vacation home, now guest house