Mackn367 - 67.5 SPL311
Moderators: notoptoy, S Allen, Solex68
-
spl310

- Roadster Guru
- Posts: 13241
- Joined: Sun Dec 29, 2002 10:38 pm
- Location: In front of this keyboard... in Jacksonville, Florida!
Re: Mackn367 - 67.5 SPL311
I like your steering wheel. Id like to find one like that.
"Wow, a Roadster!" Stuart Little
1967.5 2000
1967.5 2000
1964 1500
1964 1500
1967.5 1600
1968 chassis
2006 Acura MDX
2013 Volkswagen Jetta TDI wagon
1995 F350 Powerstroke!
More...
1967.5 2000
1967.5 2000
1964 1500
1964 1500
1967.5 1600
1968 chassis
2006 Acura MDX
2013 Volkswagen Jetta TDI wagon
1995 F350 Powerstroke!
More...
-
Mackn367
- Site Supporter
- Posts: 533
- Joined: Tue Mar 27, 2018 3:38 pm
- Location: Orange County, CA
- Model: 1500/1600
- Year: Low Windshield-64-67.5
- Contact:
Re: Mackn367 - 67.5 SPL311
Thanks. I’m pretty sure it is the original EMPI wood steering wheel.
Nick
1967.5 Roadster 1600
VIN: SPL311-13038
Orange County, CA
1967.5 Roadster 1600
VIN: SPL311-13038
Orange County, CA
-
Mackn367
- Site Supporter
- Posts: 533
- Joined: Tue Mar 27, 2018 3:38 pm
- Location: Orange County, CA
- Model: 1500/1600
- Year: Low Windshield-64-67.5
- Contact:
Re: Mackn367 - 67.5 SPL311
Finally found time to install passenger side seat. Here we go. Always fun drilling holes in your floorboards.... NOT 
You do not have the required permissions to view the files attached to this post.
Nick
1967.5 Roadster 1600
VIN: SPL311-13038
Orange County, CA
1967.5 Roadster 1600
VIN: SPL311-13038
Orange County, CA
-
Mackn367
- Site Supporter
- Posts: 533
- Joined: Tue Mar 27, 2018 3:38 pm
- Location: Orange County, CA
- Model: 1500/1600
- Year: Low Windshield-64-67.5
- Contact:
Re: Mackn367 - 67.5 SPL311
Update...
- Removed old side trim and emblems and will be installing new trim/emblems soon
- New "old" license plate (true 1963 CA license plate - not the new ones you can get from DMV now)
- 2 new seats installed
I still need to do a bunch of little projects here and there. Slow progress but at least I'm making progress
You do not have the required permissions to view the files attached to this post.
Nick
1967.5 Roadster 1600
VIN: SPL311-13038
Orange County, CA
1967.5 Roadster 1600
VIN: SPL311-13038
Orange County, CA
-
S Allen
- Site Admin
- Posts: 4572
- Joined: Thu Dec 05, 2002 4:57 pm
- Location: Knoxville, IA(Lake Redrock)Emory, TX
- Model: 1500/1600
- Year: Low Windshield-64-67.5
- Contact:
Re: Mackn367 - 67.5 SPL311
Looking good. Making it your own is always fun.
Steve
Steve
66 Stroker-Going Orange
67 SRL311-00279-resto project
Stock '72 240Z-Blue
2002 Ford F250 7.3 Diesel 2WD Hauler
2008 Toyota FJ Cruiser
2009 Smart ForTwo Passion Coupe
2013 Fiat 500 Abarth
67 SRL311-00279-resto project
Stock '72 240Z-Blue
2002 Ford F250 7.3 Diesel 2WD Hauler
2008 Toyota FJ Cruiser
2009 Smart ForTwo Passion Coupe
2013 Fiat 500 Abarth
-
2mAn
- Roadsteraholic
- Posts: 2238
- Joined: Mon Jan 09, 2017 5:02 pm
- Location: Westchester, CA
- Model: 2000
- Year: High Windshield-68-70
Re: Mackn367 - 67.5 SPL311
We need updates Nick!
Simon
Current Cars:
-1999 Porsche 911 4/98-build, 3.8L M96
Current Cars:
-1999 Porsche 911 4/98-build, 3.8L M96
-
Mackn367
- Site Supporter
- Posts: 533
- Joined: Tue Mar 27, 2018 3:38 pm
- Location: Orange County, CA
- Model: 1500/1600
- Year: Low Windshield-64-67.5
- Contact:
Re: Mackn367 - 67.5 SPL311
Haha ok I'll write something up today. Just been busy with so many things lately
Nick
1967.5 Roadster 1600
VIN: SPL311-13038
Orange County, CA
1967.5 Roadster 1600
VIN: SPL311-13038
Orange County, CA
-
Mackn367
- Site Supporter
- Posts: 533
- Joined: Tue Mar 27, 2018 3:38 pm
- Location: Orange County, CA
- Model: 1500/1600
- Year: Low Windshield-64-67.5
- Contact:
Re: Mackn367 - 67.5 SPL311
I've been working on many different projects. Usually multiple projects at once. I'll try and list the projects in order from oldest to most recent. I actually just recently started another fun project that RustBucket actually has been helping me with since he had the same issue last year.
Get on with it! Bring on the pictures!
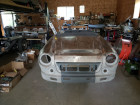
First picture I wanted to show is where I work on the Datsun. We don’t have garages in my complex. I also have to clean everything up by the end of the night. This is why projects take me a lot longer to complete.
Changed fuel filter. Cut old filter open to inspect how bad it was. It was bad. Changed to a see thru filter case
Temporarily fixed the exhaust hole with exhaust tape. Future project will be entire new exhaust system.
Bought new door locks. Had to file them down a little to make them fit in the door. Driver side are in door now but I haven’t attached the arm yet.
Removed driver side pieces to clean and polish. Sorry I don’t have a finished picture. I will take better pictures when I do the passenger side.
While driving down PCH (Pacific Coast Highway) my starter kicked on which was followed by smoke coming from my dash. Immediately pulled over and had it towed home. An ignition wire was fried. The ignition switch was also fried and it appeared a prong was loose too.
Bought new ignition lock and switch assembly. Tried to install but the diameter of ignition bracket that goes around the steering wheel was too large. Found out there are actually two different sizes. Returned and bought correct size.
Messaged Steve about the tech wiki page on the ignition alternative. Asked if we could add the correct size that should be bought along with a picture showing which wire goes to the correct prong on the switch. The diagrams are great but they still did not show the actual prong location. I edited a few pictures I took and sent them to him. Wiki page was edited with kudos from Steve. Thanks Steve!
Bought a new alternator. Still need to install but first I need to cut my bracket to make it fit.
One day heard a “pinging†sound that appeared to be coming from cylinder 3 or 4. Took a brief video and sent it to some local 311 members. They said valves seem to need to be adjusted. Began the process to measure valve slash. Tried cranking engine but had trouble reaching the crankshaft nut.
Removed fan shroud to make more room and still had an issue reaching it so I then removed the fan too.
Removed plugs. Got engine to TDC. Feeler gauges ready. Time to measure them all.
Cranked and cranked till I felt like Popeye. Made a note on which valves appeared to not meet the .017 measurement. Red circle was too tight and blue circle was too loose.
I then was ready to proceed with now making the slight adjustments. I get the socket on the locking nut on the tower to loosen it. It would not budge. I thought I was doing something wrong. Researched… messaged 311 members again… it was correct. This was just extremely tight. Finally got it loose while smacking my arm on the car in the process. Cylinder 1 done. On to cylinder 3. Back to the crank.
Cylinder 3 “done†and I begin to lock it back in place. It keeps spinning but not getting tighter. I then hear a compression leak sound and realize the tower was rising while I was tightening and that’s why it was not getting tighter. This then forces me to remove the entire camshaft, towers, arms, etc to figure out what happened.
The 2 middle studs were stripped. You can see in the pic the #3 cylinder stud and how far out it came. I then removed these studs to inspect further.
One stud came out with the aluminum perfectly wrapped around it. The other didn’t have any aluminum on it but when I looked down the stud hole I saw what appeared to be helicoil… looks like this wasn’t the first time this happened.
Decided to clean the area and rods while I was there. Pulled rod, cleaned, and inspected. Sure enough found the #3 cylinder intake rod had markings along the bottom from hitting against the wall (I believe)
Still haven’t fixed the stud issue. I’m nervous about beginning the drilling and helicoil process. So in the meantime while I wrap my head around it I decided to clean up and polish the valve cover and some rusted valve cover grommets and air filter locks.
I have another project but I don’t want to post anything on it until it is complete.
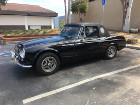
Well that’s pretty much it. So I will end with a nice picture I took a few weeks ago at the Segerstrom Hall in Costa Mesa.
Get on with it! Bring on the pictures!
First picture I wanted to show is where I work on the Datsun. We don’t have garages in my complex. I also have to clean everything up by the end of the night. This is why projects take me a lot longer to complete.
Changed fuel filter. Cut old filter open to inspect how bad it was. It was bad. Changed to a see thru filter case
Temporarily fixed the exhaust hole with exhaust tape. Future project will be entire new exhaust system.
Bought new door locks. Had to file them down a little to make them fit in the door. Driver side are in door now but I haven’t attached the arm yet.
Removed driver side pieces to clean and polish. Sorry I don’t have a finished picture. I will take better pictures when I do the passenger side.
While driving down PCH (Pacific Coast Highway) my starter kicked on which was followed by smoke coming from my dash. Immediately pulled over and had it towed home. An ignition wire was fried. The ignition switch was also fried and it appeared a prong was loose too.
Bought new ignition lock and switch assembly. Tried to install but the diameter of ignition bracket that goes around the steering wheel was too large. Found out there are actually two different sizes. Returned and bought correct size.
Messaged Steve about the tech wiki page on the ignition alternative. Asked if we could add the correct size that should be bought along with a picture showing which wire goes to the correct prong on the switch. The diagrams are great but they still did not show the actual prong location. I edited a few pictures I took and sent them to him. Wiki page was edited with kudos from Steve. Thanks Steve!
Bought a new alternator. Still need to install but first I need to cut my bracket to make it fit.
One day heard a “pinging†sound that appeared to be coming from cylinder 3 or 4. Took a brief video and sent it to some local 311 members. They said valves seem to need to be adjusted. Began the process to measure valve slash. Tried cranking engine but had trouble reaching the crankshaft nut.
Removed fan shroud to make more room and still had an issue reaching it so I then removed the fan too.
Removed plugs. Got engine to TDC. Feeler gauges ready. Time to measure them all.
Cranked and cranked till I felt like Popeye. Made a note on which valves appeared to not meet the .017 measurement. Red circle was too tight and blue circle was too loose.
I then was ready to proceed with now making the slight adjustments. I get the socket on the locking nut on the tower to loosen it. It would not budge. I thought I was doing something wrong. Researched… messaged 311 members again… it was correct. This was just extremely tight. Finally got it loose while smacking my arm on the car in the process. Cylinder 1 done. On to cylinder 3. Back to the crank.
Cylinder 3 “done†and I begin to lock it back in place. It keeps spinning but not getting tighter. I then hear a compression leak sound and realize the tower was rising while I was tightening and that’s why it was not getting tighter. This then forces me to remove the entire camshaft, towers, arms, etc to figure out what happened.
The 2 middle studs were stripped. You can see in the pic the #3 cylinder stud and how far out it came. I then removed these studs to inspect further.
One stud came out with the aluminum perfectly wrapped around it. The other didn’t have any aluminum on it but when I looked down the stud hole I saw what appeared to be helicoil… looks like this wasn’t the first time this happened.
Decided to clean the area and rods while I was there. Pulled rod, cleaned, and inspected. Sure enough found the #3 cylinder intake rod had markings along the bottom from hitting against the wall (I believe)
Still haven’t fixed the stud issue. I’m nervous about beginning the drilling and helicoil process. So in the meantime while I wrap my head around it I decided to clean up and polish the valve cover and some rusted valve cover grommets and air filter locks.
I have another project but I don’t want to post anything on it until it is complete.
Well that’s pretty much it. So I will end with a nice picture I took a few weeks ago at the Segerstrom Hall in Costa Mesa.
You do not have the required permissions to view the files attached to this post.
Last edited by Mackn367 on Tue Aug 21, 2018 1:40 pm, edited 2 times in total.
Nick
1967.5 Roadster 1600
VIN: SPL311-13038
Orange County, CA
1967.5 Roadster 1600
VIN: SPL311-13038
Orange County, CA
-
Mackn367
- Site Supporter
- Posts: 533
- Joined: Tue Mar 27, 2018 3:38 pm
- Location: Orange County, CA
- Model: 1500/1600
- Year: Low Windshield-64-67.5
- Contact:
Re: Mackn367 - 67.5 SPL311
wow that did not post how i thought it would. I'll fix it in a bit
Nick
1967.5 Roadster 1600
VIN: SPL311-13038
Orange County, CA
1967.5 Roadster 1600
VIN: SPL311-13038
Orange County, CA
-
2mAn
- Roadsteraholic
- Posts: 2238
- Joined: Mon Jan 09, 2017 5:02 pm
- Location: Westchester, CA
- Model: 2000
- Year: High Windshield-68-70
Re: Mackn367 - 67.5 SPL311
You've done a lot of work !...
I cant wait to meet up and grab those badges from ya!
I cant wait to meet up and grab those badges from ya!
Simon
Current Cars:
-1999 Porsche 911 4/98-build, 3.8L M96
Current Cars:
-1999 Porsche 911 4/98-build, 3.8L M96
-
Mackn367
- Site Supporter
- Posts: 533
- Joined: Tue Mar 27, 2018 3:38 pm
- Location: Orange County, CA
- Model: 1500/1600
- Year: Low Windshield-64-67.5
- Contact:
Re: Mackn367 - 67.5 SPL311
Thanks! Yeah I’m excited for you to get them too.2mAn wrote: Fri Aug 10, 2018 5:46 pm You've done a lot of work !...
I cant wait to meet up and grab those badges from ya!
Nick
1967.5 Roadster 1600
VIN: SPL311-13038
Orange County, CA
1967.5 Roadster 1600
VIN: SPL311-13038
Orange County, CA
-
Mackn367
- Site Supporter
- Posts: 533
- Joined: Tue Mar 27, 2018 3:38 pm
- Location: Orange County, CA
- Model: 1500/1600
- Year: Low Windshield-64-67.5
- Contact:
Re: Mackn367 - 67.5 SPL311
Just finished cleaning and polishing the valve cover, grommets, and air filter locks. I think they came out pretty good. I probably could have done more but I’m pretty beat after 2 days of polishing. Plus I got to get back to fixing my valve studs. Ughhhhh.... anyone want to come over and drill some helicoil holes with me???
You do not have the required permissions to view the files attached to this post.
Nick
1967.5 Roadster 1600
VIN: SPL311-13038
Orange County, CA
1967.5 Roadster 1600
VIN: SPL311-13038
Orange County, CA
-
2mAn
- Roadsteraholic
- Posts: 2238
- Joined: Mon Jan 09, 2017 5:02 pm
- Location: Westchester, CA
- Model: 2000
- Year: High Windshield-68-70
Re: Mackn367 - 67.5 SPL311
I can come and inspire you to do it, but Im not taking that plunge ! hahahMackn367 wrote: Sun Aug 12, 2018 1:30 pm 25D3FA35-18B2-42B7-B45E-986719B10A6A.jpeg
Just finished cleaning and polishing the valve cover, grommets, and air filter locks. I think they came out pretty good. I probably could have done more but I’m pretty beat after 2 days of polishing. Plus I got to get back to fixing my valve studs. Ughhhhh.... anyone want to come over and drill some helicoil holes with me???
Valve cover looks great!
Simon
Current Cars:
-1999 Porsche 911 4/98-build, 3.8L M96
Current Cars:
-1999 Porsche 911 4/98-build, 3.8L M96
-
Mackn367
- Site Supporter
- Posts: 533
- Joined: Tue Mar 27, 2018 3:38 pm
- Location: Orange County, CA
- Model: 1500/1600
- Year: Low Windshield-64-67.5
- Contact:
Re: Mackn367 - 67.5 SPL311
2mAn wrote: Sun Aug 12, 2018 2:36 pmI can come and inspire you to do it, but Im not taking that plunge ! hahahMackn367 wrote: Sun Aug 12, 2018 1:30 pm 25D3FA35-18B2-42B7-B45E-986719B10A6A.jpeg
Just finished cleaning and polishing the valve cover, grommets, and air filter locks. I think they came out pretty good. I probably could have done more but I’m pretty beat after 2 days of polishing. Plus I got to get back to fixing my valve studs. Ughhhhh.... anyone want to come over and drill some helicoil holes with me???
Valve cover looks great!
Haha hey I’ll take inspiration too at this point.
Thanks yeah picture doesn’t really do it justice. It wasn’t crazy bad before because I tried cleaning it while it was installed. But since I had it off I was able to get in the cover too and scrape out any grime/old oil too. Since I’ve gone this far I might as well do an oil change. Basically I’m procrastinating the valve project.
Nick
1967.5 Roadster 1600
VIN: SPL311-13038
Orange County, CA
1967.5 Roadster 1600
VIN: SPL311-13038
Orange County, CA
-
Linda
- Fraternal Den Mother-RIP
- Posts: 7807
- Joined: Sat Nov 05, 2005 11:37 pm
- Location: Los Angeles
- Model: 1500/1600
- Year: High Windshield-68-70
Re: Mackn367 - 67.5 SPL311
Worst case is you can take the head off and take it to a machine shop to do the helicoil, or Time Sert is also used. Of course then you check the head, replace the gasket but that is not as hard as the helicoiI, at least for me. I did one and it was scary because if you mess up then it's a pain. Good time then also to go for ARP studs after the head gasket. Yes it is a slippery slope
Linda

Linda
Sadly-Linda has passed away 2022. She was the 311's den mother and drove the first Rare-Parts ball joint project. RIP.