WOOOOOO! I'M BACK!!!!!

So I've been at pretty much 95% travel since January for work. Before I left, I had ordered the SR20det mounts and alignment jig from Spriso hopes it would arrive before I had to fly out. Unfortunately I did not have the time and was gone for several weeks. I managed to free up a weekend to knock that out before my next trip. I do owe Mr. Spreadbury an apology for holding onto the jig for so long, I'm sorry. This made it so freaking easy, it was awesome! Set the jig up, trim the mounting plates, weld 'em, cut some gussets, weld 'em, DONE! Highly recommended.
20160204_153745.jpg
20160204_153732.jpg
20160204_153737.jpg
20160204_165851.jpg
20160512_190151.jpg
20160512_185831.jpg
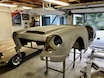
This is how it sat until last week. I'm done travelling for a couple months, and my boss gave me a week off. Perfect! Datsun day, every day

. My goal was to get the frame painted and the front suspension bolted up. I didn't get that far, but much progress was made. I mocked up an SR block/trans in the frame, and had to notch a little bit more. All of the frame cutting and welding for the SR is now complete! I spent a day wire-wheeling, scrubbing, and power washing the frame. I then used black KBS frame paint. They had 3 products: KBS-Klean (basically a degreaser), KBS Rust-Blast(etches the metal and removes rust), and the paint itself. The paint is a self leveling enamel, and i applied it with a brush. It said to apply two thin coats, but it was such a PITA with how i have the body still above the frame, I just did one thick coat. full cure is 96 hours, but after about 12, it was extremely hard, and could not be easily scratched off. There are spots that I just couldn't get with a brush, so next time I get time to work on it, I will go over it all with some spray bombs.
20160513_180356.jpg
20160513_180331.jpg
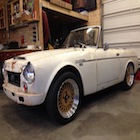
I forgot to snap some pictures of my new goodies before I left Dallas, but I ordered Comp front springs, 23mm sway bar, KYB gas-adjusts, and front and rear drilled/slotted z32 brake rotors. I'm really close to getting it sitting on its front wheels. The 5-lug hubs are now finally installed on the roadster spindles. I had to space out one of the bearings because the roadster spindle was about 3/16" too long, making the bearings unable to seat properly. An NL30 Nordlock washer set was the exact outer diameter as the outer diameter of the roadsters outer wheel bearing. This was fit into the hub prior to the bearing, spacing it out .22". The bearings now seat correctly, and the spindle nut can be tightened. OEM Nissan wheel seals were tapped into the back. They sit right where they should on the shoulder of the spindle. The cotter pin hole lines right up with the slots in the castle nut as well!
20160525_211322.jpg
20160525_211141.jpg
20160525_211305.jpg
20160525_214358.jpg
20160525_215210.jpg
20160525_215506.jpg
20160525_215455.jpg
20160525_215534.jpg
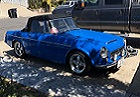
Thats pretty much where I'm at right now. The next goal I have for the car is to finish up the 4-link, and get the rear axle built. After trying to mock up the triangulated 4-link, I realized that I just didn't have the space I need to pull it off. That idea has been abandoned, and the new plan is to do a parallel 4-link with a watts linkage. The bottom bars are already fabbed and installed. I'm designing a bracket system for the upper bars, and should have it sent out to be water-jet early next week. Also a watts linkage center pivot section is on its way from GriggsRacing. Once i get this thing rollable, its coming down to Austin with me, and progress should be much faster and more consistent!
Cheers,
Wade
You do not have the required permissions to view the files attached to this post.