Dash cap installatoin

Tech tips and how to's

Moderators: notoptoy, S Allen, Solex68

Post Reply
User avatar
msampsel
Roadster Nut-Site Supporter
Posts: 1812
Joined: Mon Jul 14, 2014 5:31 pm
Location: SoAZ

Re: Dash cap installatoin

Post by msampsel »

Zedyone_Kenobi wrote:I clean a lot as I go
I cannot wait to start cleaning all the inner dash and wires
It would be a crime not to

But uh yeah
Not sure who inhaled more
Me or the shop vac
We love Sagas bye the way, but your garage is too darn clean :wink:
I thought your gauges looked good!
67 1600 (Mods only a mother could love)
78 911 SC Targa (Severe Oversteer but still loved)
User avatar
msampsel
Roadster Nut-Site Supporter
Posts: 1812
Joined: Mon Jul 14, 2014 5:31 pm
Location: SoAZ

Re: Dash cap installatoin

Post by msampsel »

bakerjf wrote:Congrats on the dash. When it's all said and done you'll be much happier with the cap, and it's good bonding time with the car.
As to the dash light bulbs, Motorsport Auto (the Z guys) used to sell instrument bulbs that were something like 4 watts instead of the standard 3 watts (I think). It doesn't sound like much, but it's a 25% brighter bulb and for people with increasingly bad night vision (like me), it makes a big difference.

http://www.thezstore.com/page/TZS/PROD/ ... 03/45-4327
Nice,

Are these same size as the older gauges (to aid my older eyes)?
67 1600 (Mods only a mother could love)
78 911 SC Targa (Severe Oversteer but still loved)
User avatar
bakerjf
Site Supporter
Posts: 1391
Joined: Wed Sep 07, 2011 5:48 pm

Re: Dash cap installatoin

Post by bakerjf »

msampsel wrote:
bakerjf wrote:Congrats on the dash. When it's all said and done you'll be much happier with the cap, and it's good bonding time with the car.
As to the dash light bulbs, Motorsport Auto (the Z guys) used to sell instrument bulbs that were something like 4 watts instead of the standard 3 watts (I think). It doesn't sound like much, but it's a 25% brighter bulb and for people with increasingly bad night vision (like me), it makes a big difference.

http://www.thezstore.com/page/TZS/PROD/ ... 03/45-4327
Nice,

Are these same size as the older gauges (to aid my older eyes)?
I'm not sure what kind of bulbs the flat dash cars use. Maybe someone out there can chime in if they're the same?
J. Baker
Lafayette, CA
'69 2000 (Solex)
User avatar
bakerjf
Site Supporter
Posts: 1391
Joined: Wed Sep 07, 2011 5:48 pm

Re: Dash cap installatoin

Post by bakerjf »

I was checking out my car tonight for a cars and coffee tomorrow morning. This is a pretty fair representation of how the bright the instruments are with the enhanced bulbs.
image.jpeg
You do not have the required permissions to view the files attached to this post.
J. Baker
Lafayette, CA
'69 2000 (Solex)
User avatar
Zedyone_Kenobi
Roadster Fanatic
Posts: 200
Joined: Thu Apr 03, 2014 8:27 am
Location: League City, Texas

Re: Dash cap installatoin

Post by Zedyone_Kenobi »

Spent some quality time with the roadster. Cleaning thing and adding things to the FIX list. Took the time to clean all the terminals I could reach, and removed all the years of gunk and dust and dirt. The harness is looking much more like maybe it would have when the car was newer. I also went ahead and removed the heater core and box.

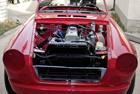
So this is where we are now.

Image

The heater core and box did not come out with out a fight. And it blessed with with a bath in the most foul smelling brown liquid I have ever encountered. And that includes the septic tank I had to dig up as a kid. :Tosser:

As for the heater core. Well it never leaked out that liquid, so it is not leaking, but I have no idea of it condition. I may try to get it pressure tested and see if it can be 'rotted' out. If they still do such things.

The same cannot be said for the box. It is in quite a bad state of decay.

Image

Image

The motor runs quietly, and has always worked. All the mechanisms move as they should, but there is no sealing gaskets to be had. They are as you would expect LONG gone. I have a penchant to get all of this working again.

I have the intake tube on top of the solex manifold blocked off now so no flow goes into the firewall at all, but I kept all the fittings to make it OEM again. I could find a way to make this work. It would be nice to have a functional heater in the cooler part of the year.. The water cock is absolutely frozen. It is a non starter. I had an extra one for the Z I got in a big parts buy, but it is sadly not the same.

Image

That will have to be replaced along with all the hoses.

I found out the cowl drain hose was not attached anymore, and it is in rather poor condition as well.

Image

The previous owner who I still talk to says he never even bothered with the heater as he was never going use it anyway...so I want to make this right and get her back closer to how she should be.

Sadly all was not perfect. On the passenger side when I was cleaning up the brown liquid of death. I noticed a bubble where the passenger feet go just behind where the speaker sits. I poked it and my finger went through. :(

I stuck a screwdriver in there and then went into the engine bay to see where it may end up, but I found nothing. All I can figure is there is a cavity beneath the battery behind the wheel well but in front of the floor board. Things looked dirty it there with a flashlight, but I would wager I would need to pull the front fender off to see i really well and fix any rust that may be in there.

These are the things that keep you up at night. Do I fix this now or later. I do think I can tackle that job later AFTER I finish this one. Getting in too deep I can be a recipe for an unfinished project, and this car drives like a dream, so it would be a shame to NOT get her back on the road ASAP.

I almost tried putting the cap on today, but decided I had enough fun. I still need to make a shopping list of parts to order. I cleaned my tools and will tackle it again this week. The heater core project was expected, and I think it will slow things down pinch. But ultimately I believe it is the right thing to do.

Any advice on the heater core. I see some in much better shape than mine on eBay for 125 OBO. It may be easier to go with that. Much less rust.
Image
1971 240Z (94% done)
1968 2000 Roadster
User avatar
bakerjf
Site Supporter
Posts: 1391
Joined: Wed Sep 07, 2011 5:48 pm

Re: Dash cap installatoin

Post by bakerjf »

Your heater box looks NOS compared the POS mine was. Metal Rescue or Evaporust is your friend - with some dark grey/black paint and some new screws, yours can look new again too. I actually did the molasses technique (see YouTube) to remove the rust on my box, but the other products work about 10x faster. After a day submerged in the MR, and exercising the mechanism, you might be able to save that heater valve too - they are something like $200 to replace.
I don't think a shop will "rod out" your core, but they can pressure test it. Did I mention Metal Rescue? :D You can fill up your core with it and get rid of the corrosion inside...
J. Baker
Lafayette, CA
'69 2000 (Solex)
User avatar
Zedyone_Kenobi
Roadster Fanatic
Posts: 200
Joined: Thu Apr 03, 2014 8:27 am
Location: League City, Texas

Re: Dash cap installatoin

Post by Zedyone_Kenobi »

Yeah, evaporust is my friend. I you look on my workbench in the photos, there is dish filled with it. All products go into it that have any rust, and in 24 hours, they are back to normal. It is a hell of a product. I may try to loosen up that heater valve. Seems a shame not to give it a chance to live again.
Image
1971 240Z (94% done)
1968 2000 Roadster
User avatar
spl310
Roadster Guru
Posts: 13241
Joined: Sun Dec 29, 2002 10:38 pm
Location: In front of this keyboard... in Jacksonville, Florida!

Re: Dash cap installatoin

Post by spl310 »

I'm told that antifreeze will loosen it up too.
"Wow, a Roadster!" Stuart Little

1967.5 2000
1967.5 2000
1964 1500
1964 1500
1967.5 1600
1968 chassis
2006 Acura MDX
2013 Volkswagen Jetta TDI wagon
1995 F350 Powerstroke!
More...
User avatar
msampsel
Roadster Nut-Site Supporter
Posts: 1812
Joined: Mon Jul 14, 2014 5:31 pm
Location: SoAZ

Re: Dash cap installatoin

Post by msampsel »

Admire your perseverance so press on it's fun ...
Antifreeze and a little PB blaster and twist and turn.

Of course heaters are one of the amenities

I've managed to live without in Montana and Texas and now AZ in my roadster. It just is not a
cold weather car for me.

Best heater for me was pulling the rubber shift boot up and out and

letting the air fly up past the tranny. :shock:
67 1600 (Mods only a mother could love)
78 911 SC Targa (Severe Oversteer but still loved)
User avatar
msampsel
Roadster Nut-Site Supporter
Posts: 1812
Joined: Mon Jul 14, 2014 5:31 pm
Location: SoAZ

Re: Dash cap installatoin

Post by msampsel »

bakerjf wrote:I was checking out my car tonight for a cars and coffee tomorrow morning. This is a pretty fair representation of how the bright the instruments are with the enhanced bulbs.
image.jpeg
Ooo ahhh nice, I might need to get these for my 911 too.
They are too darn dim .... :shock: need em with all the over steer LOL
67 1600 (Mods only a mother could love)
78 911 SC Targa (Severe Oversteer but still loved)
User avatar
theunz
Roadster Nut-Site Supporter
Posts: 2469
Joined: Sat May 02, 2009 1:54 pm
Location: Catoosa Ok.
Model: 2000
Year: High Windshield-68-70

Re: Dash cap installatoin

Post by theunz »

My heater valve was frozen too, but I was able to dissemble it and return it to its normal smoothness. I made a new gasket for the top out of some foam rubber. It doesn't really matter if the door flaps seal all that well, as basically your just trying to get heat to the windshield, and any air escaping is just going to help warm up the cockpit anyway. Although they can get a little pricey, a sand / bead blaster is a real time saver during a restoration. I use mine way more than I ever imagined. With a little work that heater box can look like new. When did you say that body was coming off the frame :D Mike
Mike M

Old enough to know better, too old to remember why!


1969 2000 solex mine since 1972, under resurrection. (Finally resurrected as of spring 2019!)
1969 Porsche 911s -worth more, but not as valuable! Gone!
2017 Lotus Evora 400 - Oh my!!
C.Costine
Roadster Nut-Site Supporter
Posts: 1737
Joined: Fri Feb 13, 2015 8:08 pm

Re: Dash cap installatoin

Post by C.Costine »

Wow, that valve looks like NOS compared to the one that I bought to replace my missing valve. Of course yours is somewhat different. If you plan to replace it you should offer it up for sale, it will probably go quickly, being so good.
located in Chester NH
1967 1600 in restoration
2013 Arctic Cat F-1100 turbo
Ford F-350 6.0
Ford 9000 puller, Ford 960 puller, Ford 901show, Ford 971 worker, Oliver 70 waiting its turn
User avatar
brubojacru
Site Supporter
Posts: 73
Joined: Tue Jan 25, 2011 9:53 pm
Location: Regina, SK Canada

Re: Dash cap installatoin

Post by brubojacru »

My heater control valve was stuck as well on my 1969 2000 but they are fairly easy to disassemble and clean.

http://www.311s.org/PhotoGallery/albums/userpics/10004/CIMG4740.JPG

http://www.311s.org/PhotoGallery/albums/userpics/10004/CIMG4741.JPG

I found a new o-ring which fit close to the original

http://www.311s.org/PhotoGallery/albums/userpics/10004/CIMG4742.JPG

My hose was shot and I had to cut it to get the valve out. I found a similar hose at a Canadian Tire store and cut a bit off.

http://www.311s.org/PhotoGallery/albums/userpics/10004/CIMG4802.JPG

Seems to fit pretty nicely too.

http://www.311s.org/PhotoGallery/albums/userpics/10004/CIMG4809.JPG

Regards,
Bruce
1969 Datsun 2000
2006 Tahoe Z71
User avatar
Zedyone_Kenobi
Roadster Fanatic
Posts: 200
Joined: Thu Apr 03, 2014 8:27 am
Location: League City, Texas

Re: Dash cap installatoin

Post by Zedyone_Kenobi »

Totally agree on the valve. I have not even tried to fiddle with it. IT just felt stuck. I will dig deeper into it.

A did remove my heater core from the box last night. Man, I was shocked. I was expecting a rusted heap. What I found was almost immaculate. It has all the old Jute looking material around it, Insulation I suppose, but the actual core has perfect looking vanes and I do not see any corrosion around the inlet or outlets. I will take off the Jute padding/insulation and give it a good clean. I did finally order this...

Image

It comes with a dipping basket. I will see if I can get the bulk of the parts in there and bring that heater box back to life. Meanwhile I need to find a cooling schematic of the U20 engine to see what goes where. Right now I have the water pump coming into my manifold and the back side is plugged. So I need to get flow into the heater core properly if I am going to do this.

More pics to follow after I get the core cleaned. I will still get it pressure tested once out. I may rig up something myself to do that.
Image
1971 240Z (94% done)
1968 2000 Roadster
User avatar
bakerjf
Site Supporter
Posts: 1391
Joined: Wed Sep 07, 2011 5:48 pm

Re: Dash cap installatoin

Post by bakerjf »

I think you said your's is a solex car. You should have a "T" water pipe sticking out of the front of the water tube on your manifold. The water pump plugs into that, the other input is the outlet hose from the heater core that comes out of the firewall behind the engine. It's a long preformed hose you can get from most of the vendors. The water pipe is available from Jim (JT68). The rear outlet of your waterpipe goes down to valve on the right side of the car. It's also utilizes a preformed hose, and is not compatible with the SU setup. That's all there is to it...
J. Baker
Lafayette, CA
'69 2000 (Solex)
Post Reply