I use the ground glass.theunz wrote:Curtis, I used glass beads, they leave parts "ready to paint".
What did you do TO or FOR your Datsun today?(Roadsters only)
Moderators: notoptoy, S Allen, Solex68
-
Curtis

- Site Supporter
- Posts: 4164
- Joined: Fri Jan 01, 2010 2:49 pm
- Location: Des Moines, WA
- Model: 1500/1600
- Year: Low Windshield-64-67.5
Re: What did you do TO or FOR your Datsun today?(Roadsters o
66 stroker, almost done.
67 basket case, paint coming soon.
67 basket case, paint coming soon.
-
theunz
- Roadster Nut-Site Supporter
- Posts: 2471
- Joined: Sat May 02, 2009 1:54 pm
- Location: Catoosa Ok.
- Model: 2000
- Year: High Windshield-68-70
Re: What did you do TO or FOR your Datsun today?(Roadsters o
I bought my cabinet used (just barely) and it came with what the PO thought was ScatBlast which I think may be a mix of crushed glass and glass beads. I have also used just crushed glass. The glass beads leave a noticeable smoother finish than either and seemed to work just as fast. The downside to the beads is that they cost about 3 times as much as the crushed glass, about $30 dollars per 50 lb vs about $10. Mike
Mike M
Old enough to know better, too old to remember why!
1969 2000 solex mine since 1972, under resurrection. (Finally resurrected as of spring 2019!)
1969 Porsche 911s -worth more, but not as valuable! Gone!
2017 Lotus Evora 400 - Oh my!!
Old enough to know better, too old to remember why!
1969 2000 solex mine since 1972, under resurrection. (Finally resurrected as of spring 2019!)
1969 Porsche 911s -worth more, but not as valuable! Gone!
2017 Lotus Evora 400 - Oh my!!
-
dynaguy
- Roadster Fanatic-Site Supporter
- Posts: 1250
- Joined: Wed Jan 01, 2003 3:27 pm
- Location: Colton, Wa
-
RCMike

- Roadsteraholic
- Posts: 2460
- Joined: Tue Mar 13, 2012 12:58 pm
- Location: Pomona, CA
-
spl310

- Roadster Guru
- Posts: 13242
- Joined: Sun Dec 29, 2002 10:38 pm
- Location: In front of this keyboard... in Jacksonville, Florida!
Re: What did you do TO or FOR your Datsun today?(Roadsters o
Man, I really would like some Empi wheels better than the Libres that I have.
"Wow, a Roadster!" Stuart Little
1967.5 2000
1967.5 2000
1964 1500
1964 1500
1967.5 1600
1968 chassis
2006 Acura MDX
2013 Volkswagen Jetta TDI wagon
1995 F350 Powerstroke!
More...
1967.5 2000
1967.5 2000
1964 1500
1964 1500
1967.5 1600
1968 chassis
2006 Acura MDX
2013 Volkswagen Jetta TDI wagon
1995 F350 Powerstroke!
More...
-
theunz
- Roadster Nut-Site Supporter
- Posts: 2471
- Joined: Sat May 02, 2009 1:54 pm
- Location: Catoosa Ok.
- Model: 2000
- Year: High Windshield-68-70
Re: What did you do TO or FOR your Datsun today?(Roadsters o
Man, I would really like to have both  plus some 15 or 16 inch Pannasports so I could fit some performance tires, however $$$. The neat thing about the Libres is that you see far less of them than the 8 spokes. Mike
Mike M
Old enough to know better, too old to remember why!
1969 2000 solex mine since 1972, under resurrection. (Finally resurrected as of spring 2019!)
1969 Porsche 911s -worth more, but not as valuable! Gone!
2017 Lotus Evora 400 - Oh my!!
Old enough to know better, too old to remember why!
1969 2000 solex mine since 1972, under resurrection. (Finally resurrected as of spring 2019!)
1969 Porsche 911s -worth more, but not as valuable! Gone!
2017 Lotus Evora 400 - Oh my!!
-
Nissanman
- Roadster Fanatic-Site Supporter
- Posts: 3453
- Joined: Mon Apr 16, 2007 8:07 pm
- Location: Adelaide, South Australia
- Model: 1500/1600
- Year: Low Windshield-64-67.5
- Contact:
Re: What did you do TO or FOR your Datsun today?(Roadsters o
Two jobs out of the way today: -
1. Removed the temperature sender from the head, set up a test rig and calibrated the temperature gauge to the sender.
Used a 12V power supply, digital K type thermocouple and a hot air gun to set the gauge to all three of the graduations, 130, 190 and 240degF. Hopefully it will now be a lot closer to the actual coolant temperature
2. Wrapped the exhaust pipe with 1" black header wrap. Had enough to do the leading section and centre section that run underneath the passenger side cabin floor. I used a 25x35cm section of self adhesive blanket on the floor pan immediately above the first muffler.
You do not have the required permissions to view the files attached to this post.
Nissanman, just trying to help.
1965 SP310 Engine No. G-93326 Car No. SP310-10817
https://photos.shutterfly.com/album/60141836519
On the road again!
1965 SP310 Engine No. G-93326 Car No. SP310-10817
https://photos.shutterfly.com/album/60141836519
On the road again!
-
Toptech360
- Roadsteraholic
- Posts: 661
- Joined: Mon Oct 28, 2013 1:59 pm
- Location: Bellingham, Washington
Re: What did you do TO or FOR your Datsun today?(Roadsters o
I need to do the same thing. Could you explain how you did the calibration? Thanks!Nissanman wrote:Two jobs out of the way today: -
1. Removed the temperature sender from the head, set up a test rig and calibrated the temperature gauge to the sender.
Used a 12V power supply, digital K type thermocouple and a hot air gun to set the gauge to all three of the graduations, 130, 190 and 240degF. Hopefully it will now be a lot closer to the actual coolant temperature
Dan
1964 Datsun SPL310. The Datsun
1997 Toyota Tacoma LX 4wd. The Truck
2009 Subaru Forester XT.
2017 Toyota AWD Swagger Wagon.
1964 Datsun SPL310. The Datsun
1997 Toyota Tacoma LX 4wd. The Truck
2009 Subaru Forester XT.
2017 Toyota AWD Swagger Wagon.
-
raggs53

- Roadster Nut
- Posts: 57
- Joined: Tue Nov 25, 2014 2:21 am
- Location: Oklahoma City Ok
Re: What did you do TO or FOR your Datsun today?(Roadsters o
After sanding the pitted paint down to metal, epoxy primer, some body work, more primer, some more body work and primer now hoping after sand and some touch up, This be last coat of primer before new Fireball Red go's on.
You do not have the required permissions to view the files attached to this post.
JEFF
67 SPL311 05429 restore/driver
31 Ford 5 window coupe
07 Ford Mustang GT
55 Chevy 2 Door Post
67 SPL311 05429 restore/driver
31 Ford 5 window coupe
07 Ford Mustang GT
55 Chevy 2 Door Post
-
Nissanman
- Roadster Fanatic-Site Supporter
- Posts: 3453
- Joined: Mon Apr 16, 2007 8:07 pm
- Location: Adelaide, South Australia
- Model: 1500/1600
- Year: Low Windshield-64-67.5
- Contact:
Re: What did you do TO or FOR your Datsun today?(Roadsters o
Toptech360,
I got some advice from Lou Mondello here in Oz about calibrating the gauge.
He apparently was an instrument tech in a previous life.
For the '65 and I assume previous models, the Temperature gauge has two toothed pinwheel adjustments accessible from the rear of the gauge.
The wheels are for low scale and high scale adjustments.
I used a small flat bladed jewelers screwdriver to rotate the toothed wheel so that the needle was more accurate.
To heat the sender I positioned a heat gun to blow on the body with the thermocouple bead clamped under an alligator clip connected to battery positive.
Battery negative was connected to the Yellow/Green wire of the gauge.
The Yellow/White from the gauge was connected to the sender screw terminal.
My gauge was wound up to the max to read high, so it was fairly obvious which way to adjust and the needle dropped significantly.
First, I heated the sender to 55C[130F] and the needle was at the LHS of the scale so that was cool
Adjusted the gun to raise the temp to 90C[194F] which is the mid scale graduation [190F actually].
Needed to adjust the upper wheel to get the needle mid scale.
Wound up the heat to 115C[240F] and the needle was not quite on the 240F graduation.
Good enough he said
Much more accurate than before she said.
Make sure you have the correct sender for the early cars, positive temperature coefficient, resistance increases as the temperature increases.
FWIW, here are the resistance values I read whilst doing a preliminary temperature run: -
Deg C/Deg F:Ohms
55/130:63 COLD graduation
65/150:64
75/167:66
85/185:67 thermostat opening temperature, should be "NORMAL" reading
90/194:68 MID scale graduation
95/203:68.5
100/212:69
115/240:70 HOT graduation
HINT: -
You might want to spray some electronic cleaner and lube inside the gauge before you start, so that the wheels are easier to turn.
Last edited by Nissanman on Wed Jan 14, 2015 11:56 pm, edited 1 time in total.
Nissanman, just trying to help.
1965 SP310 Engine No. G-93326 Car No. SP310-10817
https://photos.shutterfly.com/album/60141836519
On the road again!
1965 SP310 Engine No. G-93326 Car No. SP310-10817
https://photos.shutterfly.com/album/60141836519
On the road again!
-
Toptech360
- Roadsteraholic
- Posts: 661
- Joined: Mon Oct 28, 2013 1:59 pm
- Location: Bellingham, Washington
Re: What did you do TO or FOR your Datsun today?(Roadsters o
Fantastic info! Thank you nissanman. Tech info like this should be included in the wiki for sure. My 64 was handed down to me by my father in law, and he told me that the gauge has never done anything but peg to full hot for as long as he remembered. The sender i have is a nos correct part and calibrating it correctly is at the top of my to do list.
In some of my checks prior to this knowledge, i discovered ive got a bit of resistance between the engine and frame. About 25 ohms difference when measuring. The battery was unhooked when i was doing measurements but i bet this would lead to a voltage drop which could be compounding my problem. My first step is to add/improve the grounding of the engine to the frame. Next will be to calibrate. Again, thanks!! Including the ohms/temp is a great reference. Cheers and happy roadstering.
In some of my checks prior to this knowledge, i discovered ive got a bit of resistance between the engine and frame. About 25 ohms difference when measuring. The battery was unhooked when i was doing measurements but i bet this would lead to a voltage drop which could be compounding my problem. My first step is to add/improve the grounding of the engine to the frame. Next will be to calibrate. Again, thanks!! Including the ohms/temp is a great reference. Cheers and happy roadstering.
Dan
1964 Datsun SPL310. The Datsun
1997 Toyota Tacoma LX 4wd. The Truck
2009 Subaru Forester XT.
2017 Toyota AWD Swagger Wagon.
1964 Datsun SPL310. The Datsun
1997 Toyota Tacoma LX 4wd. The Truck
2009 Subaru Forester XT.
2017 Toyota AWD Swagger Wagon.
-
Nissanman
- Roadster Fanatic-Site Supporter
- Posts: 3453
- Joined: Mon Apr 16, 2007 8:07 pm
- Location: Adelaide, South Australia
- Model: 1500/1600
- Year: Low Windshield-64-67.5
- Contact:
Re: What did you do TO or FOR your Datsun today?(Roadsters o
I have 2 cables from the battery positive, one to the engine block and one to the chassis: -

There should be a threaded hole in the chassis for the smaller cable.
When I re-fitted the sender, I smeared Loctite thread sealer around the shoulder of the sender but left the tube nut and head threads clear of sealant. That way the sender seals the coolant and the tube nut when torqued up, provides a nice healthy ground.
A couple of minutes with a DVM either reading voltages with everything connected or resistance with the battery disconnected will help you track down any poor grounds.
I also used a carbon grease on all of the screw connections.

It is a conducting grease which seals out moisture at these important connections.
There should be a threaded hole in the chassis for the smaller cable.
When I re-fitted the sender, I smeared Loctite thread sealer around the shoulder of the sender but left the tube nut and head threads clear of sealant. That way the sender seals the coolant and the tube nut when torqued up, provides a nice healthy ground.
A couple of minutes with a DVM either reading voltages with everything connected or resistance with the battery disconnected will help you track down any poor grounds.
I also used a carbon grease on all of the screw connections.
It is a conducting grease which seals out moisture at these important connections.
Nissanman, just trying to help.
1965 SP310 Engine No. G-93326 Car No. SP310-10817
https://photos.shutterfly.com/album/60141836519
On the road again!
1965 SP310 Engine No. G-93326 Car No. SP310-10817
https://photos.shutterfly.com/album/60141836519
On the road again!
-
Curtis
- Site Supporter
- Posts: 4164
- Joined: Fri Jan 01, 2010 2:49 pm
- Location: Des Moines, WA
- Model: 1500/1600
- Year: Low Windshield-64-67.5
Re: What did you do TO or FOR your Datsun today?(Roadsters o
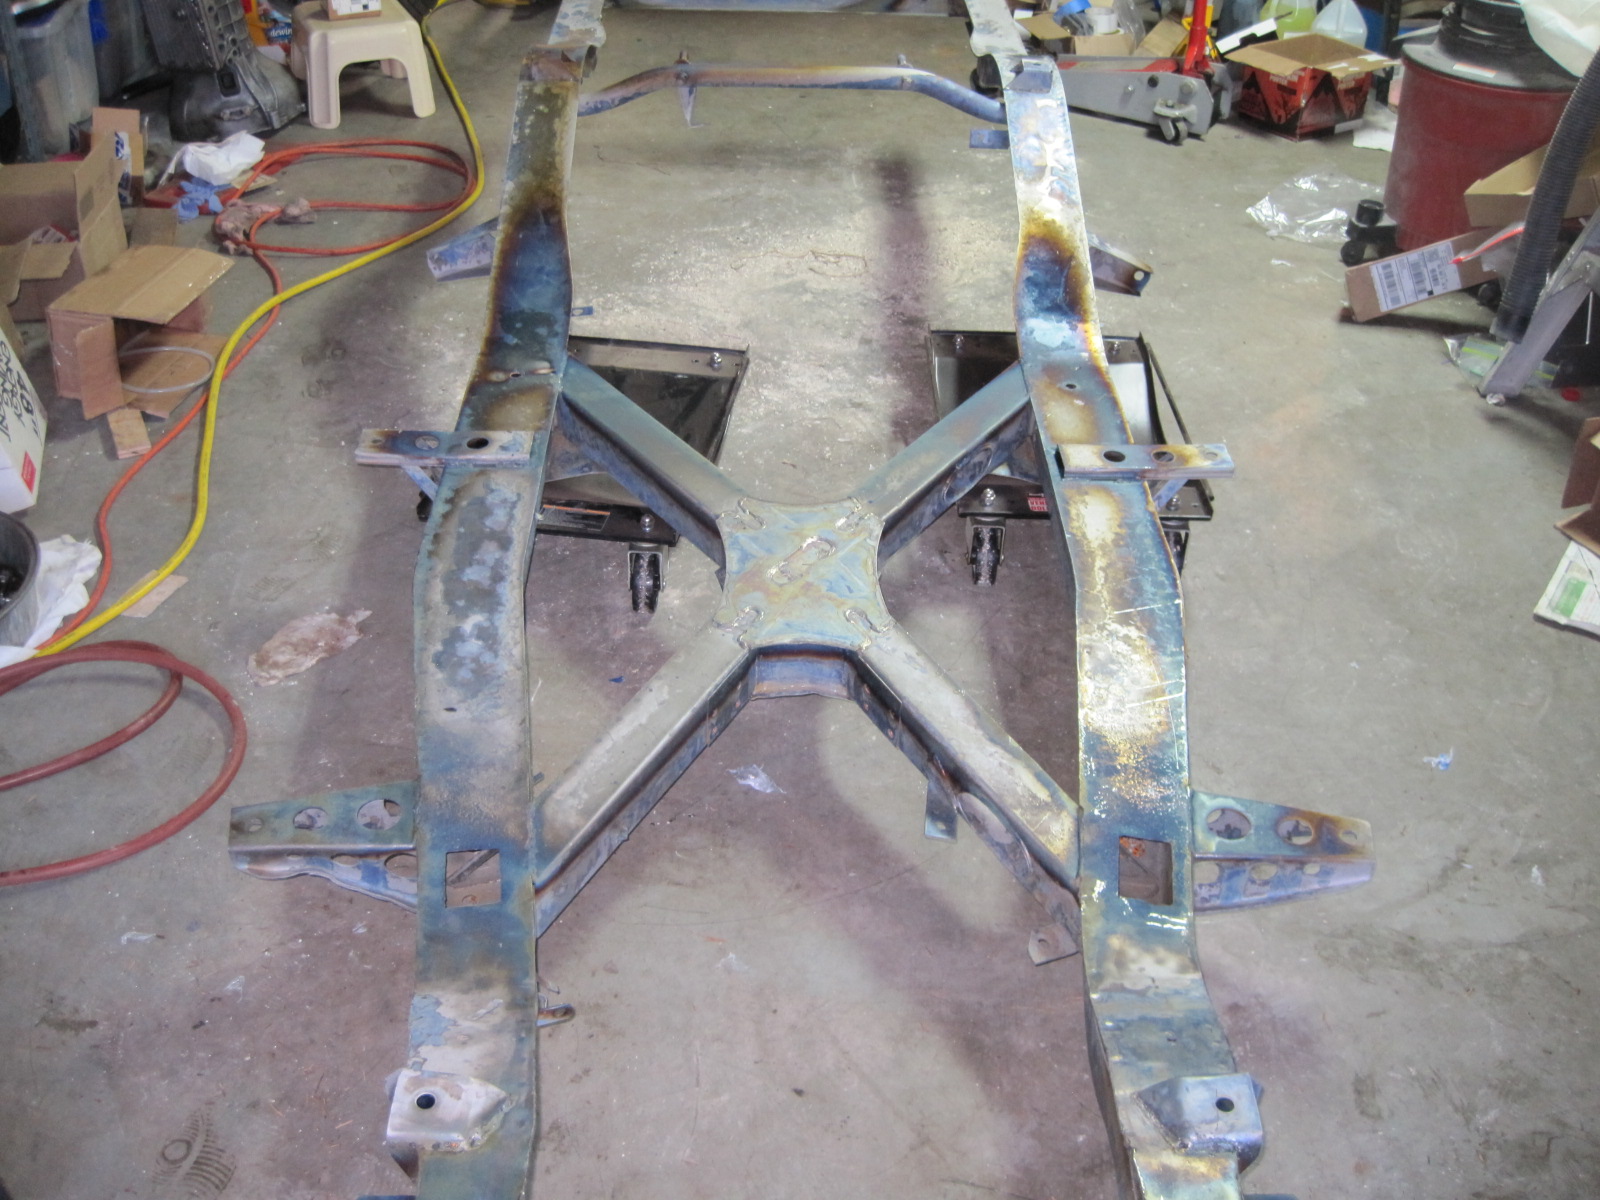
It's Back! I picked up my frame today from having it dipped.
Went from this.
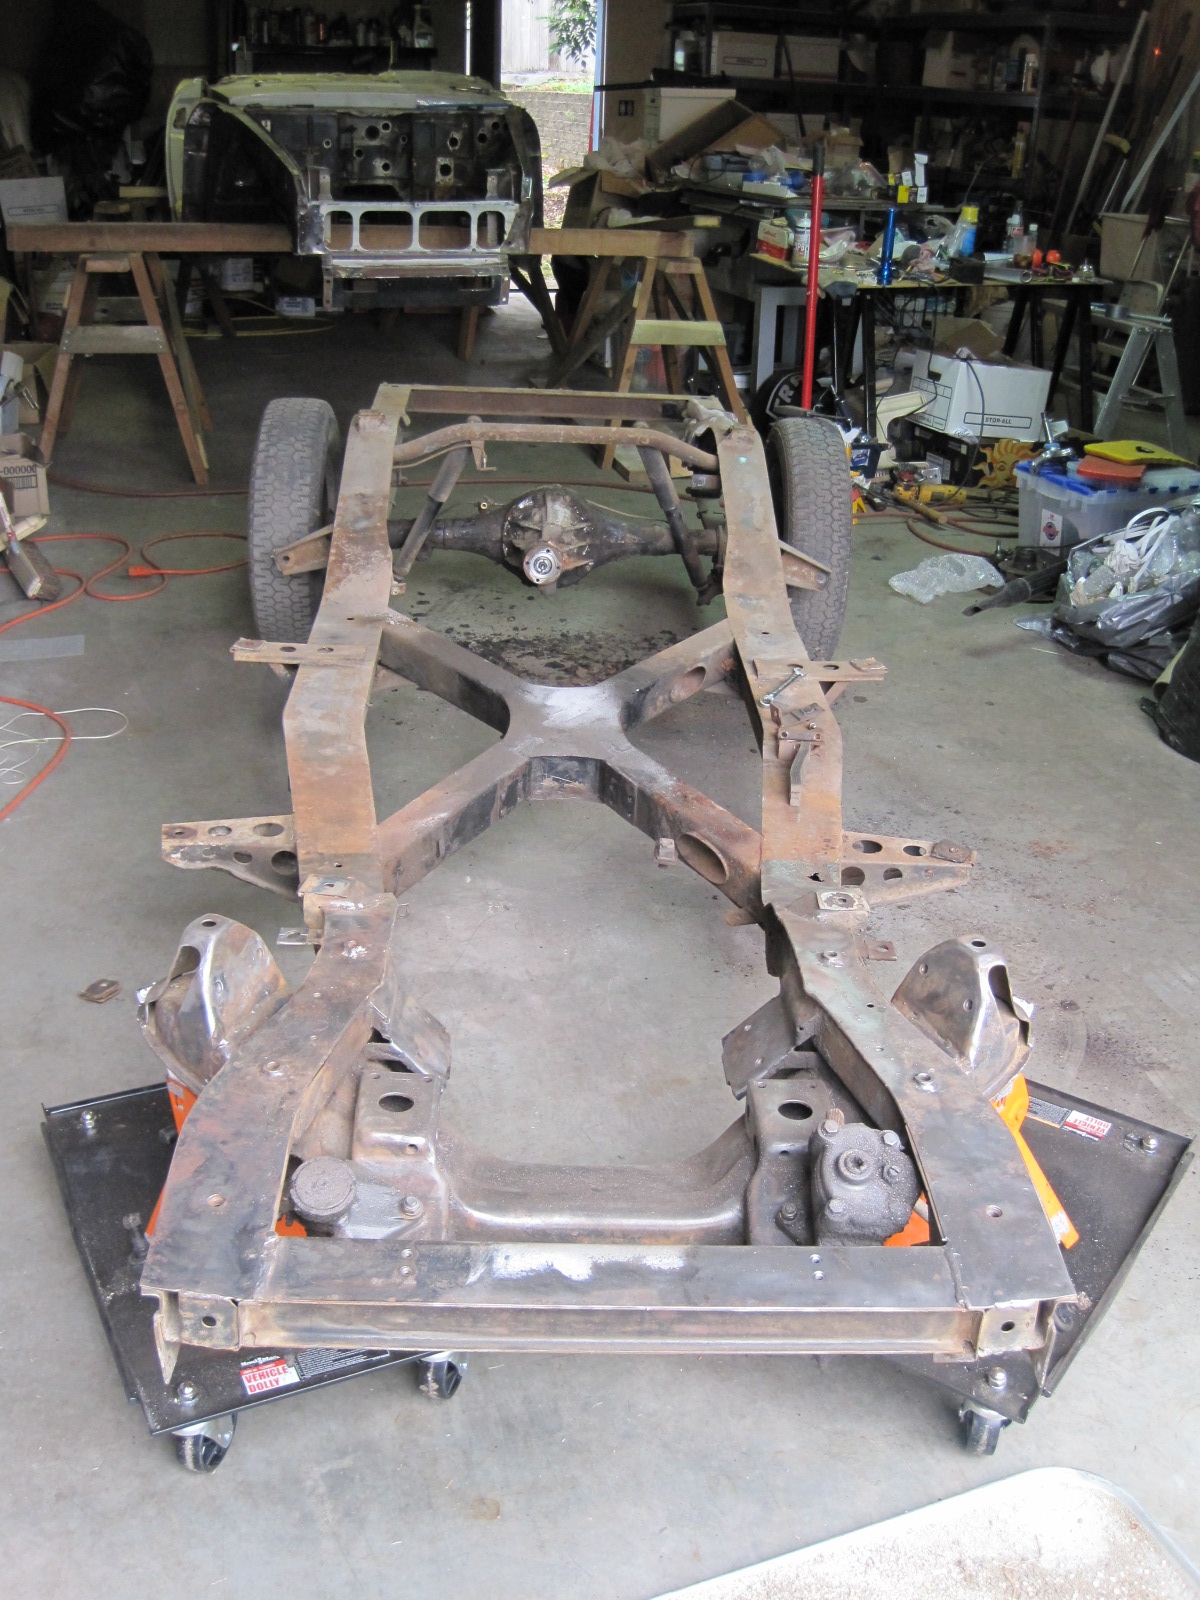
To this. All clean and phosphate coated. No paint, no grease.
Went from this.
To this. All clean and phosphate coated. No paint, no grease.
Last edited by Curtis on Tue Jan 20, 2015 9:15 am, edited 1 time in total.
66 stroker, almost done.
67 basket case, paint coming soon.
67 basket case, paint coming soon.
-
RBMann
- Roadsteraholic
- Posts: 548
- Joined: Mon Jan 05, 2015 8:37 pm
- Location: Kenmore, WA
- Model: 1500/1600
- Year: High Windshield-68-70
Re: What did you do TO or FOR your Datsun today?(Roadsters o
Replaced the throttle cable that had some broken strands at the carb end with my spare 1.5mm bicycle cable. Also made all the holes in the door limiter arms and brackets round instead of oval then installed bushings and new pins.
You do not have the required permissions to view the files attached to this post.
RBMann
mechanic on '69-1600(not mine)
mechanic on '69-1600(not mine)
-
Nissanman
- Roadster Fanatic-Site Supporter
- Posts: 3453
- Joined: Mon Apr 16, 2007 8:07 pm
- Location: Adelaide, South Australia
- Model: 1500/1600
- Year: Low Windshield-64-67.5
- Contact:
Re: What did you do TO or FOR your Datsun today?(Roadsters o
Be careful with those new pins, they will need to be trimmed back to clear the aperture in the "A" pillar.
Otherwise they will crunch into the sheet metal when you close the door.
I found that if I left just enough on the pin to drill a hole for an "R" clip, everything JUST cleared
Otherwise they will crunch into the sheet metal when you close the door.
I found that if I left just enough on the pin to drill a hole for an "R" clip, everything JUST cleared
Nissanman, just trying to help.
1965 SP310 Engine No. G-93326 Car No. SP310-10817
https://photos.shutterfly.com/album/60141836519
On the road again!
1965 SP310 Engine No. G-93326 Car No. SP310-10817
https://photos.shutterfly.com/album/60141836519
On the road again!