Switch letter restoring
Moderators: notoptoy, S Allen, Solex68
-
iamangelfriend
- Roadster Newby
- Posts: 8
- Joined: Wed Jan 25, 2012 9:40 pm
- Location: Sunnyvale, California USA
- Model: 1500/1600
- Year: High Windshield-68-70
- Contact:
Switch letter restoring
If you have switch knobs with white letters worn so much they're hard to read... a simple fix is to use a drop of appliance touch up enamel paint found at many hardware stores. Clean the knob of any dirt by washing (use an old toothbrush) or by using a fine wire brush. Take a toothpick and get a drop of the paint on it to add to the letter grooves. A Q-Tip works well or the corner of a Kleenex or toilet paper to soak up the excess paint or wipe carefully over the surface (be careful not to soak the paint out of the grooves!). Once the paint dries (fairly quickly)... the knobs will look pretty much new again!
-
Garm
- Roadster Enthusiast
- Posts: 2061
- Joined: Wed Dec 28, 2011 9:49 am
- Location: Canoga Park, CA
- Contact:
Re: Switch letter restoring
I got a little jar of hobby paint from the hobby store.
I could match the off-white on the car I was working on that way.
Good technique, it works!
I could match the off-white on the car I was working on that way.
Good technique, it works!
1969 Roadster 1600-ish #26244 "Spike"
---------------------------------
OS GIKEN LSD $1720
AASCO light flywheels $398.95
---------------------------------
OS GIKEN LSD $1720
AASCO light flywheels $398.95
-
Nissanman
- Roadster Fanatic-Site Supporter
- Posts: 3452
- Joined: Mon Apr 16, 2007 8:07 pm
- Location: Adelaide, South Australia
- Model: 1500/1600
- Year: Low Windshield-64-67.5
- Contact:
Re: Switch letter restoring
Thanks for those tips.
Did you use any clear coat to protect the job?
I have my instrument faces being restored as we speech.
They will actually spray the white first, then black, then laser etch where the white markings should be.
Ultimately, after re-chroming, they will do the black text on the heater, fresh air and switch panels unless the quote is scary, then I'll try what you have done.
However, I was going to try to do the shift pattern image on my gear shift knob myself.
So your advice is very timely
Nissanman, just trying to help.
1965 SP310 Engine No. G-93326 Car No. SP310-10817
https://photos.shutterfly.com/album/60141836519
On the road again!
1965 SP310 Engine No. G-93326 Car No. SP310-10817
https://photos.shutterfly.com/album/60141836519
On the road again!
-
iamangelfriend
- Roadster Newby
- Posts: 8
- Joined: Wed Jan 25, 2012 9:40 pm
- Location: Sunnyvale, California USA
- Model: 1500/1600
- Year: High Windshield-68-70
- Contact:
Re: Switch letter restoring
I didn't do any clear coating. I'm not all that concerned with "authentic restoration" so having shiny knobs isn't a concern. I know the newer replacement knobs are plastic and quite cheap feeling and looking! They may be shiny so the "magpie syndrome" takes effect but I like the better quality feel of the original knobs. The laser etching is gonna be really accurate but more than likely pricey. It's a great idea though! Check out your panels and get an idea of how thick the paint is. If it was an enamel, it's more apt to be thicker in which case this method should work. Thinner coats of paint would make it a bit more troublesome. You might consider a laser etched adhesive backed "template" that you could put on the panel and then do the paint. maybe one of each (positive and negative) so you can do both colors of paint?! I may even know someone that does that sort of thing in San Jose, Ca. That might be a better price and just as good a job?
-
Linda
- Fraternal Den Mother-RIP
- Posts: 7807
- Joined: Sat Nov 05, 2005 11:37 pm
- Location: Los Angeles
- Model: 1500/1600
- Year: High Windshield-68-70
Re: Switch letter restoring
I believe I wet sanded the knobs first then used the appliance paint with a brush, then a Q tip swab in acetone to clear the excess.
Linda
Linda
Sadly-Linda has passed away 2022. She was the 311's den mother and drove the first Rare-Parts ball joint project. RIP.
-
iamangelfriend
- Roadster Newby
- Posts: 8
- Joined: Wed Jan 25, 2012 9:40 pm
- Location: Sunnyvale, California USA
- Model: 1500/1600
- Year: High Windshield-68-70
- Contact:
Re: Switch letter restoring
That should do just fine. As long as hands are steady! I used the toothpick because I could get less paint on it and therefore only in the groove. I figure whatever works for folks is what they should stick by! I REALLY appreciate the help people on this site are willing to freely give!
Does anyone know of a 1969 1600 Roadster owner in the SF Bay Area that I can contact to see a car in either original or restored condition? I'm in the South Bay Area... Sunnyvale or Palo Alto.
I'm still not sure what's missing on mine (although it's in pretty good condition!). For instance... where the heater hoses go and which one is in and which one is out! My car came from San Diego area so the heater was pretty much irrelevant! Thanks in advance!!
-
Nissanman
- Roadster Fanatic-Site Supporter
- Posts: 3452
- Joined: Mon Apr 16, 2007 8:07 pm
- Location: Adelaide, South Australia
- Model: 1500/1600
- Year: Low Windshield-64-67.5
- Contact:
Re: Switch letter restoring
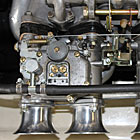
Does this help?
You do not have the required permissions to view the files attached to this post.
Nissanman, just trying to help.
1965 SP310 Engine No. G-93326 Car No. SP310-10817
https://photos.shutterfly.com/album/60141836519
On the road again!
1965 SP310 Engine No. G-93326 Car No. SP310-10817
https://photos.shutterfly.com/album/60141836519
On the road again!
-
mraitch

- Roadsteraholic
- Posts: 3629
- Joined: Mon Oct 02, 2006 7:03 pm
- Location: Lake Balboa (SFV) - CA
- Model: 1500/1600
- Year: High Windshield-68-70
- Contact:
Re: Switch letter restoring
Re heater - top hose from engine compartment is in - bottom out - though don't really suppose it matters actually - all you are worried about is water coursing through the small radiator - the fan does the work - water is always going through it as part of natural engine circulation from the water pump.
When you get under there- which is which is obvious due hose alignment.
If you are down there - good idea to take the heater apart - get the small radiator checked out - mine had a ton of+ pinholes in the entry/exit tubes - fortunately covered by the hoses - BUT
Also the various bits of foam baffling will have detoriated, so you are not getting the full benefit of the fan output, which some people poo-poo, but with the top DOWN, keeps your tootsies warm, and with the top UP, does quite a good job of keeping the cockpit warm.
It was also recommended to be CAREFUL as to what paint you MIGHT wish to paint it with - some paints under heat have a nasty odor - suggestion was DON'T
Peter Harrison
1970 1600 (Stroker) - TOAD SAN (Eliza)
1970 1600 (Stock) - As Yet Unnamed
Lake Balboa (SFV) , California
1970 1600 (Stroker) - TOAD SAN (Eliza)
1970 1600 (Stock) - As Yet Unnamed
Lake Balboa (SFV) , California
-
iamangelfriend
- Roadster Newby
- Posts: 8
- Joined: Wed Jan 25, 2012 9:40 pm
- Location: Sunnyvale, California USA
- Model: 1500/1600
- Year: High Windshield-68-70
- Contact:
Re: Switch letter restoring
The heat factor was one reason to use enamel paint. It will usually take a higher heat and since there's SO little used on the switch letters... if they are burning... there's a MUCH bigger problem goin' on!
Thanks for the heads up on what to look for regarding heater hoses. I DO like warm tootsies!!! The posted picture is helpful in that it shows more than what I have currently! Thanks for that too!!
Thanks for the heads up on what to look for regarding heater hoses. I DO like warm tootsies!!! The posted picture is helpful in that it shows more than what I have currently! Thanks for that too!!