I'm not sure if I would have started this project without resources like Michael. Thanks for being there. Greg, I may need a therapist at the end of this project.
I'm lucky that I don't a have a set timetable but my philosophy has been that when I wake up in the morning I say to myself what am I going to do today to further this project. Something can be done everyday.
Orlando Engine Swap Project
Moderators: notoptoy, S Allen, Solex68
-
denniswagnerusa

- Roadster Fanatic
- Posts: 159
- Joined: Mon Dec 26, 2011 9:56 pm
- Location: Orlando, Florida
-
Gregs672000

- Roadster Fanatic-Site Supporter
- Posts: 9428
- Joined: Fri Aug 07, 2009 11:47 pm
- Location: Tacoma, WA
Re: Orlando Engine Swap Project
Hey, no problem... I'm cheap... free! Anyone can send me a PM and it will be confidential. Advice or suggestions are always free! I know you're kidding, but as I think about it I am serious; I won't be a therapist to anyone but I am happy to give some guidance on what to do in a given situation. I work in an ER so I've probably heard it all.denniswagnerusa wrote:I'm not sure if I would have started this project without resources like Michael. Thanks for being there. Greg, I may need a therapist at the end of this project.
I've said it before, but I'll say it again: Michael is one of the few restoration people I know who are willing to share info (and jigs even!). I've never met him personally but he seems like a quality guy and he has helped many swappers on this list. I like that!
Greg Burrows
'67 2000 #588
Tacoma, WA
'67 2000 #588
Tacoma, WA
-
692000
- Roadster Nut
- Posts: 67
- Joined: Sat May 14, 2011 10:41 am
- Location: Portland,OR
Re: Orlando Engine Swap Project
x2notoptoy wrote:Great progress, would love to see more, and larger, pictures!
69 roadster project
-
denniswagnerusa
- Roadster Fanatic
- Posts: 159
- Joined: Mon Dec 26, 2011 9:56 pm
- Location: Orlando, Florida
Re: Orlando Engine Swap Project
Big day today. Got my frame with engine back from my mechanic.
The next step will be to remove the engine and get the frame sandblasted and powder coated. Today I drove 2 1/2 hours to Wachula Fl to deliver the front fenders and trunk lid to a place that will do an alkaline dip and remove all the paint, rust, undercoating, and bondo. I saw what looked like a late 50s Chevy there that had been stripped of all paint. Pretty impressive. Will take 10 days.
Also painted some of the surfaces under the engine compartment on the body. They will not be accessible when I put it on the frame. I will also use POR-15 on rusty spots under the main body and then undercoat. Then I'm done with the body until I attach it to the frame.
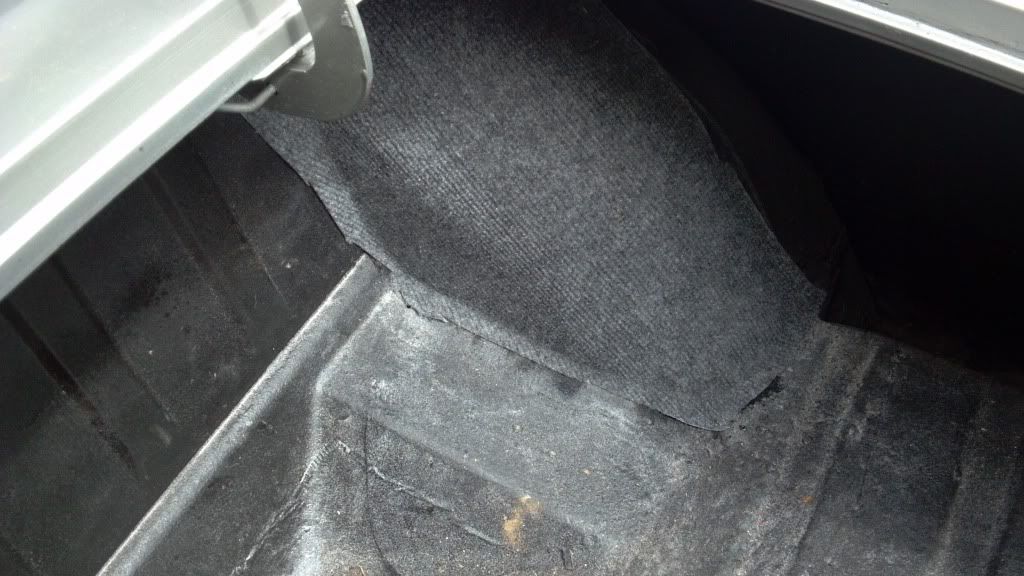
Anyone have suggestions about how to finish trunk. I have a light coat of undercoating in there now. Looks OK but needs to be refreshed.
Also painted some of the surfaces under the engine compartment on the body. They will not be accessible when I put it on the frame. I will also use POR-15 on rusty spots under the main body and then undercoat. Then I'm done with the body until I attach it to the frame.
Anyone have suggestions about how to finish trunk. I have a light coat of undercoating in there now. Looks OK but needs to be refreshed.
You do not have the required permissions to view the files attached to this post.
-
spriso

- Vendor
- Posts: 1629
- Joined: Wed Jun 04, 2003 9:20 am
- Location: Oregon
- Contact:
Re: Orlando Engine Swap Project
Dennis-- looks great! More photos please!
Keep going...
Michael
Keep going...
Michael
Spriso Motorsports
http://www.spriso.com
Instagram https://instagram.com/spriso/
SR20 Powered Roadsters
Engine swap kits Available! See my website!
http://www.spriso.com
Instagram https://instagram.com/spriso/
SR20 Powered Roadsters
Engine swap kits Available! See my website!
-
dbrick

- Roadster Fanatic-Site Supporter
- Posts: 10084
- Joined: Thu Sep 09, 2004 11:05 pm
- Location: Kenilworth, New Jersey
Re: Orlando Engine Swap Project
They make a special paint for trunks, can get it in spatter or regular. Call me different, but I like to carpet the trunk. It's not too hard to do, looks finished, and when you put things in there, they stay cleaner and don't get all scuffed up. It also seems to quiet the interior a bit I used cheap flexible auto carpet the first time in black in the 69, fit well, lots of adhesive. I used a stiffer grey carpet in the 66, car is silver. Fits well, much less adhesive. $18.00 at Home Repo
Wheelwells first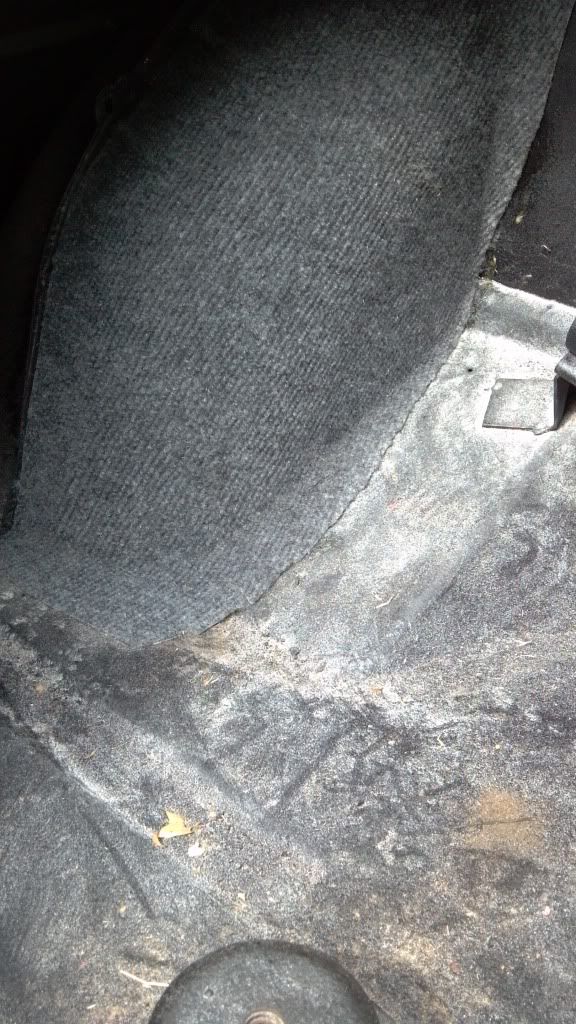
Then the floor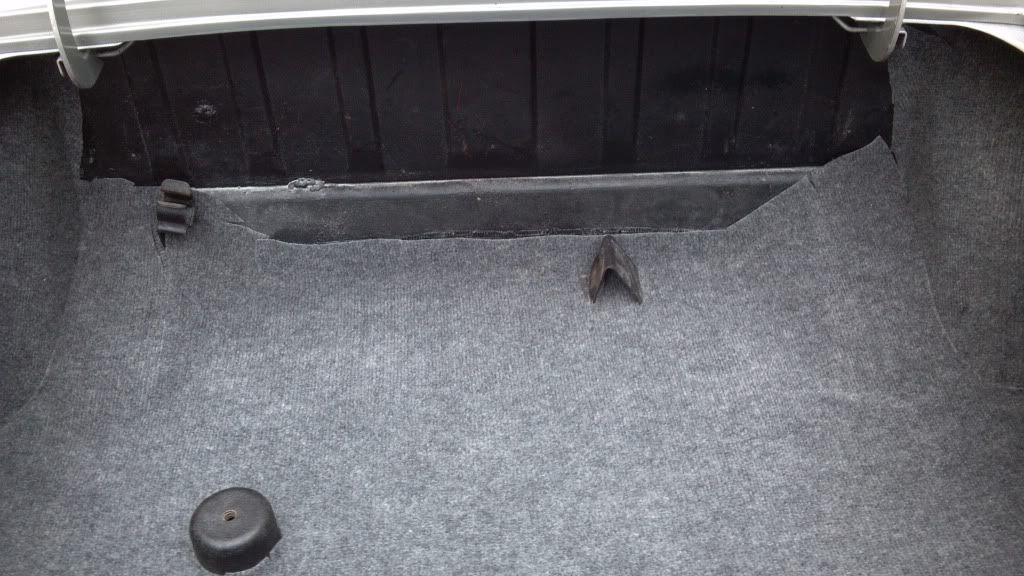
Then the back wall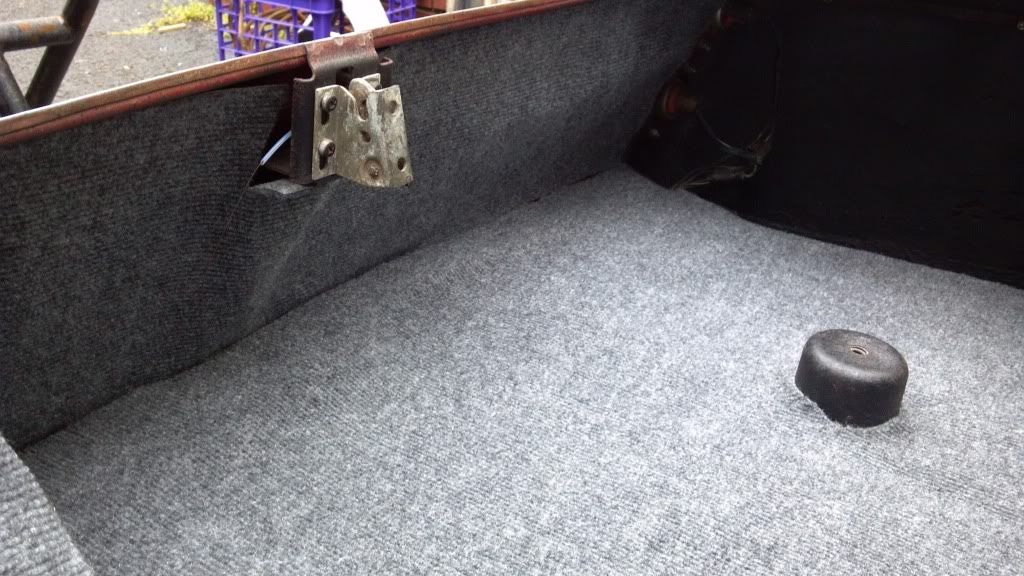
I'm going to make a carpet wrap for the fuel filler and a cover for the compact spare.
didn't take a photo of the front bulkhead, but it's fuzzy and grey
Wheelwells first
Then the floor
Then the back wall
I'm going to make a carpet wrap for the fuel filler and a cover for the compact spare.
didn't take a photo of the front bulkhead, but it's fuzzy and grey
Dave Brisco
Take my advice, I'm not using it"
66 2000 The Bobster
64 1500 in pieces for sale
1980 Fiat X1/9
2009 Volvo C-70
08 Expedition EL, STUPID huge but comfy
1962 Thompson Sea Lancer, possible money pit
-
notoptoy

- Vendor-Site Supporter
- Posts: 9700
- Joined: Fri Oct 02, 2009 2:55 pm
- Location: Winston-Salem, NC and Ocala, FL
- Contact:
Re: Orlando Engine Swap Project
On a personal note, I don't like the spatter paints, they are water based and eventually start to break down and flake. The PO of mine did the engine compartment and Trunk in Spatter, the EC was a PITA to get the stuff off that hadn't flaked already. The trunk looks OK, but like Dave, I have most of it carpeted so you don't see the spatter paint so much. Eventually I'll get rid of it all and go body color with carpet.
"When all else fails, force prevails!" Ummm, we're gonna need a bigger hammer here.
67.5 SPL311 H20 w/5 speed
65 Impala Convertible
2017 C43 AMG
67.5 SPL311 H20 w/5 speed
65 Impala Convertible
2017 C43 AMG
-
scogre

- Roadster Fanatic
- Posts: 170
- Joined: Mon Oct 17, 2011 12:48 pm
- Location: San Diego, CA
- Contact:
Re: Orlando Engine Swap Project
Do you put any padding behind the carpet?
Dreaming of the day when I can drive my '69 Roadster with a SR20DET motor purring beneath the body. 
http://www.DatsunRoadsterFun.com" onclick="window.open(this.href);return false;
http://www.DatsunRoadsterFun.com" onclick="window.open(this.href);return false;
-
notoptoy
- Vendor-Site Supporter
- Posts: 9700
- Joined: Fri Oct 02, 2009 2:55 pm
- Location: Winston-Salem, NC and Ocala, FL
- Contact:
Re: Orlando Engine Swap Project
I did not in the Roadster, but did in my Impala.
"When all else fails, force prevails!" Ummm, we're gonna need a bigger hammer here.
67.5 SPL311 H20 w/5 speed
65 Impala Convertible
2017 C43 AMG
67.5 SPL311 H20 w/5 speed
65 Impala Convertible
2017 C43 AMG
-
denniswagnerusa
- Roadster Fanatic
- Posts: 159
- Joined: Mon Dec 26, 2011 9:56 pm
- Location: Orlando, Florida
Re: Orlando Engine Swap Project
Never thought about carpeting. I might paint the sides and carpet the floor. Did you need to bind the edges of the carpet to keep it from unraveling.
-
notoptoy
- Vendor-Site Supporter
- Posts: 9700
- Joined: Fri Oct 02, 2009 2:55 pm
- Location: Winston-Salem, NC and Ocala, FL
- Contact:
Re: Orlando Engine Swap Project
The carpet I got had a plasticy back, and the edges have not come apart, but I would prefer to have bound edges as it looks so much more complete and professional.
I also only carpeted the floor, not the sides.
I also only carpeted the floor, not the sides.
"When all else fails, force prevails!" Ummm, we're gonna need a bigger hammer here.
67.5 SPL311 H20 w/5 speed
65 Impala Convertible
2017 C43 AMG
67.5 SPL311 H20 w/5 speed
65 Impala Convertible
2017 C43 AMG
-
denniswagnerusa
- Roadster Fanatic
- Posts: 159
- Joined: Mon Dec 26, 2011 9:56 pm
- Location: Orlando, Florida
Re: Orlando Engine Swap Project
We have written about all the time and money that is involved in this kind of project. But there are many benefits as well. Besides having a really fun car to drive in the end, our family will have an alternate reliable car to use when another is in the shop. If you are like me you will acquire new tools as you go that will help in other projects. Certainly you will learn new skills that will be used on other cars. This project has been a way to connect with friends online and in my neighborhood who love to follow a work in progress. It is surprising the number of people who either have a classic car squirreled away somewhere or have had one in the past. I have become good friends with some guys who are in my ski club who also do adventure racing with me. I found out later that each has his own classic car. One is in the process of restoring a 66 Corvette and the other has a cherry Ford Bronco with a 289. We look forward to getting the cars together.
My wife was leery of the costs getting started with this project. However she has totally changed her mind because of a little unanticipated benefit of this project. One of my sons drove this car in high school and college. This car was quite the chick magnet for him. He had a whole page in his high school yearbook dealing with him and his car. Anyway due to little conflicts becoming bigger conflicts my son and I did not communicate for a long time. He is married and had a son three years ago. We have not seen our grandson. At Christmas my wife called him to see how we could send a gift to our grandson. He offered to come to our business to pick it up. He came by and we talked for an hour and a half. While there he saw pictures I had of a SR engine mounted in the roadster chassis. He got very excited about the renovation of the roadster and has been following it on this site. He now answers emails and seems anxious to communicate. I do not know where this will go but I feel like I'm closer to seeing my 3 year old grandson. This rift has been killing my wife who would make the best grandmother in history. Anyway when this project looked like it would help with my son she was all for it. She wants to get it done so our son will come by to see it. He has not been home in 3 years and his brother and the cat miss him.
Not really. The cat doesn't care.
You do not have the required permissions to view the files attached to this post.
-
denniswagnerusa
- Roadster Fanatic
- Posts: 159
- Joined: Mon Dec 26, 2011 9:56 pm
- Location: Orlando, Florida
Re: Orlando Engine Swap Project
Been busy. Used POR-15 on the rusty areas under the body. Boy, was that messy. Then I used spray can undercoating to undercoat the entire underside. I'm impressed with professional grade rubberized spray undercoating. It is also paintable. Is anyone painting their undercoating? My original undercoating was painted. What color is best?
Today I removed the SR engine from the frame and I will start to remove everything from the frame to get ready for sandblasting and powdercoating. I'm expecting a call soon saying my fenders and trunk lid are ready to pick up at the alkaline dip place. I will need to use POR-15 and primer soon after I get it back to prevent fresh rust. I will be studying options for the rear axle and looking at suspension rebuild kits. Lots still to do.
Today I removed the SR engine from the frame and I will start to remove everything from the frame to get ready for sandblasting and powdercoating. I'm expecting a call soon saying my fenders and trunk lid are ready to pick up at the alkaline dip place. I will need to use POR-15 and primer soon after I get it back to prevent fresh rust. I will be studying options for the rear axle and looking at suspension rebuild kits. Lots still to do.
-
pebbles
- Roadster Fanatic-Site Supporter
- Posts: 3931
- Joined: Thu Dec 16, 2010 12:00 am
- Location: Washington
Re: Orlando Engine Swap Project
There is no need to paint the undercoating, unless you want it to match the body. Black will not show the slug guts, beetle juice, and road grime as a lighter color would.
I enjoy seeing your progress Dennis, stay with it, you will love it when its done!
I enjoy seeing your progress Dennis, stay with it, you will love it when its done!
David
"When we were standing next to the motor while on the dyno, and the motor hit VVL, eyes went watery.."
"When we were standing next to the motor while on the dyno, and the motor hit VVL, eyes went watery.."
-
denniswagnerusa
- Roadster Fanatic
- Posts: 159
- Joined: Mon Dec 26, 2011 9:56 pm
- Location: Orlando, Florida
Re: Orlando Engine Swap Project
Passed several milestones in this project this weekend. First, I am no longer taking things apart. I've removed everything from the frame and it is away being powder coated. Second, I realized that I was nearly out of Purple Power degreaser, even though I had bought a 5 gal bucket, and realized that is fine because nothing on my car needs degreasing anymore. Third, several things that had me worried were resolved this weekend. I was worried that I could not get the front suspension apart. Well it was not easy but I did get it apart. It was made harder by the fact that most of it was salvageable so I could not damage parts as I took them apart. I rented a front suspension tool kit from Advance Auto Parts and used it to explode the joints. They do explode, sending a ball joint several yards away. I found out that the key is to use a big hammer (a small sledge in my case) to hit the joint squarely while it is under pressure from the suspension tool. I was also worried that I would not be able to fix the steering box which I had screwed up taking the steering shaft out. The only way I can fix the steering box is to remove the pitman arm. I knew from other posters that it was nearly impossible to remove. Well, I GOT IT OFF. I sprayed it many times with penetrating catalyst but could not get the suspension tool to work because it did not have a foothold on one side of the pitman arm. I built a shelf for the tool to attach by drilling 3-4 holes to enlarge a shelf that was already there. So I put the tool on and got it tightened as much as possible then hit it with the small sledge and it released. Now I can remove the shaft to realign it with the worm gear. I can see that getting that adjusted is going to be difficult. Fourth, I was worried about the lower ball joints. Mine were toast and Nissan wanted $330 each for them. A roadster part place would get you rebuild ones for $250. I found a place on Ebay that supplies lower ball joints for $123 each. It is a machine shop that specializes in rare parts. I ordered them and got them in 2 days. I'm guessing that they are manufacturing hard to find parts from scratch. They look good so we'll see how they work.
I mentioned that yesterday I delivered the frame and the valve cover for the SR to a powder coater. I did not send any suspension parts because they all seem to have rubber parts which cannot go through the process. I decided to paint some parts myself when I found out the rubber parts in the front of the leaf springs, which would be destroyed by removing, were $120 to replace. With good preparation I can paint them myself.
Got my fenders and trunk lid back from the alkaline dip. The results were amazing. All the paint, rust, bondo, and undercoating were removed to leave virgin metal. My plan had been to treat all the rusted areas with POR-15 and then primer to await paint, but I'm checking with the powder coaters to see if it would be better to powder coat the fenders and trunk lid so that all the nooks and crannies are painted.
Spent today in the shade of a magnolia tree cleaning the suspension parts. All the grease boots were gone so everything was covered with grease. Tomorrow I will paint some of the parts after taking the wife to breakfast and going to a local garden for mother's day.
I've got photos but I'm so tired right now I will post them on another day. I fell asleep at the computer last night while trying to post here and my wife deleted it by accident this morning.
Another side issue. I am having trouble finding a RX7 rear end. I contacted Currie Enterprises about a new custom Ford 8" rear end that I know some people have put in their roadsters. I was surprised to learn that they do not keep track of build info by make of car. I would need to have a name of someone who ordered the conversion to a Ford 8" rear end in a Datsun roadster. Would anyone share their build info or give me the name of someone who would for a Currie Enterprises rear end? I need to know what width they used for what kind of tires and wheels. What angle did they set the differential to line up with the SR engine? Did everything work out OK in the end?
I feel like I just passed the halfway point in this project. Feels good.