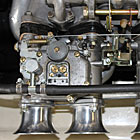
I had some spare time to try my hand at polishing my carb domes. I wish I had taken a "before" pic, but here are two to look at.
They were pitted and grey as aluminum gets under the hood. I'm really happy with how they turned out.....except the rest of the hardware now looks even crappier than it did before......
.......and now the slippery slope begins.. ...
Mike Hudson
Last edited by 23yrRebuild on Thu Jan 07, 2010 11:34 am, edited 4 times in total.
Wow-those look awesome. How long did it take you? What steps did you use to arrive at the polished look? I assume you used a buffing wheel and various compounds. Again-they look very nice.
That's the downside of polishing. It turn you into an obsessive compulsive maniac and causes you to start polishing everything. I have a full polished valve cover on the 69, looks great. I bought it that way and am trying to avoid getting the obsession.
Dave Brisco
Take my advice, I'm not using it"
66 2000 The Bobster
64 1500 in pieces for sale
1980 Fiat X1/9
2009 Volvo C-70
08 Expedition EL, STUPID huge but comfy
1962 Thompson Sea Lancer, possible money pit
They really look great. I am always frightened by the time benefit ratio of undertaking a project like that - then finding the ratio has multiplied exponentially to the negative as I methodically go piece by piece through the engine bay because as you state, making one piece look good makes everything else look bad!
Nice work, but I am curious as to how long that took.
"When all else fails, force prevails!" Ummm, we're gonna need a bigger hammer here.
The procedure is:
lots of elbow grease applied to:
progressively finer and finer grades of wet/dry sandpaper (180 - 600 grit), followed by using:
polishing compounds (tripoli, white, then red) applied to:
various diameters and shaped buffing wheels, attached to:
air die grinder, electric drill, and Dremel tool.
They took about 4 hours each over several days.
I did the same thing - jewelers bits/dremel/.pastes/buffers etc and a LOT of alcohol (and the same on the water pump) and it is worth it for the domes. The rest of the assembly is a bugger to do - looking for a cheap "small parts" blaster so that I can get really anal - but polished pots really do look nice.
Hi Coocoo, welcome to the forum!
Remove the plunger from the top, there will be some oil there.
Remove the 4 screws at the base, lif the dome off. There will be some oil left around the piston - should not be too big a mess.
Please post your location in our profile and consider introducing yourself in the "introductions" section!
"When all else fails, force prevails!" Ummm, we're gonna need a bigger hammer here.
mraitch wrote:I did the same thing - jewelers bits/dremel/.pastes/buffers etc and a LOT of alcohol (and the same on the water pump) and it is worth it for the domes. The rest of the assembly is a bugger to do - looking for a cheap "small parts" blaster so that I can get really anal - but polished pots really do look nice.
Harbor Freight has a nice bench top blast cabinet large enough to even a cylinder head for about $110.00. Not a bad price, and you can use walnut shells or glass beads.
Harbor Freight has a nice bench top blast cabinet large enough to even a cylinder head for about $110.00. Not a bad price, and you can use walnut shells or glass beads.
I bought this one. It leaked like a sieve and was very difficult to see my work. I returned it about two hours later.
I buy a lot of stuff from HB but this is one item I would NOT recommend.
Shannon
69 2000 SRL311-10088 (Type 4 Solexes)
68 SR20DE SPL311-18735 (SR20DE S15 Autech)
68 2000 SRL311-01179 (Restoration underway) 68 1600 SPL311-20462 SOLD! After 41 years in the family