I was really concerned about screwing up the crossovers, so I marked everything...funny thing though, tape doesn't like to stick to old grease and brake fluid..."who'd a thunk it"
I "think" I got them all back correctly. I only did one side at a time. I think a previous owner over tightened one of the lines, because it was tight to remove, the entire way. When I went to put it back together, I noticed that the leading edge of the fitting was "mushroomed" out a bit. It was a real bear to get it to thread back in. I kept looking at the other one multiple times to see if I had the ends reversed...I hope not. It looks right, because the bends in the crossover lines are in the right place to give clearance to the brake rotor.
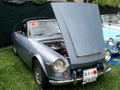
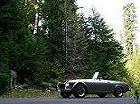
After 15 years, finally starting a restoration!
Moderators: notoptoy, S Allen, Solex68
-
JMartin
- Roadster Fanatic
- Posts: 496
- Joined: Sun Aug 28, 2011 11:29 pm
- Location: Armstrong, BC Canada
Re: After 15 years, finally starting a restoration!
________________________________
Jim Martin
Armstrong BC, Canada
69-2000
one done, one to go!
Jim Martin
Armstrong BC, Canada
69-2000
one done, one to go!
-
JMartin
- Roadster Fanatic
- Posts: 496
- Joined: Sun Aug 28, 2011 11:29 pm
- Location: Armstrong, BC Canada
Re: After 15 years, finally starting a restoration!
Here are some photos of the rotor and brake calipers painted up.
You do not have the required permissions to view the files attached to this post.
________________________________
Jim Martin
Armstrong BC, Canada
69-2000
one done, one to go!
Jim Martin
Armstrong BC, Canada
69-2000
one done, one to go!
-
notoptoy

- Vendor-Site Supporter
- Posts: 9700
- Joined: Fri Oct 02, 2009 2:55 pm
- Location: Winston-Salem, NC and Ocala, FL
- Contact:
Re: After 15 years, finally starting a restoration!
The blue is an interesting choice - I like it. What type of paint did you use?
"When all else fails, force prevails!" Ummm, we're gonna need a bigger hammer here.
67.5 SPL311 H20 w/5 speed
65 Impala Convertible
2017 C43 AMG
67.5 SPL311 H20 w/5 speed
65 Impala Convertible
2017 C43 AMG
-
JMartin
- Roadster Fanatic
- Posts: 496
- Joined: Sun Aug 28, 2011 11:29 pm
- Location: Armstrong, BC Canada
Re: After 15 years, finally starting a restoration!
I believe it is a GM blue engine paint. On a side note, I was greasing up the front end and noticed that all the castle nuts except one were missing cotter pins. What a surprise!
________________________________
Jim Martin
Armstrong BC, Canada
69-2000
one done, one to go!
Jim Martin
Armstrong BC, Canada
69-2000
one done, one to go!
-
JMartin
- Roadster Fanatic
- Posts: 496
- Joined: Sun Aug 28, 2011 11:29 pm
- Location: Armstrong, BC Canada
Re: After 15 years, finally starting a restoration!
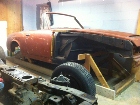
Well, I finished removing the tar from the floor boards (I started another post to ask about how to remove the stuff, thanks for all the great ideas) I found more rust areas just below the roll bar mounts, so I will need to fix these as well. I am seriously still thinking of using the structural adhesive in the photo below, as I am not a welder. Apparently I've been told I made a mistake by not welding in cross supports from the hinge to the striker, and across from door to door before removing it from the frame. If I don't do this, and cut off the rusty floor area, the frame holes may not line up, and the door may not close properly. DARN  Now I have to get 4 guys to help me lift it back onto the frame, put in the frame bolts, weld in supports, take it back off the frame, and put the new floor panels in.
You do not have the required permissions to view the files attached to this post.
________________________________
Jim Martin
Armstrong BC, Canada
69-2000
one done, one to go!
Jim Martin
Armstrong BC, Canada
69-2000
one done, one to go!
-
pebbles
- Roadster Fanatic-Site Supporter
- Posts: 3931
- Joined: Thu Dec 16, 2010 12:00 am
- Location: Washington
Re: After 15 years, finally starting a restoration!
Will you be patching? or cutting the entire pan?
David
"When we were standing next to the motor while on the dyno, and the motor hit VVL, eyes went watery.."
"When we were standing next to the motor while on the dyno, and the motor hit VVL, eyes went watery.."
-
JMartin
- Roadster Fanatic
- Posts: 496
- Joined: Sun Aug 28, 2011 11:29 pm
- Location: Armstrong, BC Canada
Re: After 15 years, finally starting a restoration!
i was going to patch behind the seat and replace entire in front of the seat.
________________________________
Jim Martin
Armstrong BC, Canada
69-2000
one done, one to go!
Jim Martin
Armstrong BC, Canada
69-2000
one done, one to go!
-
Frisky311
- Roadster Fanatic
- Posts: 97
- Joined: Sat Sep 03, 2011 4:23 pm
- Location: Trail bc canada
Re: After 15 years, finally starting a restoration!
Two quick questions Jim,
First what do you have your body sittin on? And are the doors still attached?
Thanks
Errol Frisk
First what do you have your body sittin on? And are the doors still attached?
Thanks
Errol Frisk
1968 Datsun Roadster 1600 spl311-19266
~Only 6000 more hours and it'll be done!
~Only 6000 more hours and it'll be done!
-
pebbles
- Roadster Fanatic-Site Supporter
- Posts: 3931
- Joined: Thu Dec 16, 2010 12:00 am
- Location: Washington
Re: After 15 years, finally starting a restoration!
Ill have to agree with fergo about plenty of overlap. IMO 1.0" min. clean and rust free. If that cannot be acheived , strength will be compromised. I would try and leave as much of the OG pan as possible. Maybe add a 4.0" doubler/backer to the seam at the seat joint, and a double row of fasteners w/2.0" spacing. Try to leave 10 or more inches of the OG pan in front of the seat.JMartin wrote:i was going to patch behind the seat and replace entire in front of the seat.
Sorry I want to say "weld a strip" but ,,,,,,
Last edited by pebbles on Thu Jan 05, 2012 4:31 am, edited 1 time in total.
David
"When we were standing next to the motor while on the dyno, and the motor hit VVL, eyes went watery.."
"When we were standing next to the motor while on the dyno, and the motor hit VVL, eyes went watery.."
-
JMartin
- Roadster Fanatic
- Posts: 496
- Joined: Sun Aug 28, 2011 11:29 pm
- Location: Armstrong, BC Canada
Re: After 15 years, finally starting a restoration!
Errol; presently the car is off the frame, resting on 4 corners (not enough to cut off the floor and weld/"glue" I understand) The doors are still on the car. I'm sure I need to at least put support infront of the rear wheel, directly under the door jam to stop any sagging.
David; I could cut up the new floor pan I purchased from Ross, and leave more area in front of the cross rib if that's what you mean. Did you mean to leave 4" or 10" of the original floor pan in front of the cross rib in front of the seat?
David; I could cut up the new floor pan I purchased from Ross, and leave more area in front of the cross rib if that's what you mean. Did you mean to leave 4" or 10" of the original floor pan in front of the cross rib in front of the seat?
________________________________
Jim Martin
Armstrong BC, Canada
69-2000
one done, one to go!
Jim Martin
Armstrong BC, Canada
69-2000
one done, one to go!
-
pebbles
- Roadster Fanatic-Site Supporter
- Posts: 3931
- Joined: Thu Dec 16, 2010 12:00 am
- Location: Washington
Re: After 15 years, finally starting a restoration!
10, the more the better imo
David
"When we were standing next to the motor while on the dyno, and the motor hit VVL, eyes went watery.."
"When we were standing next to the motor while on the dyno, and the motor hit VVL, eyes went watery.."
-
JMartin
- Roadster Fanatic
- Posts: 496
- Joined: Sun Aug 28, 2011 11:29 pm
- Location: Armstrong, BC Canada
Re: After 15 years, finally starting a restoration!
Today I used an engine hoist and a spreader bar to lift the body up and temporarily mount back onto the frame in order to prepare to weld in the new floor. I haven't removed the doors, and need to do some playing around to see if the play I see in the door is from behind the bottom door hinge, or just the bottom door pin. I don't have any of the rubber body to frame pads in place yet, so I want to put a little larger size just behind the 2nd body to frame mount beside the seats. I think that if I lift this "sagged" area a bit, the door might just close better. When it's closed, the body lines look fine, when the door is open, I think the body sags a bit due to the poor condition of the entire floor area.
It took me a few tries to get the spreader bar balanced just right to pick up the car and keep it level. I used the rear roll bar mounts, as well as the triangle gusset areas just in front of the firewall to pick up the car.
It took me a few tries to get the spreader bar balanced just right to pick up the car and keep it level. I used the rear roll bar mounts, as well as the triangle gusset areas just in front of the firewall to pick up the car.
You do not have the required permissions to view the files attached to this post.
________________________________
Jim Martin
Armstrong BC, Canada
69-2000
one done, one to go!
Jim Martin
Armstrong BC, Canada
69-2000
one done, one to go!
-
notoptoy
- Vendor-Site Supporter
- Posts: 9700
- Joined: Fri Oct 02, 2009 2:55 pm
- Location: Winston-Salem, NC and Ocala, FL
- Contact:
Re: After 15 years, finally starting a restoration!
That is one serious balancing bar, I assume that is a custom made job?
Nice work.
Nice work.
"When all else fails, force prevails!" Ummm, we're gonna need a bigger hammer here.
67.5 SPL311 H20 w/5 speed
65 Impala Convertible
2017 C43 AMG
67.5 SPL311 H20 w/5 speed
65 Impala Convertible
2017 C43 AMG
-
JMartin
- Roadster Fanatic
- Posts: 496
- Joined: Sun Aug 28, 2011 11:29 pm
- Location: Armstrong, BC Canada
Re: After 15 years, finally starting a restoration!
A bit of overkill on the bar, but what the hell, it worked. The guy who is going to help me weld in the floor, and check the door posts made it for me. The darn bar was very heavy, and when I picked it up I couldn't figure out why he didn't weld in a 3rd point in the middle of the bar to attach the chain to. It was a royal pain in the butt trying to do it with only 1 person. Now I know...after sliding the pull straps back and forth 3 times to make it lift evenly, you don't really know where the balance point is going to be. For anyone that needs to lift off the body, it worked excellent with this bar having the welded in connection points 5 feet apart. I used 2 x 4 foot by 1 inch wide straps on the front gussets, and used chain through the holes in the roll bar mounts (length was between 3-4 feet of chain per side)
________________________________
Jim Martin
Armstrong BC, Canada
69-2000
one done, one to go!
Jim Martin
Armstrong BC, Canada
69-2000
one done, one to go!
-
JMartin
- Roadster Fanatic
- Posts: 496
- Joined: Sun Aug 28, 2011 11:29 pm
- Location: Armstrong, BC Canada
Re: After 15 years, finally starting a restoration!
Floor welding day!
I had a friend come over who knows how to weld, and we spent almost 9 hours redoing the floor area. You will notice that I had to add more metal above the floor pan I purchased from Ross, as well as I added another much larger piece up the drivers foot rest side area. I drilled 2 x 1/2" holes in the new floor pan so that I could get the welder to tack it to the floor in places where the original metal was still decent.
I had a friend come over who knows how to weld, and we spent almost 9 hours redoing the floor area. You will notice that I had to add more metal above the floor pan I purchased from Ross, as well as I added another much larger piece up the drivers foot rest side area. I drilled 2 x 1/2" holes in the new floor pan so that I could get the welder to tack it to the floor in places where the original metal was still decent.
You do not have the required permissions to view the files attached to this post.
________________________________
Jim Martin
Armstrong BC, Canada
69-2000
one done, one to go!
Jim Martin
Armstrong BC, Canada
69-2000
one done, one to go!