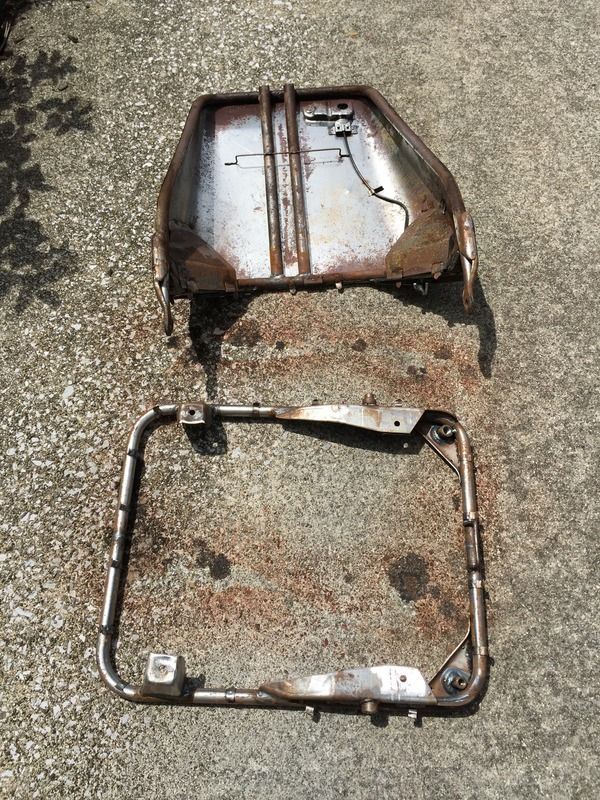
The seats in the '68 were in need of new covers. The old "custom" fabric was rotten and splitting.
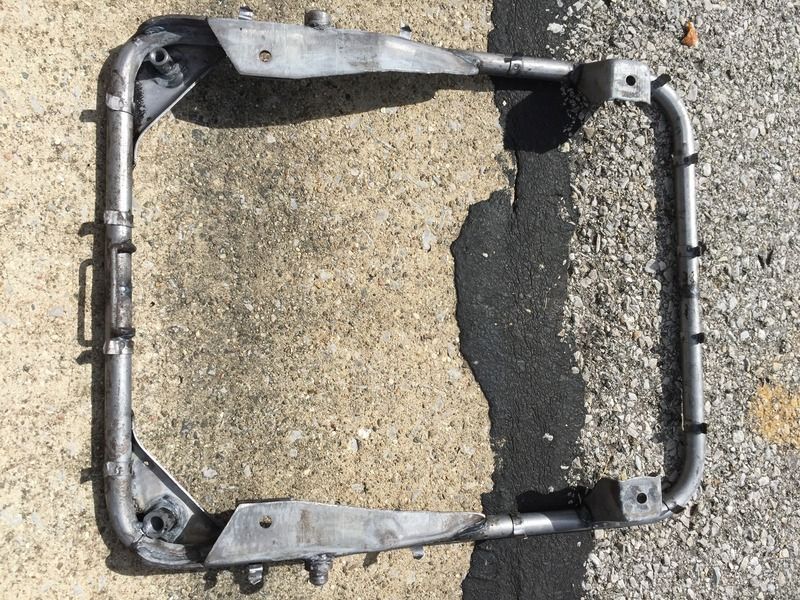
I stripped the seats to the frames and had the frames sandblasted. I disassembled the rubber band assemblies and soaked the clips and staples in a rust dissolver.
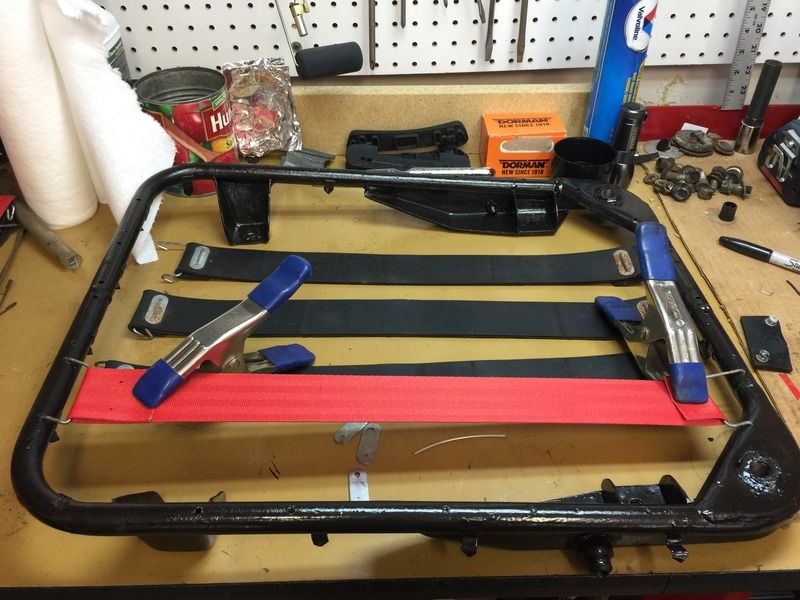
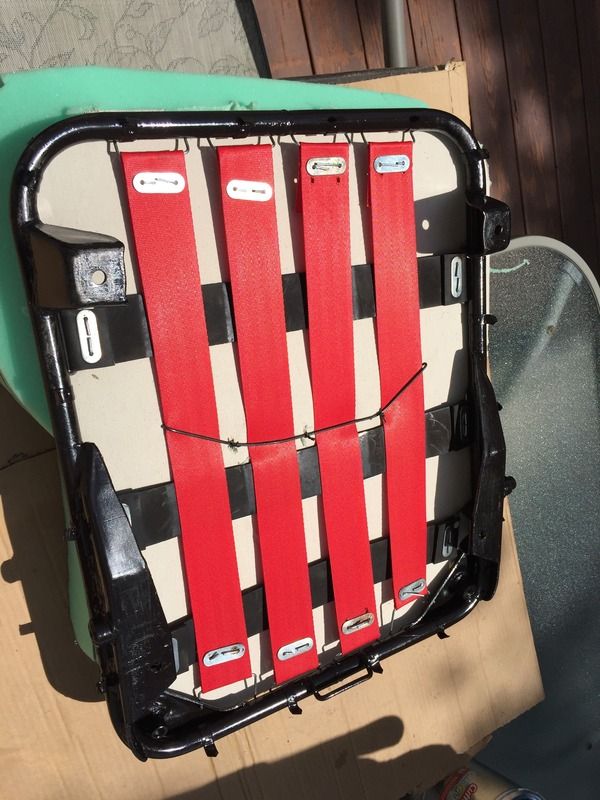
Two coats of etching primer on all. Frames and bolts painted satin black, clips and staples painted gloss aluminum. I was lucky with these frames, all the finger poking metal tabs were still on the frame so didn't have to replace or rethink the upholstery attachment method.
Built up the straps with new strapping and the refreshed hardware. I cut new burlap (two layers) from a couple of coffee bean sacks I got at the local craft store).
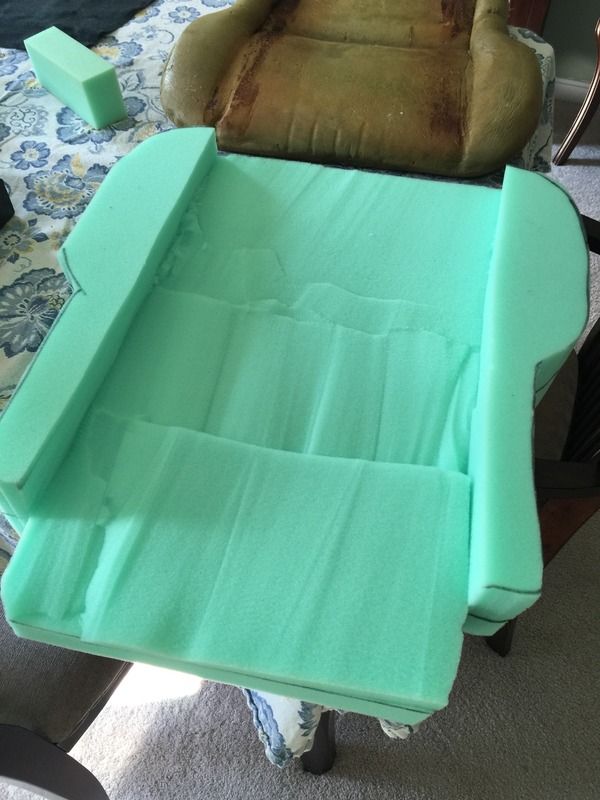
The foam wasn't too bad so I was able to reuse it. I added some scrim backed 1/4" foam to the bolsers. I added some 1/2" hi density foam to the center of the seat bottoms (the butt dent).
I bought the stock replacement covers (made by Distinctive Industries as I'm sure all the replacement covers are).
The covers arrived with no instruction or hints about installation. I guess the manufacturer assumes the installer knows what he's doing. Seems odd for a product that pops up on most any Google search for Datsun Roadster Upholstery.
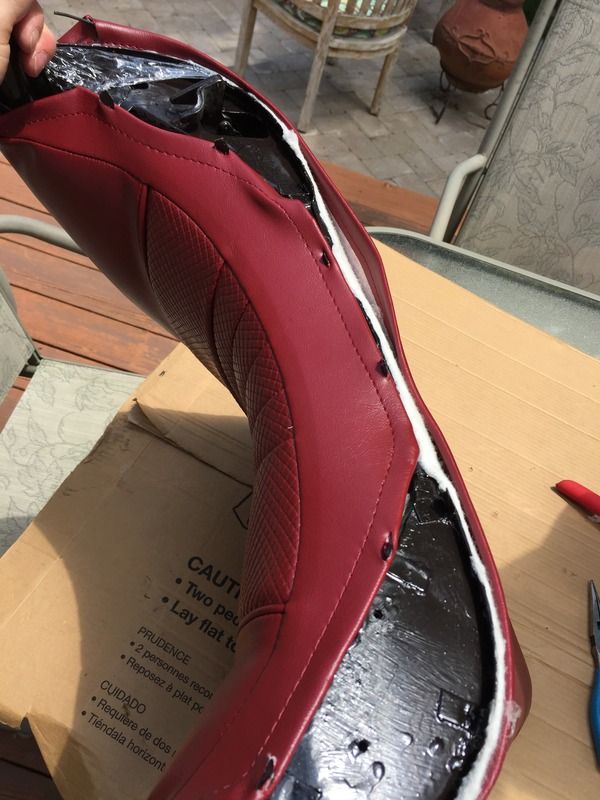
The covers are well made but very snug. All the bottom edges are tucked inside and sewn making about a 3/8" loop under the edge of the cover.
My original thought was to slit thru that double thickness of material, push the slit over the frame prongs and bend 'em down. That's the way the old covers were attached on both cars so seemed "factory".
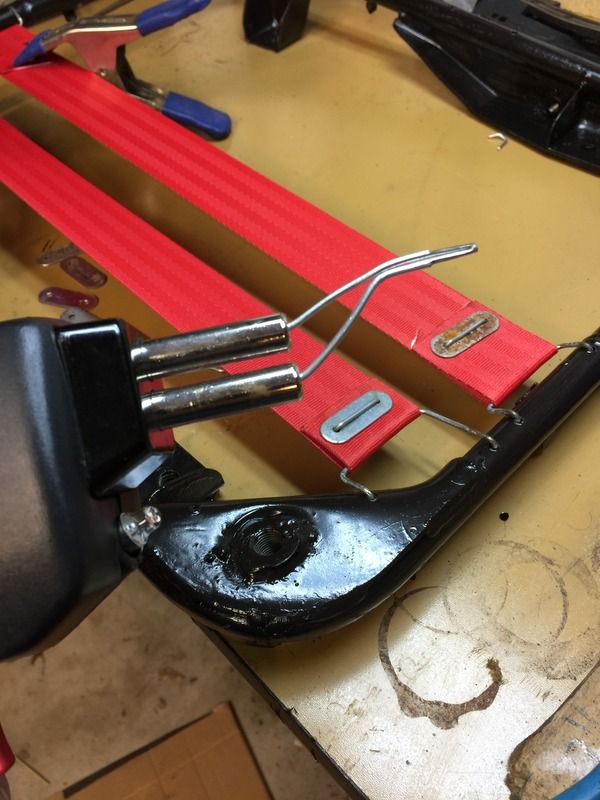
It takes a lot of pulling to get the covers in place and stretched around to where I could get the prongs pushed into the covers. I was concerned about strength and the gap between prongs making the cover shift or pull so I bought in an expert (my wife). After some discussion, we decided to first thread a 1/16" music wire thru the "loop" at the bottom of the cover. Then we did the slit/prog thing on the backside of the wire. This music wire is very "springy" and will bend around a large radius at the bottom of the seat but resists kinking. You can buy 36" lengths at most any hobby or hardware store.
Adding the wire meant that the cover pulls uniformly along the entire length of the wire and makes a very secure connection once the wire is hooked over the prong. It also makes the job of pulilng the cover into place easier because you can grip the wire in the cover easier and more uniformly than simply pulling on the cover material. Most of the domestic cars and pickups of the 60's thru 80's used this sort of method. The bottom of the seat had a wire trapped in the bottom seam. That wire was hog ringed to the seat frame to attach the upholstery.
I notched the closed end of a trash bag (to make it easier to tear) and slipped it over the frame/foam before I pulled the cover over the seat. The plastic bag is very slick and helps the cover slide over the foam padding. One the cover is in place and few fastening points are done, it's pretty easy to pull the plastic out (remember those notches??).
The job would also be easier if the covers were left in the sun but it's been cloudy here for a couple weeks so I didn't want to wait for sunshine.
We're pleased wih the way the seats came out. They look as good as the custom upholstery in the '69.
It's not a tough job, takes some time and patience but seems a job most anyone could so. If you decide to tackle the project, try the wire trick, it'll help a lot.
Dan
Seat Upholstery installation
Moderators: notoptoy, S Allen, Solex68
-
greydog
- Roadster Fanatic-Site Supporter
- Posts: 1790
- Joined: Sat Nov 21, 2009 11:37 pm
- Location: Vancouver, Washington
- Model: 1500/1600
- Year: High Windshield-68-70
Seat Upholstery installation
SPL311 aka Skooter. Sold. Now wasting away in the SF area.
1990 Nissan 300zx. Sold this one too.
2018 VW Tiguan
1990 Nissan 300zx. Sold this one too.
2018 VW Tiguan
-
svwilbur
- Roadster Fanatic-Site Supporter
- Posts: 688
- Joined: Fri Aug 10, 2012 1:29 am
- Location: Santa Cruz Mountains, California
Re: Seat Upholstery installation
That is great that you got it done and sounds like you did it right!
Depending on the material the seats are made from many shops or seat cover manufacturers will recommend using a hand held upright clothes steamer (something like Rowenta IS6200 Compact Valet Full Size Garment and Fabric Steamer) on the upholstery to help temporarily stretch and soften it a bit to make it easier to pull over. I had to do that on my 57 pickup seats. I had put new foam in it that was "cut to size" by the cover manufacturer but in reality it was oversized and had to be cut some as it was really pulling the seams. The garbage bag or cleaners bag is also good to do to help it slip over. I did that on my 97 Camaro factory replacement seat covers.
It is not as easy as it would appear to be to put the cover on. My wife and I had several goes at it with the 57 chevy truck seats. And on my Datsun the Previous owner paid an upholsterer to install the covers that he bought from Dean for the seats and the back deck. If I recall it was several hundred to install them. Like 400 or so not counting the cost of the covers.
Pictures????
Stacey Wilbur
1970 2000 SRL311-14335 White
1970 2000 SRL311-14335 White
-
jheck
- Roadster Fanatic
- Posts: 159
- Joined: Tue Jun 02, 2015 12:52 pm
Re: Seat Upholstery installation
No to butt in on Greydog's work.
I finished up my drivers seat last night. I used POR15 cleaner/degreaser then their metal prep. Applied POR15 chassis black and then a coat of rattle can black.
Post cleaner/degreaser. The black paint just washed right off.
Post metal prep
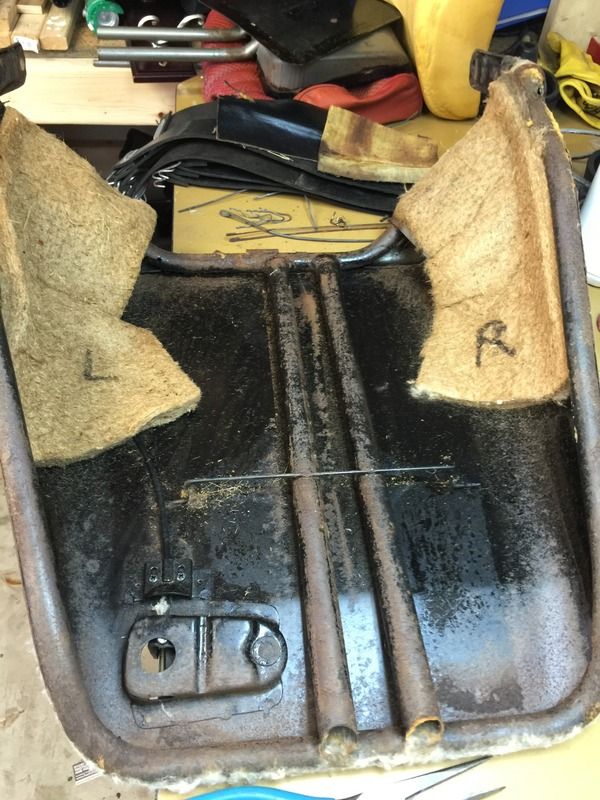
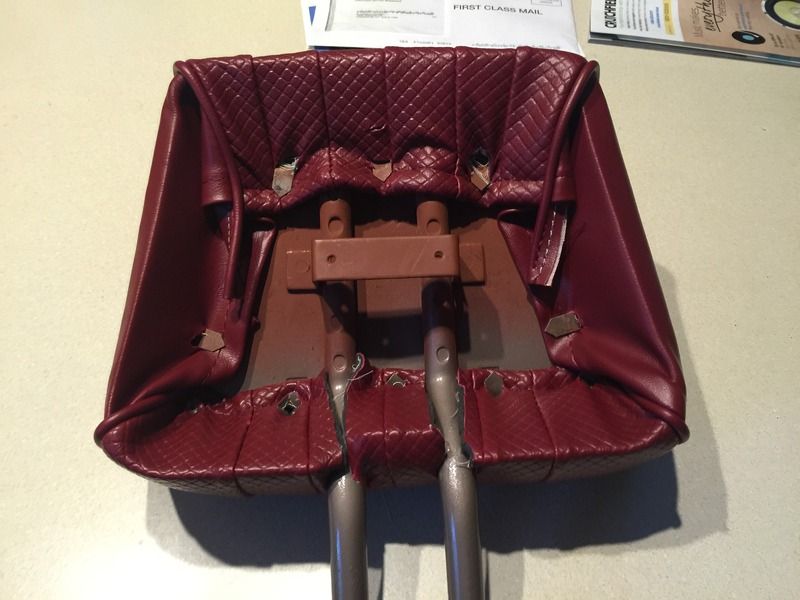
For new straps I used 2" webbing. I modified a soldering gun to melt holes into the webbing for the 14ga wire holding clips. I made the nylon straps about 1/4 shorter than needed. It doesn’t stretch much.
I modified a piece of 14ga wire to allow me to melt holes in the strapping for the wire retainers.
The new foam seat bottom I cut it with an electric knife out of 4" high density foam. Then used 3M 77 spray adhesive to glue heavy canvas to the foam seat bottom where it contacts the strapping.
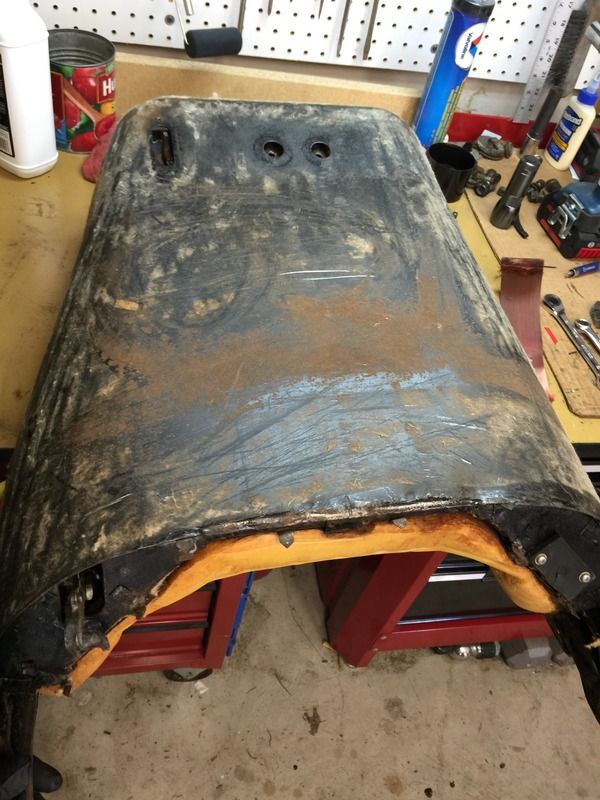
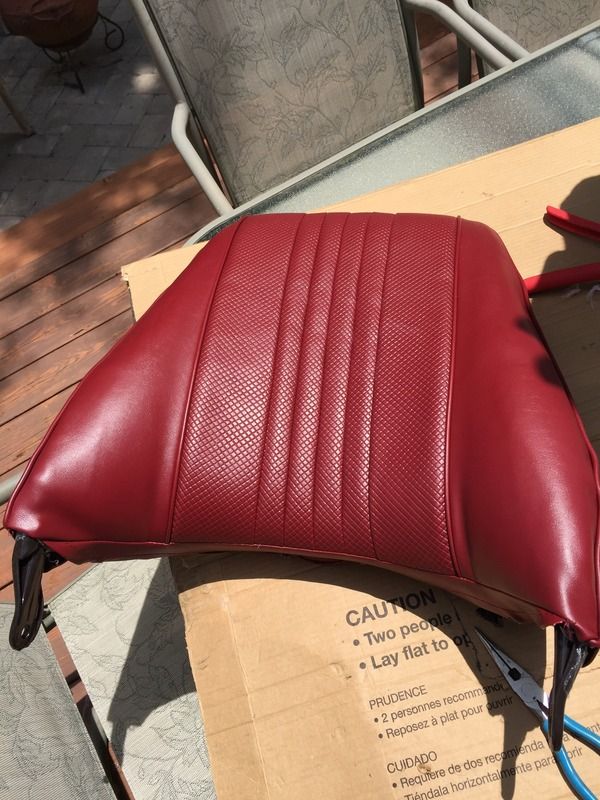
The steel back of the seat has cotton batting material spray glued to it to help keep a smooth look and be a little softer to the touch than just the steel back. Use a dry cleaning bag over the foam to ease slipping the cover on. I put my vinyl covers in the dryer for 5 minutes on low and they were very pliable. I also worked on covers in the sun so they’d stay somewhat warm.
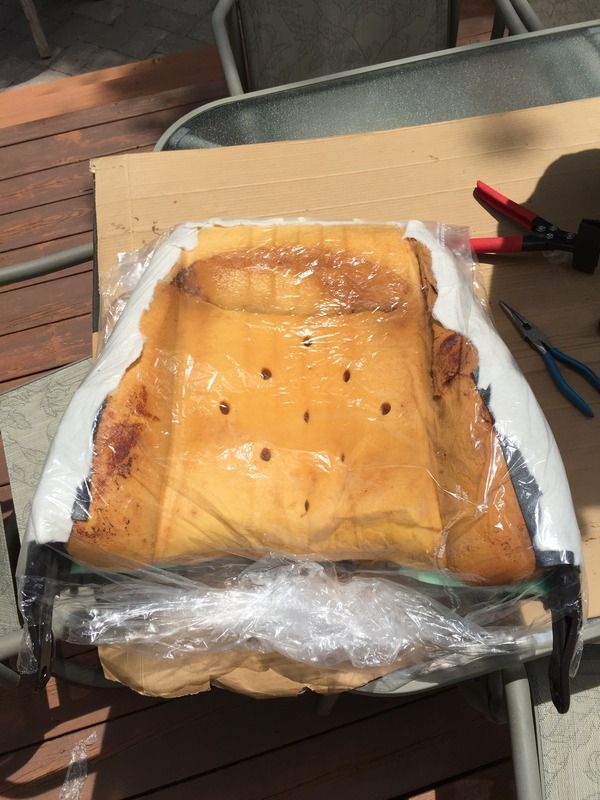
You can see it in this picture(top left corner), I have 14ga wire, instead of music wire, in the sewn over vinyl at the bottom of the cover. It helped keep and even pull on the material and wont let it pucker. I used a utility knife to cut the slots in the vinyl for the tabs.
Barge contact cement, apply to two surfaces and allow to dry for 45 minutes minimum. The below picture is the back of my headrest.
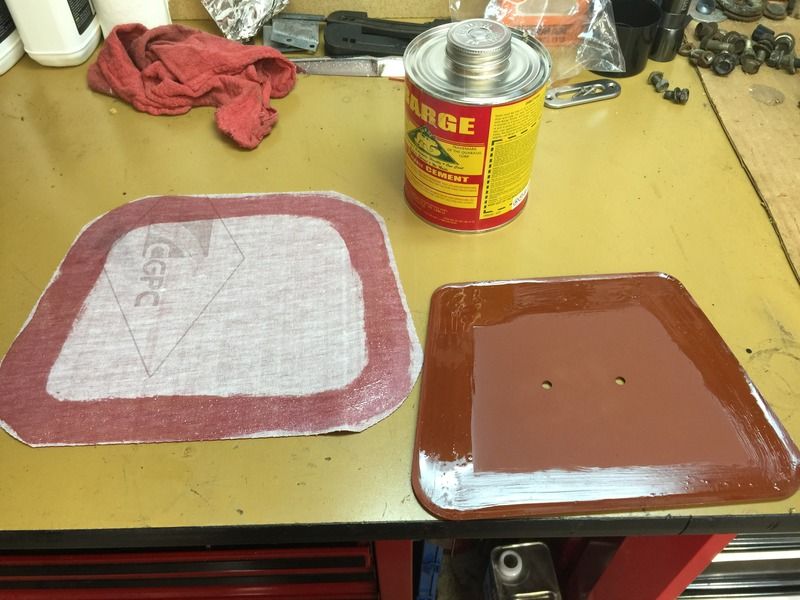
I used a rattle can of Krylon brown hammered finish on the headrest.

I finished up my drivers seat last night. I used POR15 cleaner/degreaser then their metal prep. Applied POR15 chassis black and then a coat of rattle can black.
Post cleaner/degreaser. The black paint just washed right off.
Post metal prep
For new straps I used 2" webbing. I modified a soldering gun to melt holes into the webbing for the 14ga wire holding clips. I made the nylon straps about 1/4 shorter than needed. It doesn’t stretch much.
I modified a piece of 14ga wire to allow me to melt holes in the strapping for the wire retainers.
The new foam seat bottom I cut it with an electric knife out of 4" high density foam. Then used 3M 77 spray adhesive to glue heavy canvas to the foam seat bottom where it contacts the strapping.
The steel back of the seat has cotton batting material spray glued to it to help keep a smooth look and be a little softer to the touch than just the steel back. Use a dry cleaning bag over the foam to ease slipping the cover on. I put my vinyl covers in the dryer for 5 minutes on low and they were very pliable. I also worked on covers in the sun so they’d stay somewhat warm.
You can see it in this picture(top left corner), I have 14ga wire, instead of music wire, in the sewn over vinyl at the bottom of the cover. It helped keep and even pull on the material and wont let it pucker. I used a utility knife to cut the slots in the vinyl for the tabs.
Barge contact cement, apply to two surfaces and allow to dry for 45 minutes minimum. The below picture is the back of my headrest.
I used a rattle can of Krylon brown hammered finish on the headrest.
Jason
1970 1600
Bluegrass country, KY
1970 1600
Bluegrass country, KY
-
greydog
- Roadster Fanatic-Site Supporter
- Posts: 1790
- Joined: Sat Nov 21, 2009 11:37 pm
- Location: Vancouver, Washington
- Model: 1500/1600
- Year: High Windshield-68-70
Re: Seat Upholstery installation
Great job Jason. Much better with pictures.
Dan
Dan
SPL311 aka Skooter. Sold. Now wasting away in the SF area.
1990 Nissan 300zx. Sold this one too.
2018 VW Tiguan
1990 Nissan 300zx. Sold this one too.
2018 VW Tiguan
-
jheck
- Roadster Fanatic
- Posts: 159
- Joined: Tue Jun 02, 2015 12:52 pm
-
Bigtaku

- Roadster Fanatic
- Posts: 407
- Joined: Mon Dec 26, 2016 4:10 pm
- Location: Dayton, Nevada
- Model: 1500/1600
- Year: High Windshield-68-70
Re: Seat Upholstery installation
Looks like you have more padding now then the original. Have you any updates to this project? Wonderful work. I am going to start my seats soon.
Michael Montez
-
ed B
- Roadster Fanatic
- Posts: 454
- Joined: Thu Mar 26, 2015 8:40 pm
- Location: Albany NY
Re: Seat Upholstery installation
Great job Jason and thanks for the pix. I would like to do mine someday, but it looks like it takes a lot of patience and strength to stretch the fabric. Where did you get your seat covers? Do you know if the original straps were nylon or the rubberized ones with more stretch and give to them? I bought some of the stretch ones a while back with the plan to replace them someday. What did you use for the metal strap fasteners, are they the original plates, with new wire of some sort?
1969 1600
-
jheck
- Roadster Fanatic
- Posts: 159
- Joined: Tue Jun 02, 2015 12:52 pm
Re: Seat Upholstery installation
Bigtaku and Ed,
Thanks for the compliments.
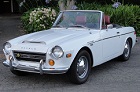
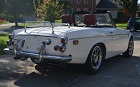
I do have a little more padding than the original. I've finished up my interior, here's a photo with the hardtop on.
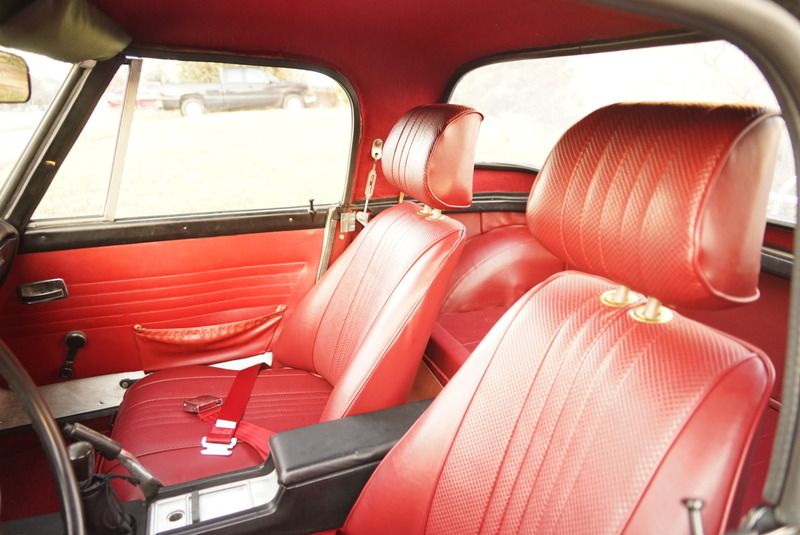
I don't have any newer photos of the interior than that one and it's not very good. I'll get one loaded in the next day or two. The seats are holding up very well. Now that I've sat in them a bunch of times they're much more comfortable.
Ed,
I used seatbelt 2" webbing, it stretches a little. The originals were rubber straps. The seat are very comfortable but more supportive than they used to be. Seat covers came from Dean(datsunsports.com). Regarding the strapping procedure, I reused the small two hole plates after putting them through my parts tumbler to clean them up. Then used 14 gauge wire to fasten the two together.
I used to rock climb when I was younger, so my hands are pretty strong. But I think you can do it. Just do it on a real warm sunny day. The heat from the sun really helps the vinyl stay pliable.
Thanks for the compliments.
I do have a little more padding than the original. I've finished up my interior, here's a photo with the hardtop on.
I don't have any newer photos of the interior than that one and it's not very good. I'll get one loaded in the next day or two. The seats are holding up very well. Now that I've sat in them a bunch of times they're much more comfortable.
Ed,
I used seatbelt 2" webbing, it stretches a little. The originals were rubber straps. The seat are very comfortable but more supportive than they used to be. Seat covers came from Dean(datsunsports.com). Regarding the strapping procedure, I reused the small two hole plates after putting them through my parts tumbler to clean them up. Then used 14 gauge wire to fasten the two together.
I used to rock climb when I was younger, so my hands are pretty strong. But I think you can do it. Just do it on a real warm sunny day. The heat from the sun really helps the vinyl stay pliable.
Jason
1970 1600
Bluegrass country, KY
1970 1600
Bluegrass country, KY
-
Linda
- Fraternal Den Mother-RIP
- Posts: 7807
- Joined: Sat Nov 05, 2005 11:37 pm
- Location: Los Angeles
- Model: 1500/1600
- Year: High Windshield-68-70
Re: Seat Upholstery installation
Very nice work. I was wondering if the slits you cut in the vinyl seats would start to tear after a while. Any thoughts on ways to reinforce, either with a round cut, grommets or some other tape to strengthen?
Linda
Linda
Sadly-Linda has passed away 2022. She was the 311's den mother and drove the first Rare-Parts ball joint project. RIP.
-
jheck
- Roadster Fanatic
- Posts: 159
- Joined: Tue Jun 02, 2015 12:52 pm
Re: Seat Upholstery installation
Linda,
To make sure I'm following, you're talking about the small slits that the metal tab point goes through to crimp down on the support wire?
If yes, they've not changed. The cut in the vinyl is just like they were for the factory covers. I don't think including grommets would work since the metal tab is not very long. The metal tab has to fold over the wire or it won't hold and will bend back.
Jason
1970 1600
Bluegrass country, KY
1970 1600
Bluegrass country, KY
-
ed B
- Roadster Fanatic
- Posts: 454
- Joined: Thu Mar 26, 2015 8:40 pm
- Location: Albany NY
-
greydog
- Roadster Fanatic-Site Supporter
- Posts: 1790
- Joined: Sat Nov 21, 2009 11:37 pm
- Location: Vancouver, Washington
- Model: 1500/1600
- Year: High Windshield-68-70
Re: Seat Upholstery installation
I'm picture challenged but will chime in.
So far, the seats/upholstery looks like it did when I installed it. The hold down slits have not torn nor has the upholstery shifted or sagged.
I'd agree with Jason, I think there might be some tearing without the wires. I had to pull pretty hard on the upholstery and, in a few spots, my heat gun helped soften the vinyl enough to pull down to reach the wires.
So far, I'm pleased with the way it turned out.
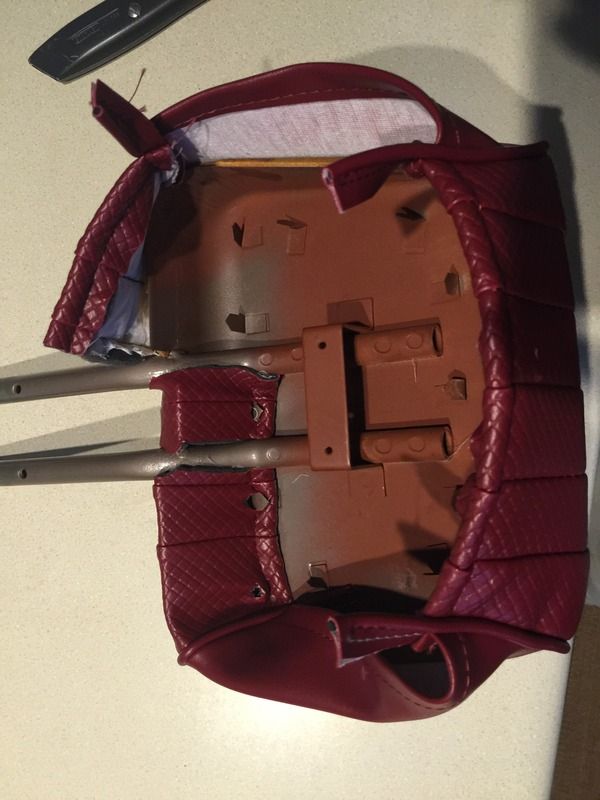
By the way, on the seat upright, there is a sort of wire U welded to the seat back standing out about 1". You can see it in a couple of Jason's prep pictures. There's a slit in the foam that fits over that. My covers had a fabric loop or channel sewn into the cover that was probably designed to be hog ringed to the seat upright thus making a sort of tuck at that point.
I chose not to use that loop and looking at Jason's excellent pictures, it appears he made the same decision. Just know that your cover may have that loop and decide if you want to use it.
Set the covers in the sun to warm, take your time and think it through, you'll be happy with the results.
Dan
So far, the seats/upholstery looks like it did when I installed it. The hold down slits have not torn nor has the upholstery shifted or sagged.
I'd agree with Jason, I think there might be some tearing without the wires. I had to pull pretty hard on the upholstery and, in a few spots, my heat gun helped soften the vinyl enough to pull down to reach the wires.
So far, I'm pleased with the way it turned out.
By the way, on the seat upright, there is a sort of wire U welded to the seat back standing out about 1". You can see it in a couple of Jason's prep pictures. There's a slit in the foam that fits over that. My covers had a fabric loop or channel sewn into the cover that was probably designed to be hog ringed to the seat upright thus making a sort of tuck at that point.
I chose not to use that loop and looking at Jason's excellent pictures, it appears he made the same decision. Just know that your cover may have that loop and decide if you want to use it.
Set the covers in the sun to warm, take your time and think it through, you'll be happy with the results.
Dan
SPL311 aka Skooter. Sold. Now wasting away in the SF area.
1990 Nissan 300zx. Sold this one too.
2018 VW Tiguan
1990 Nissan 300zx. Sold this one too.
2018 VW Tiguan
-
GoldHawg
- Roadsteraholic
- Posts: 591
- Joined: Sun Jul 30, 2006 3:27 pm
- Location: Spring Valley, OH
Re: Seat Upholstery installation
Thanks for posting the pictures earlier. I'm doing my seats now, and I'm wondering about reusing the clips that attach to the seat frame; my setup was pretty rusty and I don't know whether new are available. What is a good source for the 14 ga wire referenced here? Thoughts on just reusing the old clips?
You do not have the required permissions to view the files attached to this post.
-
greydog
- Roadster Fanatic-Site Supporter
- Posts: 1790
- Joined: Sat Nov 21, 2009 11:37 pm
- Location: Vancouver, Washington
- Model: 1500/1600
- Year: High Windshield-68-70
Re: Seat Upholstery installation
I reused the old clips. Soak em in rust remover rinse, dry, etching primer and a couple coats os satin black make em look good.
Most Ace stores have music wire in 3 foot lengths.
Dan
Most Ace stores have music wire in 3 foot lengths.
Dan
SPL311 aka Skooter. Sold. Now wasting away in the SF area.
1990 Nissan 300zx. Sold this one too.
2018 VW Tiguan
1990 Nissan 300zx. Sold this one too.
2018 VW Tiguan
-
fj20spl311
- Roadsteraholic
- Posts: 5008
- Joined: Mon Nov 28, 2005 3:54 pm
- Location: San Diego, Ca
Re: Seat Upholstery installation
Music wire I have used in the past for control rod. I think it might too brittle for the tight bend.
Phil
67.5 SRL311-00148 Blue (FJ cruiser VOODOO Blue)
67.5 SPL311 FJ20E teal SDS EFI
69 SRL311 SOLD
19 Raptor SCAB
67.5 SRL311-00148 Blue (FJ cruiser VOODOO Blue)
67.5 SPL311 FJ20E teal SDS EFI
69 SRL311 SOLD
19 Raptor SCAB